3 Working with the Network Editor
The Network Editor is the main visual programming interface to AVS/Express. In this and the following chapters we will be introducing you to the concepts, tools, and steps necessary to build a visualization network.
This chapter introduces the basic concepts and tools for interfacing with AVS/Express. It discusses:
- Choosing Your Initial Application
- Network Editor Overview
- Building Networks in a DataViewer Application
- Visual Programming
- Handling Objects in the Workspace
- Manipulating Objects
- AVS/Express' Object-Oriented Paradigm
- Reusing Your Work
- Changing Your Project Configuration
- Journaling
- Using On-line Help and On-line Documentation
- Displaying Errors
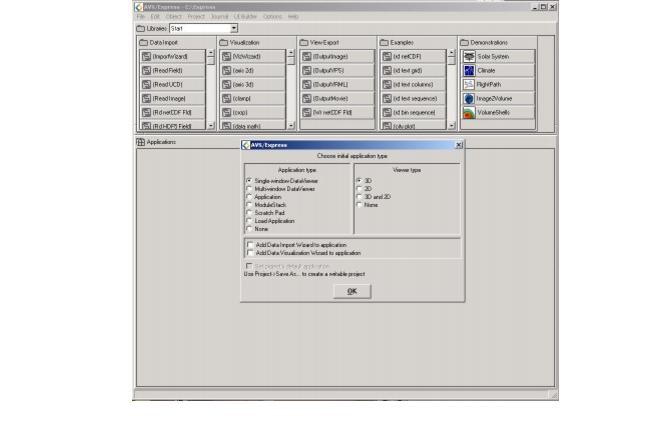
When you start AVS/Express, it displays the Network Editor and a dialog box in which you choose the initial configuration you want to use:
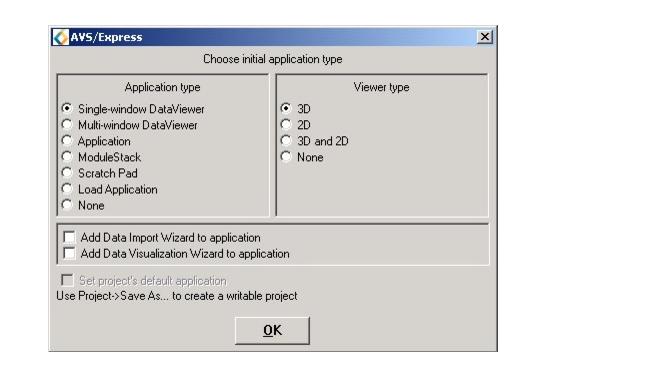
You use the dialog box to choose the type of application and viewer you want to use:
If you select one of the DataViewer applications, Application, Module Stack, or Scratch Pad, AVS/Express loads a predefined application framework. These applications are discussed in more detail in the following sections.
If you select Load application, AVS/Express displays a file browser dialog that you can use to select a previously saved application.
If you select None, AVS/Express starts-up with the root Applications object in the workspace. The Applications object is the ancestor of all applications in AVS/Express. You can instance a template application from a library into Applications. For example, you might want to instance one of the example applications from the Examples library.
If you select Add Data Import Wizard to application, AVS/Express loads a predefined application framework. This includes an instance of ImportWizard in your network editor which can be used through the modules menu in your application window to help you choose the correct reader for your data set.
If you select Add Data Visualization Wizard to application, AVS/Express loads a predefined application framework. This includes an instance of VizWizard in your network editor which can be used through the modules menu in your application window to help you create your application quickly and easily.
- You can specify the default application and viewer that is launched when you start AVS/Express.
- The library structure is organized to make it easier to find the basic visualization objects.
There is a .v file in the express/v directory, vxp_inst.v. This file is run when you start the Visualization Edition of Express.
You can put v code in this file to initialize your AVS/Express environment without having to select the application and viewer from the start-up dialogs.
For example, to open AVS/Express with the Multiwindow App application and the Uviewer viewer, use the following code:
APPS.MultiWindowApp MultiWindowApp<NEdisplayMode="maximized"> {
GDM.Uviewer Uviewer<NEx=600,NEy=450>;
};
The library structure for the Visualization Edition is different in the following ways:
- The Field Mappers sublibrary has been moved from the Main library to Accessories.
- Two new sublibraries have been added to the Examples library: Viz Macros and Graph Macros.
Select the Single-window DataViewer or the Multi-window DataViewer application to load a ready-made visualization environment framework. With either DataViewer configuration you can use the Viewer type radio buttons to create viewer windows that support 3D or 2D data, or both. AVS/Express instances a Uviewer object in the Network Editor workspace that supports the type of viewer you choose, and opens a viewer window and visualization environment.
The Single-window DataViewer opens one window that combines a viewer window in which you can display your data or image, and a set of editors that you can use to customize and interact with the viewer configuration:
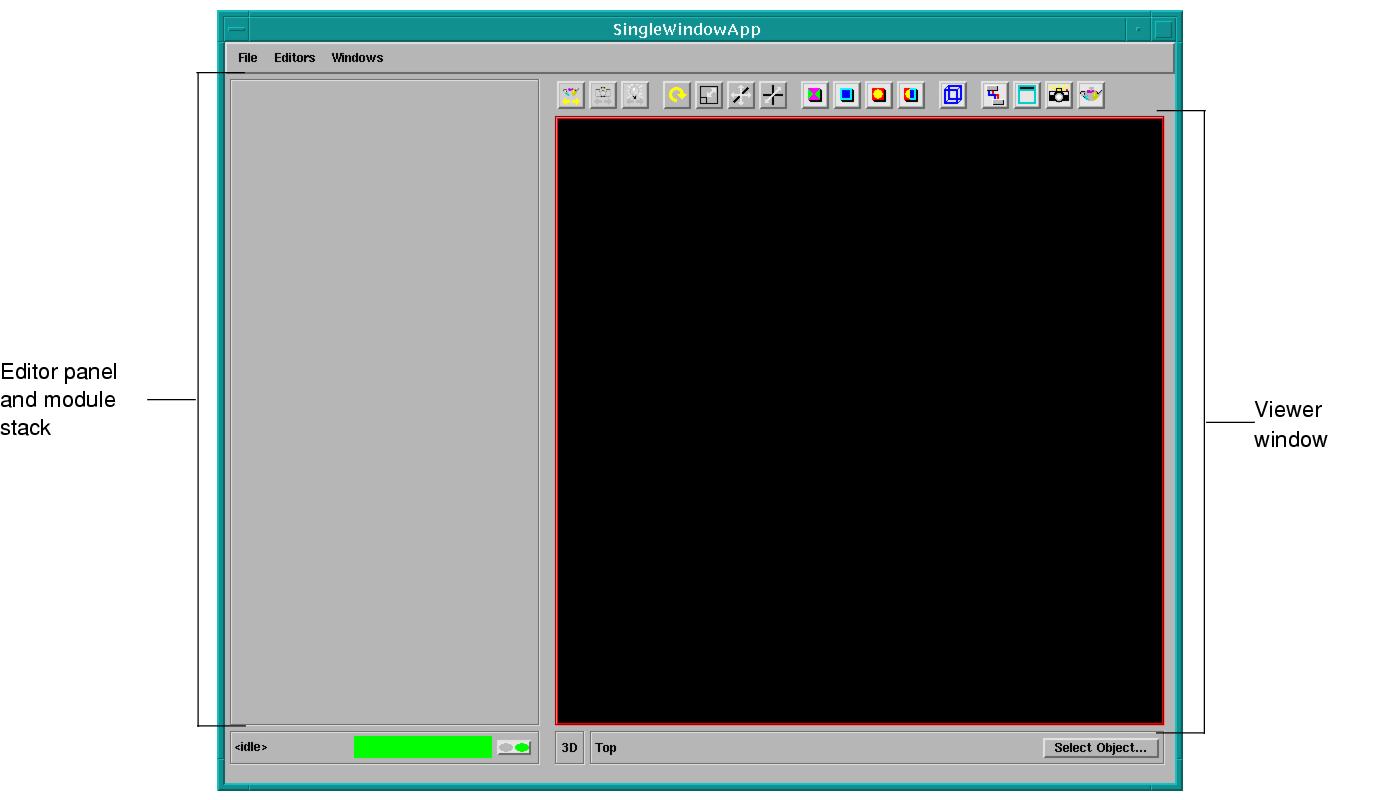
The editor panels display controls for a set of editors you can use to manipulate the view. In addition, when you add modules to your application in the network editor, the controls for the modules are automatically added to a module stack displayed in this same panel.
The multi-window DataViewer application creates two windows, a viewer window and a separate window for the editor controls:
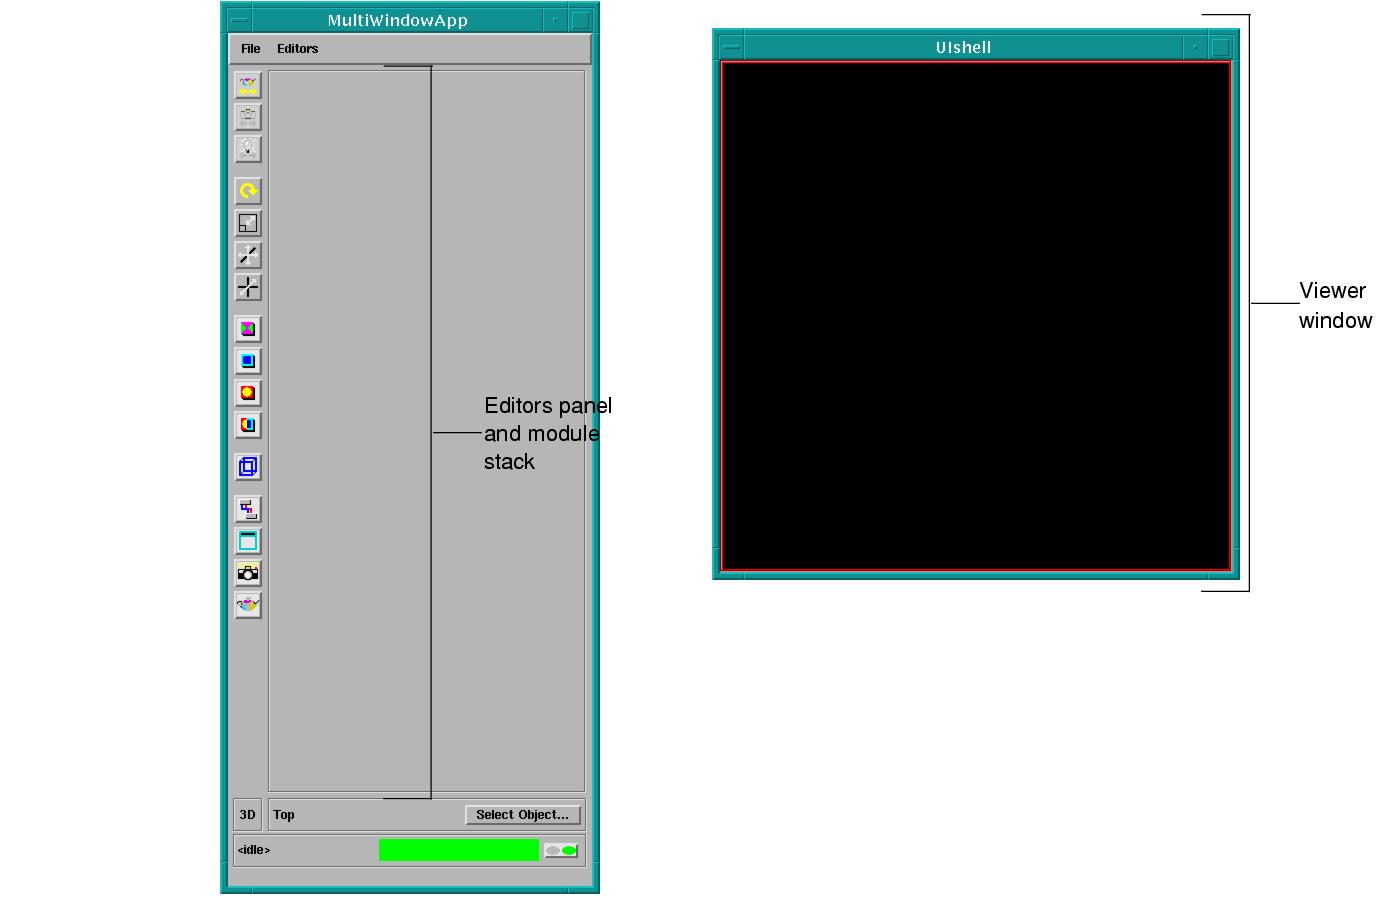
Chapter 2, Using the DataViewer Applications, provides comprehensive information about how to use the DataViewers.
The default application does not have any subobjects instanced automatically. You must instance any objects you want to use in your application, including viewer objects; UI windows and controls; and data import and processing objects.
In releases of AVS/Express prior to Release 3.0, the default application was the Module Stack. You can load this application by choosing New Application->ModuleStack from the File menu. This application is similar to the Default Application, but it includes a User Interface panel, the Module Stack. AVS/Express automatically displays the controls for objects you instance into this application in the module stack.
The Scratch Pad is a special application that you can use when creating or editing objects. When you drag an object into the ScratchPad workspace its template is moved rather than copied, and it does not become active. This means that AVS/Express does not attempt to execute the object while you are editing it. This is particularly helpful you are working on objects that interface to code.
When you are finished, you can move the edited object back to the library you moved it from or to another library.
To make your application choice the default application and avoid the start-up dialog, you can set the Set project's default application button on.
To enable this choice as the default, you must save the current session in a project file before exiting, When you start AVS/Express again using this project, the Network Editor loads your choice of application as the default and does not display the start-up dialog.
The AVS/Express install area defines the install area project. This project includes:
- The libraries of template objects that define AVS/Express' various kits.
- The object files that define methods for those objects.
- Examples of AVS/Express applications.
- The express executable. express includes AVS/Express itself and the functions called by AVS/Express' kits.
- A single external process, called user. Initially, the only objects that use this process are those in Templates.USER (which appears in the Network Editor also under Libraries.User_Libraries.User_Modules). All of the other objects use the express process.
- A bootstrap executable, called base.
The install area is read-only - you cannot make changes to it. You must create a new project or projects in which to store your work. Projects created from the install area project (or any other read-only project) are derived from it - new projects define themselves as being like the install project, but with any additions and changes to you make to libraries, objects, and so on explicitly described.
The install project is made up of the contents of several subdirectories of the install directory. Here is a summary of the most significant of these directories:
The v directory includes the following V files (among others):
Table C-2
The section provides a overview of the Network Editor, its use, and its relation to the object oriented structure of AVS/Express.
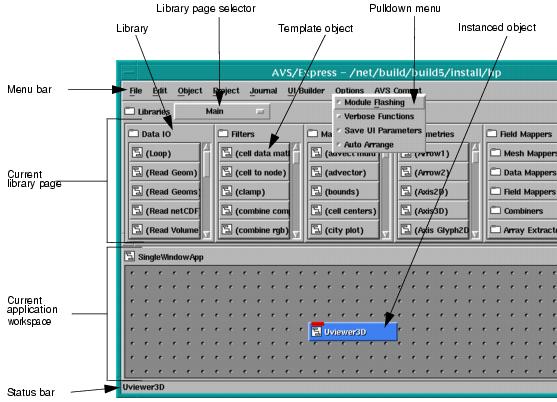
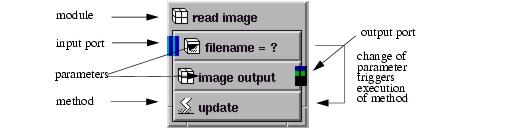
The following figure identifies the major components of the Network Editor:
The Network Editor is divided into two main sections. The top section displays libraries of template objects. The template objects are predefined components that you can use to build your own application. They include high-level macros and modules such as viewers, data filters, and User Interface components that you can use to add ready-made functionality to your application; and low-level templates for primitive data objects, methods, modules, macros, and groups that you can combine to create your own template objects. You can also import objects created by other users.
For more information about using objects, see Chapter 5, Objects in AVS/Express.
The libraries organize the objects into functional groups. You can use the Libraries option menu to change from one library page to another. On each page, sublibraries further subdivide the objects into more specialized groupings. You can move through the hierarchy to look for the kind of object you need. For example, the Main library contains the objects you will most often need. Sublibraries within Main group the modules according to their function: data IO, filters, mappers, geometries, field mappers, or viewers. You can also select Find in All Libraries or Find in Selected Libraries from the Object menu to search the library hierarchy for a specific object.
For more information about the Library hierarchy, see Understanding Libraries on page 5-11.
The bottom section of the Network Editor displays the current application workspace. You build your application in the workspace by using your mouse to drag template objects from the libraries into the workspace. When you drop the object into an application workspace, AVS/Express creates a copy of the template, called an instance. An instanced object is active, that is, AVS/Express executes the methods in the object. You can reference data between instanced objects by using your mouse in the workspace to draw connections between objects.
For more information about instancing objects see Building Networks in a DataViewer Application on page 3-13
You can also open a special application called the ScratchPad into the workspace. When you drag objects out of an editable library into the ScratchPad, AVS/Express does not instance a copy of the object. Instead it moves the object itself out of the library into the workspace without instancing it. Because the object is not active, you can edit it without AVS/Express attempting to execute methods as you add them. When you are finished you can move the object back into any of the editable libraries and use it as template just like the predefined objects supplied by Advanced Visual Systems.
You can use commands on the Network Editor menu bar to perform a variety of AVS/Express functions:
- Use the File menu to load, save, and delete applications; and to exit from AVS/Express
- Use the Edit menu to cut, copy, paste, duplicate, and delete objects in the Network Editor workspace.
- Use the Object menu to search for, load, and save objects; and to launch tools to create and edit objects, including the Properties editor, object editor, Add module tool, and Import file tool.
- Use the Project menu to edit and compile source code generated from AVS/Express objects, to customize the configuration of libraries in your project, and to save your project. You can also save a compiled project to create independent application runtimes.
- Use the Journal menu to record and playback a sequence of Network Editor menu and mouse actions.
- Use the UI builder menu to enter a edit mode that allows you to use your mouse to interactively position controls and widgets in a UI panel or shell.
- Use the Options menu to control whether modules in the Network Editor flash when executing, whether functions display in the VCP when executing, whether UI parameters in viewers and other interfaces are saved between sessions, and to automatically arrange the object icons in the Network Editor to show their connections.
- Use the AVS Compat menu to read AVS5 modules, networks, scripts, and libraries into AVS/Express.
This section presents an overview of a sample network to illustrate how you create a network in the network editor and the relationship between the Network Editor and the DataViewers. More detailed information on instancing and connecting objects is given in Chapter 5, Objects in AVS/Express.
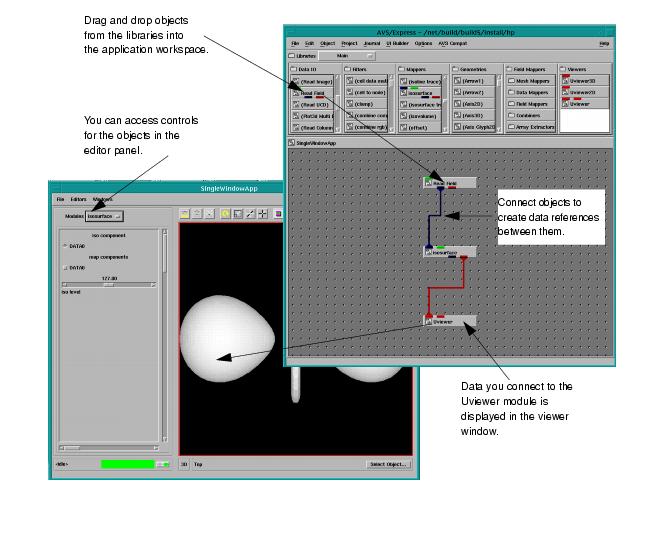
Groups of objects and their connections are called networks. You can build networks interactively by instancing template objects in the application workspace and connecting them using your mouse. By combining predefined objects you can quickly build a powerful application. The following illustration shows the implementation of a simple visualization network.
When you start-up the Single-window or Multi-window DataViewer application, a UViewer module is automatically instanced. Output from this module appears in the viewer window.
To create this network you instance Read Field from the Readers library and isosurface from the Mappers library on the Main library page into the application workspace. When you instance these modules, you can access their controls in the editors panel by selecting Modules from the Editors menu in the menu bar, and then the name of the module from the Modules option menu at the top of the editor panel. You connect Read Field to isosurface, and isosurface to Uviewer.
Read Field imports a file containing AVS/Express field data. In this case, we have read in a file containing data representing a hydrogen molecule. isosurface takes the field as input and creates a surface of constant value, analogous to 3D contour lines. The isosurface controls, available through the editors panel, allow you to specify the surface value. The viewer accepts the surface data from isosurface and renders the image in the viewer window.
You can also use the editors panel to access a set of viewer editors. These editors allow you to interactively transform and modify objects in the view and the view's camera and lights. Specifically, the following editors are available:
- View - You can use the View editor to control the display characteristics of the Dataviewer display window, and to add additional scenes to the DataViewer application. For information about the View editor, see Using the View Editor on page 2-32
- Transform - You can transform objects in the DataViewer view window interactively by using your mouse in the window, or you can specify a transform by setting explicit values. You can use the Transform editor both to define the transform you want to perform with your mouse and to set precise transformation values. For information about the Transform editor, see Using the Transform Editor on page 2-34
- Light - You can use the Light Editor to manipulate the lighting in the viewer window including setting general light attributes for the view, specifying multiple positional lights, and specifying ambient light. For information about the Light editor, see Using the Light Editor on page 2-36
- Camera - You view the images in the viewer window through a camera. You can use the Camera editor to control such things as the point of view, perspective rendering, clipping planes, and depth cueing. For more information about the Camera editor, see Using the Camera Editor on page 2-38.
- Object - You can use the Object Editor to control the basic properties of one or more of the objects in the view. The properties you can edit depend on the type of object you have selected. For example, you can control such properties as field conversion properties; rendering modes; primary, secondary, and tertiary colors; and textures characteristics for interpolation, tiling, blending, and rendering. For more information about the Object editor, see Using the Object Editor on page 2-39.
- Datamap - You can use the Datamap editor to control how data values in the input data are converted into the color values that are rendered in the view. For more information about the Datamap editor, see Using the Datamap Editor on page 2-40.
- Graph - You can use the Graph editor to edit the layout and appearance of AG graph objects connected to the 2D port of a UViewer or UViewer2D object. For more information about the Graph editor, see Using the Graph Editor on page 2-42.
- Print - You can use the Print Editor to specify various print options and print the current contents of the Viewer window. For more information about the Print editor, see Using the Print Editor on page 2-28.
In addition to building networks out of the existing objects, you can create and combine objects.
All objects in AVS/Express, whether pre-defined or created by you, are derived from one of six base types. You can find templates for various versions of these objects in the Standard Objects library. The type of the object is identified by the icon in its upper left corner.
Primitive data objects are the simplest base type. They are usually used as parameters in a module to hold data. You can create primitive objects for the following types of data:
For example, the following parameter is created from a float parameter object. For detailed information about primitive data objects, see Values and Connections on page 6-16.
You can use a group object as a parameter in a module to encapsulate other objects, typically primitive values and other groups. Modules are a special type of group (see Modules on page 3-18). For detailed information on using groups, including modules and macros, see Defining Groups, Modules, and Macros on page 5-5.
You use method objects in modules to encapsulate user code. You can use three different types of methods depending on the type of code you want to use: C, C++, or Fortran:
For detailed information about programming with method objects in AVS/Express, see Methods on page 6-41.
A module as an object that contains or encapsulates parameters and methods:
Within the module you can define the interactions between methods and parameters so that, for example, a method executes whenever a particular parameter changes value, or a method will not execute unless a parameter has a value.
For detailed information on programming with modules in AVS/Express, see Modules on page 5-5.
When you have built a network in the Network Editor by connecting several modules together, you can encapsulate this group inside another type of object called a macro:
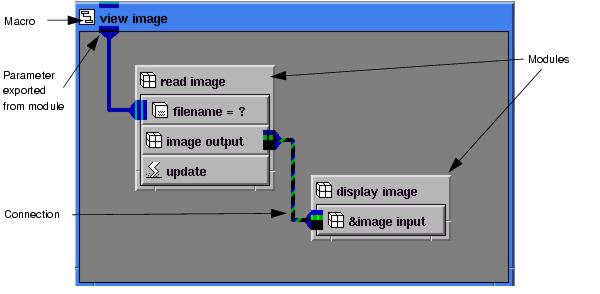
As in this example, you can export module parameters from inside a macro so that they become the interface to the macro. Parameters that are not exported are considered part of the implementation of the macro. A macro can contain other macros as well as modules so applications can be constructed out of progressively higher-level building blocks.
Since each object manages its own execution, the programming process is simplified. You instance and delete objects, and change parameter values either by making/breaking connections or by changing parameter values directly. You traverse the structure of the application visually and edit it using direct manipulation techniques. By making good use of macros, you can subdivide an application into manageable units of complexity.
The library objects are used by AVS/Express to store the object templates displayed at the top of the Network Editor. You can also create libraries of your own.
By definition, a library contains a list of AVS/Express templates. Templates are inactive objects that you can copy to create other objects. Libraries can contain macros, modules, parameters and other libraries. Their primary goal is to arrange the collection of available AVS/Express objects into sets that share common behaviors and purposes.
There are two base types that you can use to build a library in AVS/Express: library and flibrary. The library base type is global by default and used only for simple libraries. The flibrary base type is more general since it can be made global or not, and can optionally store the definition of the objects it contains in a separate V file.
For detailed information on libraries, see Understanding Libraries on page 5-11.
You use an application, like a macro, to hold networks of other objects, including other objects. But application is intended to be the root object of a project.
You can use applications to save networks that you build and then restore them. The Net work Editor has menu commands that you can use to save an application into a file. When you load the application file, AVS/Express opens the application into the Network Editor workspace, instances the objects that were instanced when you saved it, and reestablishes the connections between the objects. Other AVS/Express users can share your work by loading the application into their systems.
You can insert "comments" into a macro object using a special comment object:

You can enter a string into this object and include it in a macro to include information about your application. You, or other programmers can later open this object to reveal the text of the comment.
You can also specify the position of the comment in the macro by including a geometry string of the form +x+y or widthxheight+x+y after the initial equals sign. For example, "/*=+50+60 This is a comment. */" will be displayed as an icon at the position 50,60 in its macro parent.
AVS/Express provides support for you to add your own modules to the system. When you add modules to the system, you define the list of parameters and methods for a particular module, then specify which events should cause which methods to execute. A module's methods can execute when the module is instanced or destroyed, or when one or more parameters change. When a method is executed, it can determine which parameters have changed since the last invocation and can change one or more other parameters.
By adding a collection of modules, you can use AVS/Express to provide a visual programming interface to an existing library of code.
For information on using the Add Module tool to add a module to AVS/Express, see The Add Module Tool on page 8-2.
For detailed information about adding modules from a programming perspective, see Modules on page 5-5.
This section summarizes techniques you can use to manipulate objects in an application workspace.
You select one or more objects in advance of performing certain pulldown commands. The selection indicates the objects to which the command applies. For example, the Edit->Delete pulldown command deletes the objects that you have selected.
- select a single object
- select multiple objects at once using a lasso
- add or remove objects from the selection list
- deselect all objects
To select a single object select the object with the left mouse button.
If the object is open or maximized, you must select the object's title bar or frame. Do not select the object's ports.
AVS/Express selects the object and deselects all previously selected objects.
Lassoing means using the mouse to outline a rectangular region, or lasso. The Network Editor selects the objects that are completely or partially inside the region. Lassoing works only inside an open or maximized macro object.
To select multiple objects at once using a lasso:
- The pointer must be over an unoccupied portion of the window.
2. Drag the mouse pointer with the left mouse button to the diagonally opposite corner of the region.
- As you do, the Network Editor displays the rectangular region's outline.
The Network Editor selects the objects that are completely or partially inside the rectangular region. It removes the outline and deselects all previously selected objects.
When you select one or more objects, the Network Editor by default immediately deselects the previously selected objects. You can alter this behavior to incrementally add or remove objects from the selection list.
To add or remove objects from the selection list hold down the Shift key as you select an object.
- If the object is currently not selected, the Network Editor selects it, adding it to the selection list. The selection list now consists of that object and the previously selected objects.
- If the object is currently selected, the Network Editor deselects it, removing it from the selection list.
You can use the Shift key with a lasso operation, too.
Objects in the selection list must have the same parent object. If you attempt to add an object to the selection list, but the object's parent is different, the Network Editor selects the object and deselects the previously selected objects.
To deselect all objects select an unoccupied area in an open or maximized macro window.
Repositioning an object means moving the object within its parent's window.
The parent must be an open or maximized macro or application object.
To reposition selected objects:
- Note that Steps 1 and 2 are accomplished simultaneously if you are repositioning only one object.
- As you drag the objects, the Network Editor displays an outline of the selected objects and moves the outline. It also displays a cursor and status bar message indicating the operation, and it highlights in pink the window where the objects will be placed if you release the mouse button. Be sure not to move the pointer out of the current window; otherwise the objects will be reparented.
You can "pan" your view of a macro object. This has the effect of repositioning all objects in the macro. This is particularly useful when the parent object has so many subobjects that you cannot see them all at the same time in the window.
On Windows systems, use the right mouse button.
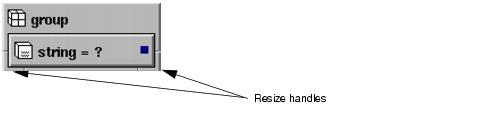
You can resize any open object in a macro window. You can also resize the Libraries workspace. A resizable object has resize handles on its lower corners:
You resize the window by dragging one of its resize handles.
To resize a window hold down the left mouse button and drag the lower left or right corner of the window.
The Network Editor displays an outline rectangle in the macro background that indicates the new size of the object.
When you resize the Libraries workspace, the Applications workspace grows or shrinks to fill the remaining space in the main Network Editor window.
You can zoom in or out on objects in an opened or maximized window. The window must be for a macro or application object.
- On Windows systems, use the right mouse button.
- To enlarge the window's objects, move the pointer up or to the right. To shrink the window's objects, move the pointer down or to the left.
To zoom so that all objects in a window can be seen:
You can reset the zooming and panning effect on a macro window. This causes all subobjects to appear in their original position and size.
You can apply an algorithm that arranges all of a macro's subobjects according to their connections.
To use automatic layout on a macro object:
You can set the value of a scalar primitive object such as an int or string.
To set the value of a scalar object:
- If necessary, open the object by pointing to it and selecting the Open popup command.
- When you open the object, a typein is created, and the keyboard focus is assigned to the typein. This means you can immediately start entering text.
- (Also, if the object has a value, the value text is selected. This means that any text you type will replace the current value text. To prevent this from happening, click inside the typein to unselect the text.)
- If the object is already open, you can assign the keyboard focus to it by clicking in the typein with the mouse.
- If you make a mistake, you can recall the current value by pressing the Esc key.
- You can apply the new object value by closing the object. If you prefer to leave the object open, apply the value by pressing the Enter key.
You can set the value of an array of primitive objects such as an ints or floats.
An array value is set using the same procedure as for setting a scalar value, but a multiline typein is used instead of a single-line typein. The multiline typein has scrollbars that allow you to access all lines of text.
You can enter newlines in the typein by pressing the Enter key. To apply the value of the typein, you either close the icon, or use a modifier key with the Enter key.
- On UNIX systems, press the Enter key while pressing the Ctrl key.
- On Windows systems, press the Enter key while pressing the Shift key.
You can access individual elements in an array of groups. When an array of groups is open, it displays the subobjects of one element at a time. You can traverse the elements using arrow buttons in the object's title bar:
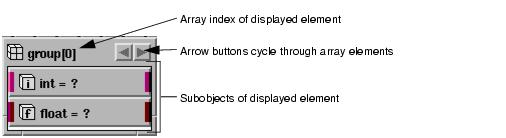
The object above is an array of groups, each element of which contains an int and a float. It is currently displaying the subobjects of element 0.
If you press the right arrow button (by clicking on it with the mouse), the current array element index is incremented. If you press the left arrow button, the index is decremented.
If the index is 0, then pressing the left arrow button causes the subobjects of the array template to be displayed. The array template is the object from which copies are made in order to create the actual array elements. When the array template is displayed, the index indicator in the object's title bar is an asterisk (array[*], for example).
For more information about arrays of groups, see Defining Arrays Of Groups, Modules, And Macros on page 6-36.
To view an object's name look at the object's icon or title bar, or display the Info dialog box for the object.
The icon or title bar displays the object's unqualified name. The Info dialog box shows the object's full pathname.
1. Select the Rename popup command for the object. Or select the object then the Object->Rename pulldown command.
- The Rename Object dialog box appears.
- Follow these rules:
- Valid characters - A name can contain uppercase letters, lowercase letters, numbers, and the special characters # (number sign) and _ (underscore). A name cannot contain only numbers.
- Case sensitivity - AVS/Express is case sensitive. For example, mygroup and Mygroup differ.
- Spaces - In the Network Editor, the underscore character in a name appears as a space. In the Rename dialog box, if you enter a name with spaces, AVS/Express internally converts each space to an underscore character.
- Uniqueness - A name must be unique among its siblings in the object hierarchy. In the Network Editor, if you attempt to create an object with the same name as a sibling, AVS/Express appends the suffix #n to the object's name.
To view an object's type display the Info dialog box for the object.
The dialog box shows the object's class and primitive type.
You cannot change an object's type, but you can merge additional types into it.
For information on merging objects, see Merging Objects on page 5-27.
For background information, see Managing Object Attributes and Properties on page 5-47.
To view an object's attributes display the Properties Editor for the object.
The current attributes appear in the Current Properties list box (along with other items).
To add additional attributes to an object or delete attributes, use the Properties Editor for the object.
In this section we will look at the most common means of cutting, deleting, pasting, and saving objects. More detail on this can be found in Chapter 6, Managing and Editing Objects.
You can perform cut and paste operations on objects. The Network Editor maintains a clipboard for temporary storage of objects. Clipboard operations are performed by selecting objects and executing commands on the Edit pulldown menu. The following operations are available:
The cut operation deletes the current contents of the clipboard, copies the selected objects to the clipboard, and deletes them from their current parent.
- The selected objects are moved to the clipboard.
The copy operation deletes the current contents of the clipboard and copies the selected objects to the clipboard, but leaves the original objects untouched.
- The selected objects are copied to the clipboard.
The paste operation copies the contents of the clipboard into the selected object. It leaves the clipboard contents unchanged, so you can paste them elsewhere.
The clipboard contents are copied into the selected object.
Duplicating means making a copy of selected objects. The duplicates are siblings of the originals.
- The duplicated objects have names similar to the originals, but with a #n suffix. For example, if you duplicate a UIcmd object, the name of the duplicate object is UIcmd#1.
Deleting an object removes its definition, including the definition of its subobjects.
Cutting is a special type of deletion, in which a copy of the deleted objects is placed on the clipboard, allowing you to subsequently paste them elsewhere.
To cut selected objects onto the clipboard:
You can save selected objects to an ASCII V file. Do the following:
- When you select an object, its subobjects are also selected, so they will also be saved.
- The Save Objects dialog box appears.
- You can navigate to a directory using the selection boxes.
You can load a V file's objects into a selected AVS/Express object. Do the following:
- This is the object into which the V file's objects will be loaded.
- The Load Objects dialog box appears.
- You can navigate to a directory using the selection boxes.
The Network Editor implements a prototype model object-oriented system. In this model the template objects are similar to the class objects of other set-based object-oriented systems, but there are important differences.
In a set-based model, like C++, you define an abstract type (the class), or modify an existing class to create a subclass, and then create individual instances of it.
In a prototype model, you can use any existing template object as a template for a subclass. In AVS/Express, when you instance an object into an application workspace, the copy operation performs both the subclass and construct operations. The subclass starts out as an identical copy of the template object but usually some additions or modifications are then made that differentiate it from the superclass.When you edit the object you are both changing the behavior of the active object and redefining the subclass it represents. If you return the object to an editable library, it can be used as a template for other objects.
When you instance an object into the application workspace, the container object into which you drop the object becomes its parent. You can reparent an object in the Network Editor simply by dragging it out of one object and into another.
Other objects at the same level in the same container object are called siblings of the instanced object. Subobjects of a container object are called its children. Together this system of parents, siblings, and children determine the object hierarchy.
For more information on the object hierarchy, see the AVS/Express Object Hierarchy on page 3-34
When you instance an object, it is derived from its template object and inherits the template object's subobjects and other characteristics such as its reference mode, array declaration, value expression, attributes, and properties. A template object may itself be derived from other objects. The derivation hierarchy of object is the hierarchy of all the template objects from which it inherits. This is similar to the class-hierarchy of other object-oriented systems.
Both subclasses and instances keep track of the template from which they were created so that future changes to the template will be propagated to the new object.
AVS/Express also supports multiple inheritance; an object may have more than one immediate ancestor in its derivation hierarchy. In the Network Editor this is represented by the merge operation which instances a template object into another object in the workspace, combining their subobjects and properties.
In most object-oriented systems, the interface to an object consists of a set of methods (also called "messages") that the object supports. You call these methods to access the functionality of the object.
In AVS/Express, an object's methods are not exposed to other objects. Instead the interface to an AVS/Express object is a list of named parameters. These parameters can be simple primitive values such as an array of three numbers specifying a color or an integer specifying the height of a widget. They can also be aggregate objects themselves such as an image that might contain width, height, and data.
The connections between objects in the Network Editor are connections between parameters. A connection provides a conduit for the sharing of information between two objects. The methods in an AVS/Express execute in response to events that occur on the parameters of the object. Objects can send messages back and forth across connections to other objects without your needing to manage this communication explicitly. Thus you do not have to know of the existence of the methods and do not need to manage the execution of the object. This is called execution encapsulation. In AVS/Express objects that have parameters and methods and have their execution encapsulated are called modules.
Parameters connect to other objects through ports. You can give a parameter an input port, output port, or both at the same time. Ports are colored based on the data type of the object. Multi-colored ports can be used to indicate polymorphic objects (objects that can be used for more than one purpose). In many cases, a connection represents a lasting relationship of equality between two parameters. For example, by connecting a width parameter to a height parameter, you are guaranteed that width will always equal height.
For more detail on this see Chapter 5, Objects in AVS/Express.
We have defined several different types of AVS/Express objects: macro, module, parameter, method, and library. Each of these objects is a subclass of a common object type called simply object. These objects are all stored in a single tree structure called the object hierarchy.
In the object hierarchy, each object may have a list of subobjects and a single parent object. The subobjects of a module are parameters and methods. The subobjects of a library are macros, modules, and other libraries. The subobjects of a macro are modules and other macros. Methods have no subobjects. If a parameter has subobjects, they are also considered parameters.
These objects are joined together to form a single object hierarchy with the Root object containing Templates and Applications subobjects.
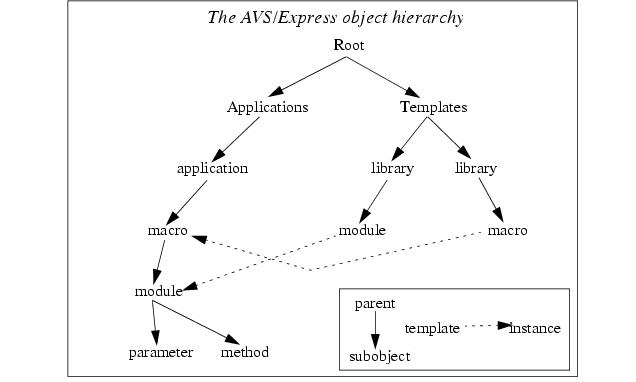
Taken as a whole, the object hierarchy defines your execution and development environment. The branch from Applications define the execution environment, The path from Templates defines the development environment, that is, the template objects you have available to you.
This entire environment is called your project. Whenever you work in AVS/Express you are working in a project.
You can save your work in applications or in projects.
By building up a hierarchy of objects, you can use AVS/Express to build a complete application. An application in AVS/Express is just a special kind of macro object that is not contained within other macros. The Network Editor's workspace represents an application object.The application object is usually created by AVS/Express when the process is started and is not destroyed until you exit the application.
You can save applications from the Network Editor using the Save Application commands on the File menu. AVS/Express displays a file dialog in which you can name the application file. When you save an application, you preserve all the objects and the structure of the AVS/Express project.
To restore the application you use the Load Application command from the File menu and specify the application file name in the file dialog that appears. AVS/Express loads the application in the Network Editor workspace and makes it the current application
One of the advantages of creating complete applications using AVS/Express is that you can pass the application to your users and optionally allow them to customize the application using the Network Editor.
When you first use AVS/Express, you access a default read-only project from the AVS/Express install area. This project includes all the libraries of template objects available with AVS/Express.
In order to save your objects you create and change the configuration of the default project, you create your own project by using the Project`Save As pull-down command from the Network Editor. You load the project when you start AVS/Express by using the -project command-line option. For example, to start the Visualization edition with a project call myproj you would use the following command:
- Note: Unlike saving an application, saving a project does not save objects and networks currently in the application workspace.In order to save objects you have created in the application workspace, you must move them into a library.
You can change the configuration of the project, excluding libraries and other templates sets by using the Project`Configure pull-down command. This command displays a dialog listing libraries and other items you can remove from AVS/Express. You can toggle the items you want to include or exclude from your project. When you save your project, these choices are used to configure the project. They next time you load the project, the Network Editor displays only the items you chose to include.
For detailed information on the structure and programming of projects, see Chapter 10, Projects and Processes.
You can also use the Save Compiled Project command from the Project menu to compile a selected set of objects into a separate project area. This mechanism allows you to build runtime versions of your AVS/Express applications that are smaller, start up faster, depend upon fewer files, and are therefore ideal for distribution.
For more information on saving and using compile projects, see Chapter 10, Projects and Processes.
To change the configuration of the libraries saved in your project, select Configure from the Project menu. AVS/Express displays a list of libraries and renderers that you can exclude from your project:
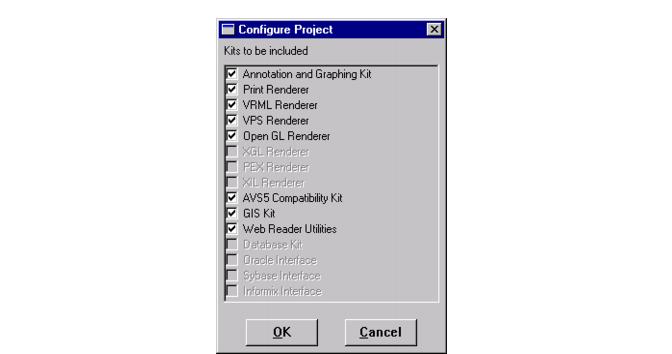
Check the items you want to include in your project. When you save the project the items you did not select will not be included. The next time you load the project the Network Editor and its associated editor interfaces and dialogs are initialized to remove the items you did not include.
Excluding objects you do not want to use makes the Network Editor interface easier to use and improves the speed with which AVS/Express starts up and initializes.
Journaling lets you record a set of operations you perform on objects in the Applications hierarchy, then replay them. AVS/Express records these operations as V statements and commands in a journal file that you specify.
- Note: The journaling facility only records operations that are made in program state and user state. For more information on state modes, see Methods on page 6-41.
This includes operations performed through the Network Editor, through the VCP, or through user interface widgets. It does not record operations performed by modules, unless these modules explicitly set the state mode.
To record a set of Network Editor operations.
1. From the Journal menu on the Network Editor menu bar, select the Record pull-down command. The Record File dialog box appears.
4. Perform a series of operations. For example, you can instance objects, connect them, set values, and interact with the resulting application. AVS/Express records each operation. You can perform actions outside of the application workspace, such as opening and scrolling libraries, but the journaling facility ignores them.
To stop recording, from the Journal menu select the Stop pull-down command.
The journaling facility stops recording and saves the resulting V file. The file contains a collection of V statements and V commands.
1. Make sure that you are no longer recording and that your network is in the same state that it was in when you began recording. For example, if you started recording with an empty Default Application object, you must have an empty Default Application object to play back your journal file.
AVS/Express loads the V file and executes the file's statements and commands. You cannot stop a playback in progress.
n Select the Help popup command for the object. Or select the object, then select the Help->On Selected Object pulldown command.
AVS/Express displays the reference page for the object in the on-line document set.
Some objects do not have associated help, in which case the Network Editor displays a dialog box containing an informational message.
To display the top-level table of contents for the on-line document set:
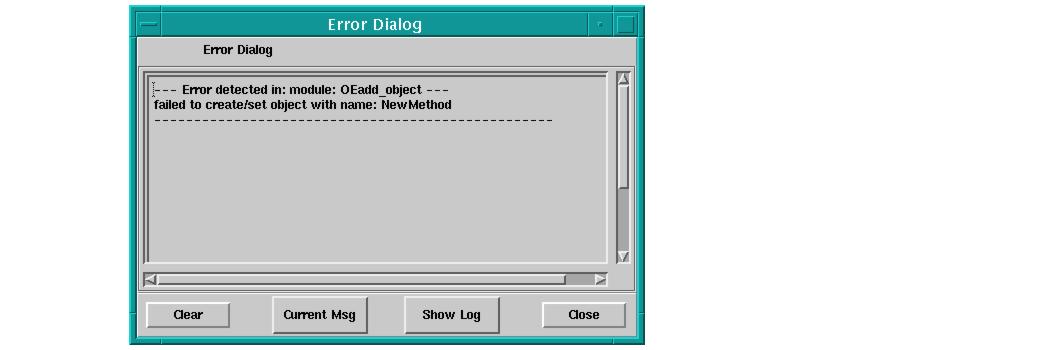
By default, AVS/Express displays error messages in an error dialogue:
You can leave this window up as a home for error messages, or close it. AVS/Express opens it when a new message arrives.
AVS/Express opens the Error Dialog window and displays the current message. You can use the buttons to control what messages are displayed:
- Select the Clear button to remove all messages from the window. However, these messages are not erased.
- Select the Show Log button to see a listing of all the error messages for this session.
- Select Current Msg to return to a display of only the most recent message.
You can also choose to display the error message in the VCP console. To disable the error dialog box mechanism and see the error messages displayed in the VCP console window, set the environment variable NE_NO_ERROR_DIALOG.