6 Managing and Editing Objects
In this chapter we describe basic concepts useful for defining and manipulating AVS/Express objects to build applications and application components.
We begin by describing a tool that guides you in setting the essential properties of objects in several common or specialized situations in AVS/Express: the Object Editor. It provides an easy interface for editing the essential properties of most basic AVS/Express objects. Specialized editing interfaces are provided for field and file objects.
This chapter discusses these concepts and tools in the following sections:
- The Object Editor
- Editing an Object's Declaration
- Setting the Reference Mode of a Group, Module, or Macro
- Values and Connections
- Declaring an Array Object
- Methods and Parameters
- Specifying Code Management Properties
- The Library Editor Pages
- The Field Object Editors
- Editing File Access Objects
The Object Editor provides a convenient interface for editing the properties of objects you create or derive.
You can use the object editor to edit the declaration (name, ... ) of instanced objects, or any of the properties of objects you have created in the ScratchPad or libraries you own. AVS/Express guides you in setting the essential properties for each type of object by displaying an interface configured for the type of object you have selected. Only the properties specific to the type of object you are acting on are displayed and active. The editor displays the current values of those objects.
Many of the properties you can manipulate with the Object Editor can also be set with the Properties Editor or in the VCP or V code. The advantage of using the Object Editor is that all the basic functions are gathered in one interface, and the interface automatically configures itself to display only the properties and attributes that are appropriate for the type of object you have selected. You do not need to learn which properties to look for in the Properties editor. The Object Editor prompts you for the essential information needed for the type of object you have selected.
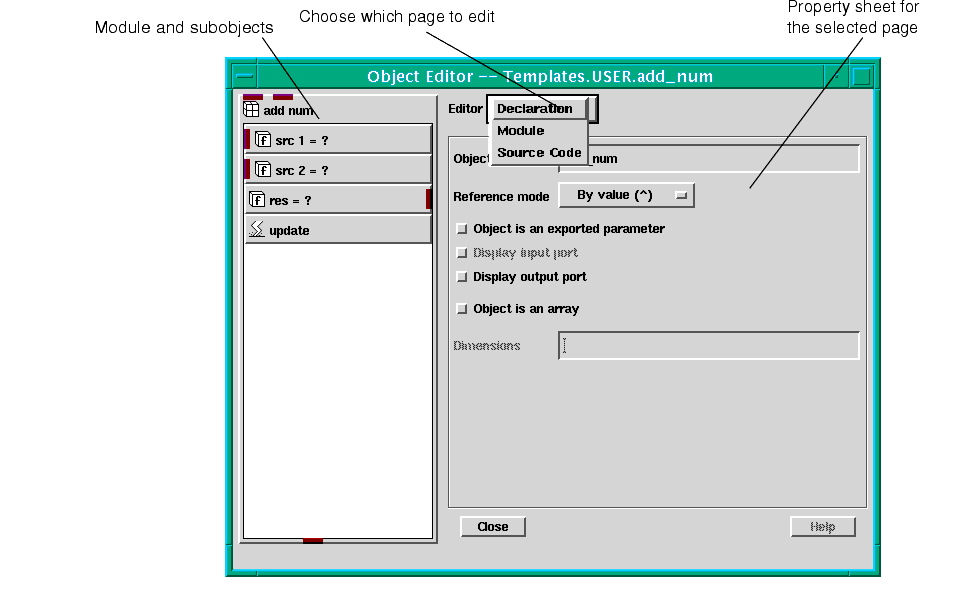
To launch the object editor, select an object in the Network Editor workspace, then select Object Editor from the Object menu or from the object's popup menu. AVS/Express displays the Object Editor with the Declaration page for the selected type or object exposed. For example, here is how the object editor appears for the sample module add_num:
On the left you can view the module and its subobjects. On the right are the controls for the current editor page.
The Editor option menu lists other editor pages that are appropriate for this type of object. You can use the Editor option menu to select the other editor pages and edit other characteristics of this type of object. For example, in the case of the module object shown above, you can select the Module to add additional methods or parameters, or select Source Code to set the code management properties for this module. Other types of objects may have different pages available. At least the Declaration page is available for all objects.
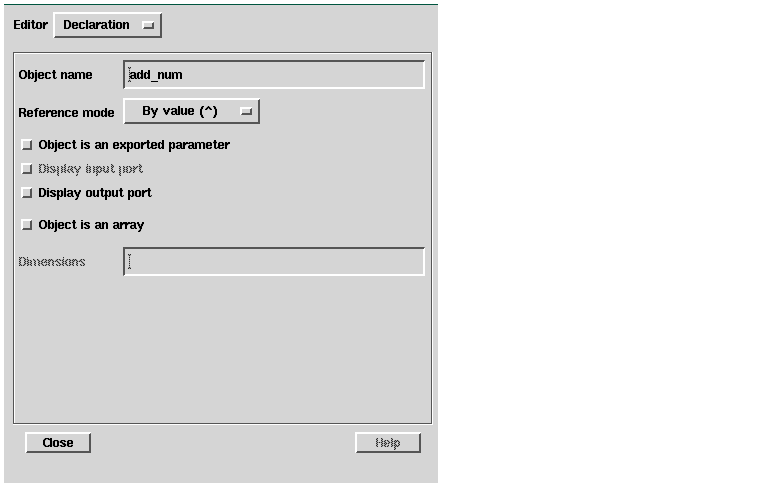
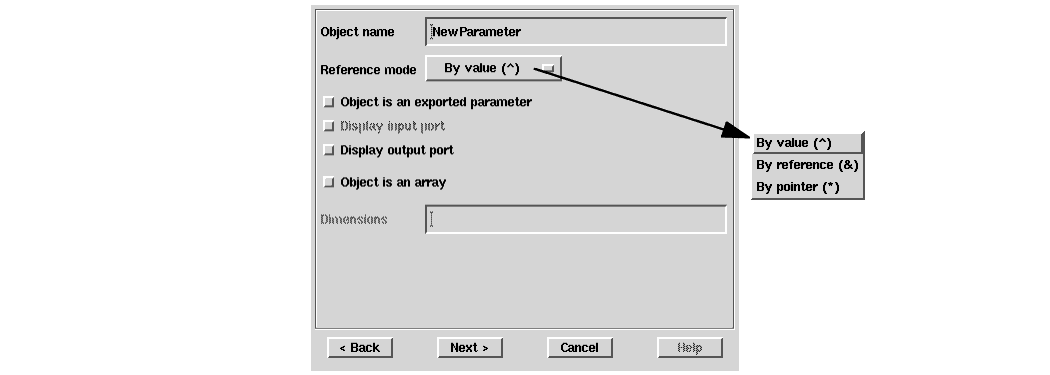
In addition to providing different sets of pages for different types of objects, the Object Editor also automatically configures each type of page to only prompt for the information that is appropriate to the type of object you have selected. For example, the Declaration page for group, module, and macro objects includes controls you can use to set the object's name and reference mode, export parameters and ports, and declare the object an array:
If you choose a reference mode of By reference or By pointer, the Object Editor adds a Connection text entry field.
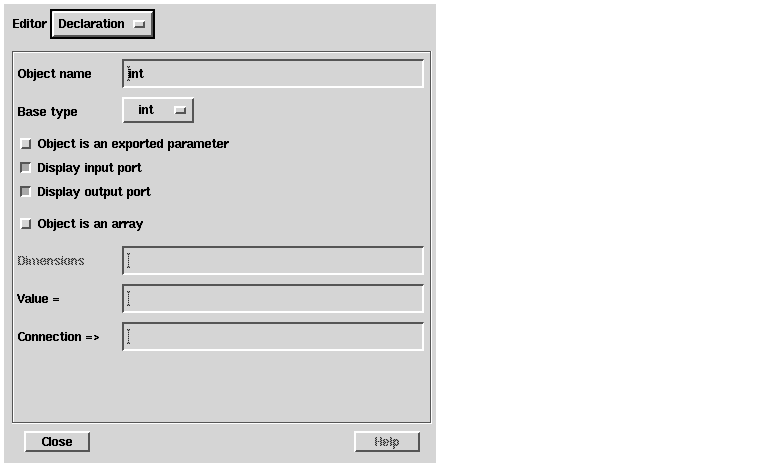
In contrast, the Declaration page for primitive objects includes similar controls for the object's name, ports, and array declaration, but it also adds an option menu that allows you to convert the base data-type of the object, and fields to specify a value or connection for the object:
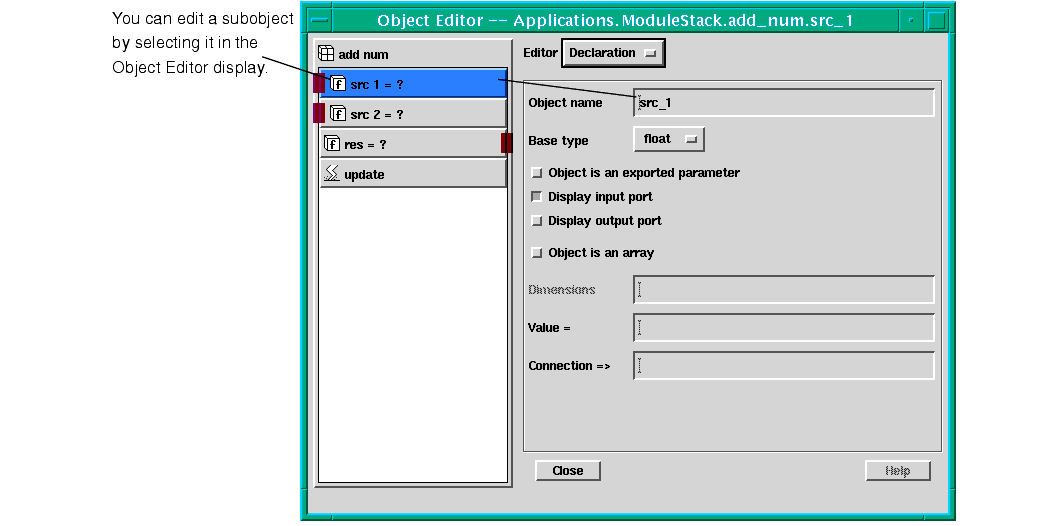
If you select a subobject in the Object Editor window, the subobject becomes the selected object in the editor, and the property sheet re-configures to display controls appropriate to it. For example, if you select the src1 parameter in the add_num module shown above, the editor changes to src1 as the selected object and displays the edit fields for a float primitive object:
- Note: If you have the Object Editor open and you select another object in the Network Editor, the focus of the Object Editor does not automatically change to reflect the newly selected object. To change to another object in the Object Editor, you must select the object in the Network Editor and then call the Object Editor again by selecting Object Editor from object's pop-up menu or the Object menu in the menu bar.
There are five basic object editor pages that may be available for an object: Declaration, Module, Method, Source Code, and Parameter .
- Use the Declaration page to edit the object's name and reference mode or base type, to specify that the object is an exported parameter, to display input or output ports, and to declare the object an array and set its dimensions.
For more information about the Declaration page, see Editing an Object's Declaration on page 6-8 and Declaration Page in the on-line help.
- Use the Module page to add a method or parameter to the currently selected object, or to add the currently selected object to another module or library.
For more information about the module page, see Methods and Parameters on page 6-41 and Editing a Module in the on-line help.
- Use the Method page to set the properties of a method: whether it runs when the object is instanced or deinstanced, its execution weight, and, for C and Fortran, the function name associated with the method object. C++ methods have the same name as their objects in AVS/Express.
For more information about the method page, see Methods on page 6-41 and Adding a Method and Editing a Method in the on-line help.
- Use the Source Code page to set properties that control how AVS/Express generates code for the module. You can set the object process, the directory and filename for the source code, and a set of advanced properties such as separate source and header files, build directory, link files, and header code. You can also edit source code and compile the process from this editor page.
For more information about the source code page, see Specifying Code Management Properties on page 6-47 and see Setting the Source Code Properties in the on-line help.
- Use the Parameter page to edit the interaction of the parameter with the methods in the module to which it belongs. You can set the notify, read, write, and required properties. This page is available for all objects that can be used as parameters.
For more information about the parameter page, see Parameters on page 6-44 and Editing a Parameter in the on-line help.
In addition, file objects, field objects, and libraries have specialized editor pages that you can use to edit their particular properties.
For more information about editing field objects, see The Field Object Editors on page 6-54. For more information about editing file objects, see Editing File Access Objects on page 6-69.
You use the declaration page to edit object characteristics. This page is available for all types of instanced objects except methods.
You can use the declaration page for the following operations:
- Naming an Object
- Specifying the Base Type of a Primitive Data Object
- Setting the Reference Mode of a Group, Module, or Macro
- Values and Connections
- Exporting Parameters And Ports
- Declaring an Array Object
These functions and their related information are described in the following sections.
When you bring up the Object Editor, the Object Name text field displays the current name of the selected object. You can edit the name in this field to rename the object. When naming an object, you should be aware of the following:
- Valid characters - A name can contain uppercase letters, lowercase letters, numbers, and the special characters # (number sign) and _ (underscore). A name cannot contain only numbers.
- Case sensitivity - AVS/Express is case sensitive. For example, mygroup and Mygroup differ.
- Spaces - If you enter a name with spaces, AVS/Express internally converts each space to an underscore character. In the Network Editor, the underscore character in a name appears as a space.
- Uniqueness - A name must be unique among its siblings in the object hierarchy. If you attempt to create an object with the same name as a sibling, AVS/Express creates a unique name by appending the suffix #1 to the object's name. If you attempt to use the name a second time, AVS/Express adds #2, and so on.
You can use the Base Type option menu to convert the data type of a primitive data object. The following table lists the primitive types:
The reference mode controls how the subobjects of a group, module, or macro object get their values. You can use the Reference mode option menu to set the reference mode of the selected object to By value, By reference, or By pointer.
In the default reference mode, By value, the subobjects maintain their own values and must be assigned locally or get their values from their own connections to another object. You must set the reference mode to By value if you want the primitive data subobjects to be active and methods to be executed.
For more information about setting a primitive objects value or connection, see Values and Connections on page 6-16.
If you set the reference mode of the object to By reference or By pointer, the subobjects get their values through the object's connection to another object. If the object has no connection, the values are "unset".
When you choose By reference or By pointer, the Object Editor displays a Connection field in which you type name of the object to which you want to connect. The reference or pointer object must match the object you connect it to in the following ways:
- The object you connect to must have all the same subobjects as the reference or pointer object. (The object you connect to can also have additional subobjects, but it cannot be missing any of the subobjects that are in the reference or pointer object.
- None of the subobjects in the reference or pointer object can have a value that conflicts with a value in the object to which you connect it. The subobjects in the reference or pointer object must have no value, or the same value as the corresponding subobjects in the object to which you connect it.
When you complete the connection the object display in the Object Editor window switches to show the connected object's subobjects. AVS/Express also draws the connecting line between the objects in the Network Editor workspace.
In By reference mode, the subobject values in the template are virtually connected to the corresponding subobjects in the connected object. Any change in the values in either object, causes a corresponding change in the other.
In By pointer mode, you do not have access to the subobject values in the connected object. In a By pointer object, the value of the connection is only the connected object, not its subobjects. If you define a method to be notified when a By pointer group changes, it is notified only when the connection changes, not when subobjects of the object at the end of the connection change.
The reference mode can be set by editing the ref_mode property via the Properties Editor in the Network Editor and by a symbol proceeding the object name in V.
By-value reference mode is the default. Use this mode for groups that represent a real instance of the object. Methods are only executed and primitive data subobjects are only active within groups that are by-value.
Use by-reference reference mode when you want to define an object that behaves just like the object to which it is connected. Operations performed on the reference are transparently performed on the object at the end of the connection. A by-reference group has an "unset value" when it is not connected to anything. Any attempt to access the subobjects of a by-reference group that is not connected modifies the template of the group reference (see below for details).
Use by-pointer reference mode when you want to define a group that behaves like a pointer to another group. In order to operate on the group at the end of the connection, you must explicitly ask for the value of the pointer. If you have a method that wants to be notified when a by-pointer group changes, it is notified when connection changes, not when the subobjects of the group at the end of the connection change.
In effect, the difference between by-pointer and by-reference mode groups is that in a by-reference mode group, the subobjects of the group are virtually connected to the subobjects of the group's value. In the by-pointer mode group, there is no access to the subobjects of the value; the value of the connection is only the group object, not the group and its subobjects.
Since a by-reference group includes the subobjects of its value in its definition, it cannot be connected to its ancestor (that would include itself in its own list of subobjects). A by-pointer group can point to an ancestor object.
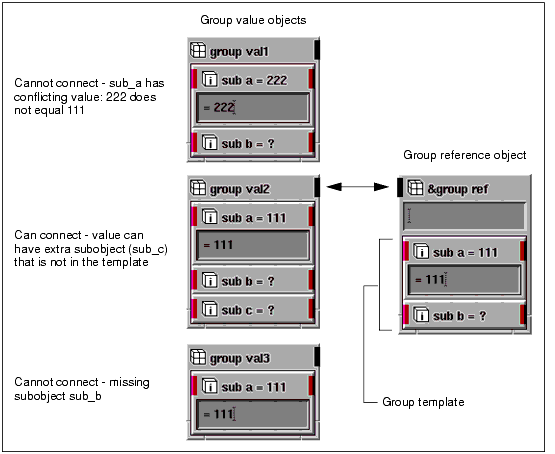
The subobjects of a by-pointer and a by-reference object are not active by themselves. Instead they define an object template that specifies the minimum information necessary to form a connection to this object. In other words, the group value that is connected to the group pointer or reference must match the template.
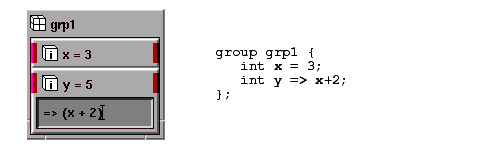
For the group value to match the template, it must have all the subobjects that the template has. Further, if any of the primitive data subobjects of the template have a value, the group value's subobject cannot have a conflicting value to match the template. For example, in the following figure, the three groups on the left are defined by-value and the one on the right is by-reference. The by-reference group can connect only to the group value in the middle:
There is one case not described in this example. If the group template has a primitive data subobject that has a value and the group value has the necessary subobject but does not have any value set, this is considered a possible match and a connection is allowed. If the group value later has this subobject set to a value that conflicts with this subobject, the connection reference object is considered invalid. A method that requires this parameter to be valid will not run in this case.
When you are adding a method to the system, you indicate that you want your method to be called when certain object values change. This is called setting a notification on an object. When you set a notification on a group reference object, you are notified only when changes are made to subobjects in the group reference's value that are also in the group reference's template. In the example above, if you set a notification on group_ref, and it is connected to group_val2, you would be notified when sub_a and sub_b changed, but would not be notified when sub_c changed.
Since the group template is used for two purposes, both notifications and connection matching, you need ways to adjust your template to accommodate both uses:
- You can allow a connection to be made to a group value that does not match one or more subobjects of the template by setting the opt attribute on the unmatched subobjects of the template.
- You can set the nonotify attribute on a subobject of your group template so that the subobject will be used for connection matching, but you will not receive notifications when this subobject changes in the group value.
If you select group from the Type option menu and click Add, AVS/Express adds a group object to the module and displays the following editor panel:
Note that the group object appears in both the Add Module window and in the module itself in the Network Editor. You can drag and drop objects into the group object in the Add Module window or in the Network Editor.
As described above for simple data type parameters, you can use this dialog to name the parameter (see Renaming the Parameter on page 6-44).
- export the parameter and its ports (see Exporting the Parameter and its Ports on page 6-44).
- declare the object as an array (see Declaring an Array Object on page 6-36).
In addition to setting these properties, for group objects you can also use the Reference Mode option menu to specify whether subobjects of the group are active (By value) or represent a connection to another group (By reference or By pointer).
When you select By reference or By pointer the dialog window displays a Connection text field. Use this field to enter the name of the group to which you want to connect this parameter. The group object to which you connect and this group parameter must match in two ways:
- The group object you connect to must have all the subobjects that the group parameter has.
- If any of the primitive data subobjects in the group parameter have a value, the corresponding subobjects in the group object you connect to cannot have a conflicting value.
Use By value mode (the default) for groups that represent a real instance of the object. In By-value mode the subobjects maintain their own values. A group must be in by-value mode to execute methods or have active primitive data subobjects.
Use By reference when you want to connect this group to another so that it behaves just like the object to which it is connected. In by-reference mode, the group's subobjects are virtually connected to the subobjects of the connected group. Operations that you perform on subobjects in the referenced group are also performed on the subobjects of the connected group.
Use By pointer when you want to create a true memory pointer to the referenced object. In by-pointer mode, you do not have access to the subojects of the referenced group; the value of the connection is only the group object, not the group and its subobjects. For example, if you set a method to be notified when a by-pointer group changes, it does not execute when subobjects of the connected group change, but only when the connection itself changes.
This sections covers setting values and making connections both by value and using the Network editor.
For primitive objects, the Object Editor includes fields that you can use to set the value or connection of the object.
To set the value of the object, enter a value expression in the Value = field and press CTRL-RETURN. You can use a C-style numeric constant or expression.
To get the value of the object from another object, type the name of the object to which you want to connect in the Connection => field. You do not need to enter the Connection operator (=>).
You must supply enough of the object path to identify the object uniquely. For example, if you want to connect to an sibling object, you do not need to enter any path at all.
If your entry does not identify the object uniquely, AVS/Express connects to the nearest occurrence of the object name in the hierarchy.
For more information, see Making Connections on page 5-42.
You can control whether the object's ports or the object itself are displayed in the module interface.
Set the button Object is an exported parameter to export the parameter to the module's parameter display list. When you open the module in the Network Editor in Display Parameters list mode, only exported parameters are visible. From the editor panel you can only export the parameter to its parent. To export the parameter further levels up the object hierarchy, set the export property using the Property Editor or V code.
Set the buttons Display input port and Display output port to export the respective port to the module interface. Export the ports that you want to be able to reference graphically in the Network Editor. When you export a port from a subobject, the port becomes visible on the frame of the module window. When you close the module, exported ports appear on the module icon; input ports display at the top of the icon and output ports display at the bottom. When a parameter's port is displayed, you can reference the parameter in the Network Editor by using your mouse to draw a connection line between it and another port in the Network Editor (see Understanding Ports on page 5-38).
A value expression is a C-style expression, ranging in complexity from a constant, to an object reference, to a multioperand expression. An expression can return a scalar value or an array value of a particular dimensionality.
A value expression can either define a lasting connection or can simply perform a one-time modification of the value of the object. Making a connection by entering a value expression is the same as making this connection by visually connecting two icons.
The most common use of a value expression is to supply a value to a primitive data object. A scalar value expression can appear in other contexts, such as in the declaration of an array's dimension or the definition of a connection for a group with reference mode set to by-reference or by-pointer.
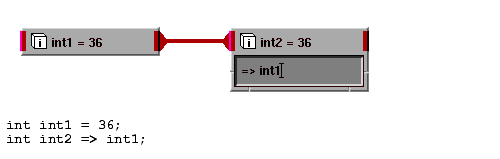
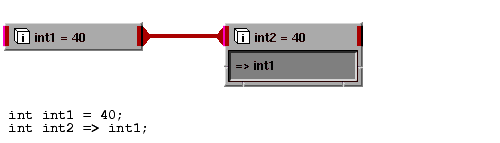
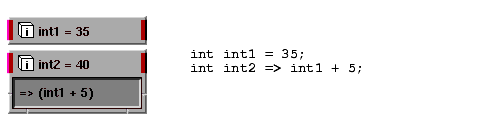
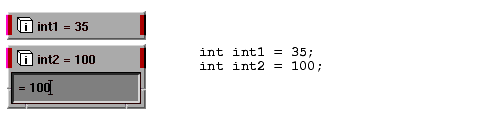
You can make connections between two objects using a value expression rather than making this connection by visually connecting two icons using the Network Editor. You do this by entering a value expression using the => operator. For example, by entering the value expression int1 into the int2 object, you are able to make this object connect to int1:
If you subsequently change the value of the int2 object, using the "=" operator, you modify the value of the object to which it is connected.
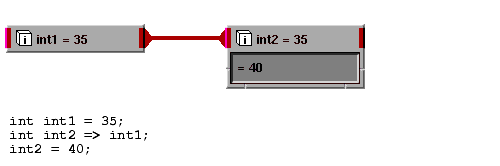
Because this connection is a read-write connection, if you enter
and then press Return, you get
Notice that the value of both objects is changed and the connection is still preserved.
A scalar expression returns a scalar value. A scalar expression can include any of the tokens described in the table below. Several examples follow the table.
Table F-1
The <+>, <*>, and ! operands are read-write operations. Normally when an attempt is made to set the value of an expression, the expression is broken and the operands of the expression are left untouched. The <+> and <*> operands implement read-write addition and multiplication respectively. The first operand is modified to make the expression valid after the set value is performed.
The ! operation is always a read-write operation. An attempt to set the value of the ! operator to a non-zero value, results in setting the operand to 0. An attempt to set the ! operator to 0 sets the operand to 1.
An array expression returns an array value. An array expression can include any of the tokens described in the table below. Several examples follow the table.
Table F-3
Each of the following array value expressions defines an array with three elements:
{1,2,3}
{a, 4, b+2}
As a second example, assume that a1 and a2 are size-two arrays. The following array literal returns a three-by-two array:If a1 has the value {1,2} and a2 has the value {3,4}, this array literal specifies the value as:
For example, the following scalar expression (assume that x is a scalar object)
if assigned to a [2] array, is equivalent to the following array literal:
For example, if a1 is a [2][3] array, the expression a1 references all of a1's elements.
For example, if a1 is a [4][3] array, then the following returns a [3][2] array consisting of the elements in rows 0 through 2 and columns 1 and 2
is equivalent to the array literal
If a1 is an [4][3] array, this syntax
If a1 is an [3] array, this syntax
If a1 and a2 arrays of [2], this example
An array expression appears in an assignment or connection for an array object. AVS/Express can perform certain dimension conversions, when necessary.
Here are the rules for dimension conversion in an array value expression. The term "object" refers to the object to which the array expression is being assigned or connected:
- All array operands in the expression require the same number of dimensions and the same size in each dimension or the dimensions must be convertible. AVS/Express can either compress a pair of dimensions into one or expand a single dimension into two dimensions. For example, [3][2] can be compressed to [6] and [6] can be expanded to [2][3] but [3][2] cannot be directly converted to [2][3];
- If the object is a one-dimensional array with specified bounds, each operand in the expression must be either a scalar or an array the same size (that is, the same total number of elements) as the object. If an operand is a scalar, AVS/Express promotes it to an array the same size as the object.
- If the object is an array with unspecified bounds, each operand in the expression can be a scalar or an array. AVS/Express changes the object's array size to match the size and dimensions of the array operands.
- If the object is a multidimensional array, each operand must be either scalar or an array with the same number of dimensions and the same size in each dimension as the object. If the operand is scalar, AVS/Express promotes it to an array the same size as the object.
A primitive data object that has been instanced but not initialized has an unset value. Assigning an object with an empty expression returns it to the state of having an unset value.
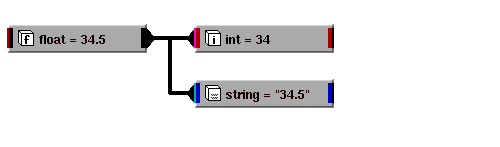
AVS/Express performs C-style data-type conversion when necessary and if possible. In addition, AVS/Express can convert from char, byte, short, int, float and double to the string data type. For example:
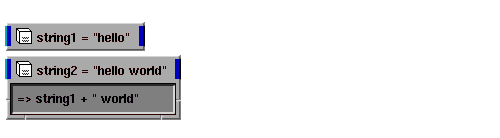
When producing a string value, the "+" operator performs string concatenation. This example uses this feature to concatenate two simple strings:
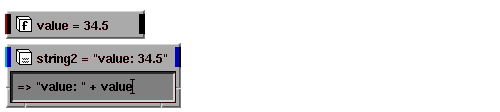
Since a float or other primitive data object can be converted directly to a string, you can use this in the concatenation operation as well:
When you make a connection in the Network Editor, you define a read-write connection. Any change made to the value of the object that is connected to the other object changes the other object's value itself. (See Value Expressions on page 6-17 for an example.)
When you define a connection to a math expression, you create a read-only connection to this math expression that is broken when an attempt is made to change the value of the object. This makes sense because most math expressions are not generally defined in the reverse direction. If you set the value of the expression "a + b", you do not know whether to change a, b, or both to continue to make this expression valid.
For example, you have the following objects connected through a math expression:
If you subsequently set the value of int2 to 100 using the "=" operator, it breaks the connection to int1 rather than modifying int:
You can create a read-only connection yourself by setting the rdonly property on the object that is the destination of the connection. Alternatively, you can construct a dummy math expression like: "a + 0". This technique is sometimes useful making transient one-way connections.
In most cases when you create a connection between two objects, you do so by visually connecting two ports. In certain places, however, you make a connection to an object by typing its name:
- in an object's value box, when specifying the target object of a connection or referring to an object in a value expression
- in the Properties Editor, when referring to an object while specifying an object's dimensions
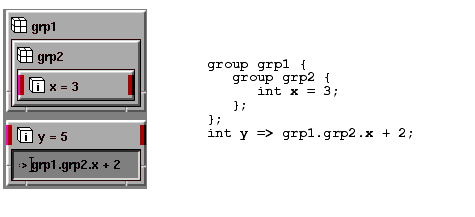
This section describes the rules for describing a connection by name. Each object has a unique pathname that designates its location in the object hierarchy. For example:
Since all children of a particular object must have unique names, you are guaranteed that no two objects will share the same pathname. When referring to an object as part of a connection, you can always use the entire pathname of the object, but creating absolute references like this makes it difficult to relocate objects. Instead, you can omit any pathname entries that are shared by both the referencing and referenced object in the connection. For example, making a connection from
you can eliminate the common path entries and just use the pathname
To make a connection in the reverse order, you eliminate the common pathname entries:
The following examples illustrate coding a value expression for a primitive data object. But the rules apply to any place you code an object reference and for all kinds of objects, including groups.
A connection to a sibling or uncle object can be unqualified. AVS/Express is able to find the referenced object in the object hierarchy.
Simply type the object's name. Here are examples:
If the referencing object is higher in the object hierarchy than the referenced object, you supply the pathname entries that join the two objects.
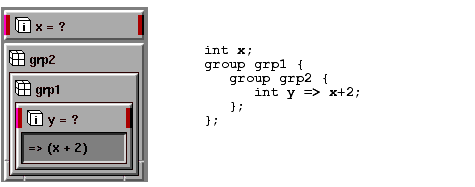
- Object y connects to object x through an expression. The reference must fill in the objects in between grp1.grp2:
An ambiguous reference can occur when the referenced object's name appears at multiple levels in the object hierarchy. For example, you reference object x, but there exists both a sibling object x and an uncle object x.
By default, AVS/Express selects the object that is closest to the referencing object in terms of level in the object hierarchy.
To force AVS/Express to go up one level in the object hierarchy, enter the characters <- in the pathname. You can specify <- multiple times to go up multiple levels. Each <- must be followed by a dot to separate it from the next component of the pathname.
If you want an object with the pathname
using a pathname of "x" gets you the wrong x (you get Root.Applications.SingleWindowApp.x.x). Instead, you can qualify the pathname with
The two <- sequences cause the reference to skip the two levels of hierarchy between SingleWindowApp.x.x.a and SingleWindowApp.x.
You can force an object to only connect to a peer by preceding the name with a "." character. In this way, you can have an object
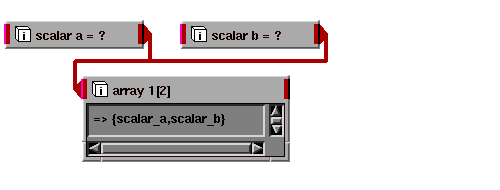
An array object can either have a single connection that points to an array object of the same dimensionality, or the array object can have a list of connections to either scalar objects or array objects that have one less dimension. For example, an array of size two is created from two scalars using:
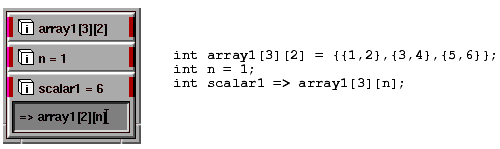
A scalar object can connect to a single element of an array object. These connections are not drawn in the Network Editor and must be entered by typing in the value of the scalar object. The syntax for this is value expression is:
where array_object is the pathname of an array object that should have at least as many dimensions as there are []'s and each dim_expr is an expression producing an integer value. AVS/Express uses zero-based array indexing so 0 refers to the first value in that dimension. For example:
This same construct can connect an n dimensional array to a subsection of an array of less than n dimensions.
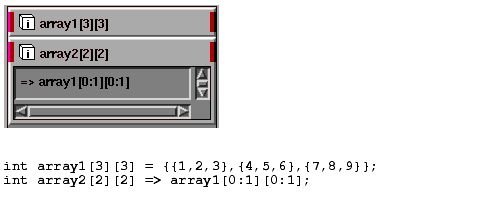
You can also connect an n dimensional array to a subset of another n dimensional array using the array range syntax. These connections also are not displayed in the Network Editor and must be entered into the value expression of the object. The syntax for one of these connections is:
The referencing object is connected to a subregion of the array specified by array_object that includes values from the index min_value to and including max_value. min_value and max_value can be any expression that produces an integer value. This example connects a [2][2] array to a subregion of a [3][3] array:
In the previously illustrated example, the value of array2 is:
A single connection can mix range dimension specifications with simple value dimension specifications.
An array value can also connect directly to a scalar value itself. This implies an array of constant value.
A forward reference is a reference to an object that has not yet been defined. Forward references are allowed, but until the referenced object is defined, the expression returns a null value.
Caution: Since forward references are allowed, AVS/Express does not supply an error message if you reference an object that does not exist. Use the $resolve V command to report unresolved references.
If you want to define a reference that will not be resolved by the time that AVS/Express attempts to resolve it (in other words, you want to suppress this error message), you can set the nres attribute on the object containing the unresolved references.
Recursive connections (or loops of connections) are not allowed. An error message is printed whenever you attempt to connect an object to itself either directly or through an expression, and the connection is disallowed.
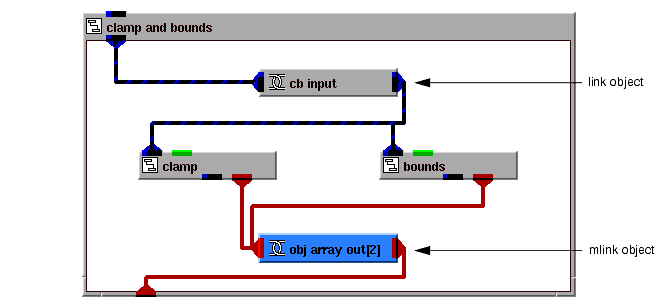
Link objects are used to route connections in as generic a way as possible. They can connect to any type of object and accept connections from any type of object and they ensure that both from and to connections are compatible in type. Link objects are commonly used in macros to perform one of the following functions:
- Route an input connection from multiple inputs inside the macro to a single output outside of the macro.
- Route an input from inside the macro to an output outside the macro so that the implementation of the macro can be changed without modifying references to the macro itself.
- Same as the above except for output connections.
- Gather multiple outputs from inside the macro and output them as a single array output.
There are two types of link objects:
If a connection is made first to a link object, all connections that are made from the link object must match the objects that are connected to it.
If the link object already is connected to another object, any new connections made to the link object must match the object to which the link is connected.
The link object uses the port colors of the objects either connected to it or to which it is connected.
An mlink can either combine a list of connections to scalars and output them as an array or can be connected to a single array input. In both cases, it outputs an array of values and should not be used to connect two scalars.
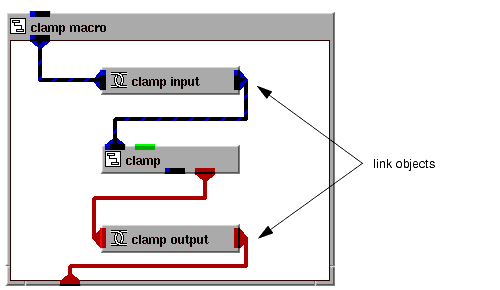
Here is an example of a macro using a link object to hide the implementation of the macro from outside users:
Here is an example of link objects used to fan out a single input to a list of inputs and fan in a list of outputs to a single output:
To declare the object as an array object:
- Set the button, Object is an array
- Use the Dimensions text field to enter an array value for the object.
You enter the dimensions of the array as a C-style array declaration. This is the same format used to set the dimensions property in the Property Editor. You can set Dimensions to any of the following:
For more information, see the Visualization Techniques manual.
Objects created from the base type group, module, and macro can have dimension specifications to indicate that they are arrays. For simplicity, this section refers to the behavior of the group object but these operations apply equally well to modules and macros.
You define the dimensionality of an array of groups in the same way that you would define the dimensionality of a primitive data object with the exception that AVS/Express only supports one-dimensional arrays of groups. The behavior of an array of groups varies depending upon the reference mode of the object.
If the reference mode is set to by-reference (&) and the dimensions are set to indicate that this is an array, the object defines an array of references to groups. This object can accept either a single connection to an array of groups or a list of connections to individual groups. The matching rules for a scalar group reference apply for each object added to the list of references.
When defining an array of group references, it is often easier to leave the dimensions unspecified. This allows the Network Editor to add additional connections when connecting to scalars and allows the array of group references to be connected to an array of groups without concern for the dimensionality. If you need to access the array size in an AVS/Express object, you can use the array_size V function.
If you explicitly define the dimensions of your array of group references, you can only connect it to an array of groups that has the same dimensionality.
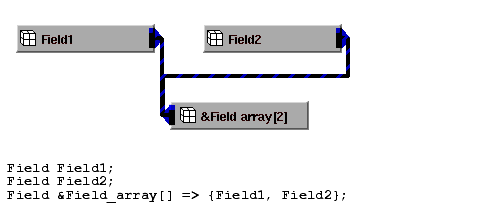
The following example defines an array of references to Field objects. The dimensionality of the array of references is left unspecified and it is connected to two scalar Field objects:
An array of group pointers defines an array of pointers to objects. It is specified in the same way as the array of group references (with the exception of the reference mode). For information on the difference between a pointer and a reference to a group
See Setting the Reference Mode of a Group, Module, or Macro on page 6-10.
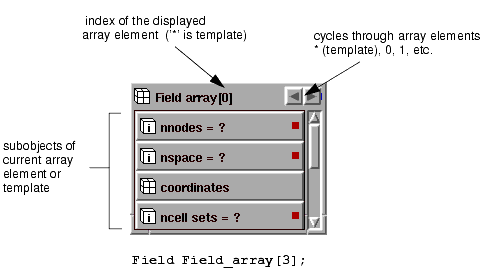
An array of groups that does not have the reference mode set maintains an explicit array of groups. The subobjects of an array of groups define a group template that is used to stamp out new array entries as its dimensionality changes. When the array dimensionality gets larger, new groups are created from the group template and added to the end of the list. As the array dimensionality gets smaller, the groups at the end of the list are destroyed.
Here is a simple array of groups as presented by the Network Editor:
This functionality is used to define a dynamic array of groups. If this array contains modules or macros that have underlying methods, these objects are instanced as they are created and de-instanced as they are destroyed.
In order to use this capability effectively, you often need to be able to make connections to and from the groups in the array and their subobjects.
There are several cases that are common:
- A subobject in each group in the array connects to the same object outside the array.
- A subobject in each group in the array connects to a corresponding object in a parallel array of groups or primitive data.
- An object from outside the array connects to a subobject of a specified group in the array.
- An object from outside the array treats the subobjects of each group in the array as an array.
In the template for the group array, you define a connection to a subobject outside of the array. Since each group in the array is stamped from the template, the subobject of each group is connected to the same value.
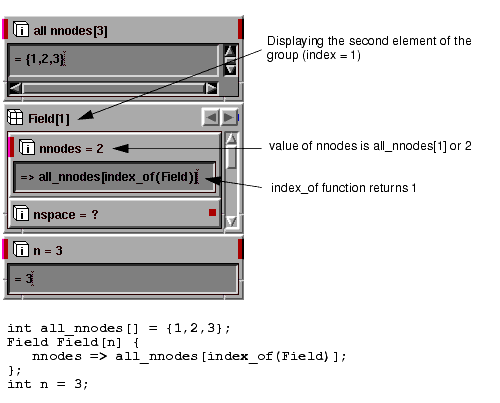
In the template for the group array, make a connection to an element of an array using the index_of function with the array. The index_of function returns an integer indicating its index in the group array. If the index_of function originates in the first element in the array, it returns 0. If it originates in the second element in the array, it returns 1, and so on. For example:
The object outside of the array can reference a subobject of the group with a constant index in its value expression. For example, to connect a value from outside of the array to the nspace subobject of the second element in the Field array (index 1) you place this value in the value expression:
In this example, you want to create an array of integers from the nspace subobjects of the Field array of the previous example. The array could be defined as
but this syntax does not increase the size of the nspace array when the Field array changes size. Instead, you simply use this syntax:
Since the object Field is an array of groups, not a scalar, this expression defines an array of nspace objects. Since nspace is an int, the result is an array of integers.
If the nspace subobject were itself a one-dimensional array, this defines a two-dimensional array (remember that AVS/Express only supports one-dimensional arrays of strings and groups so this does not work with these base types).
In addition to a declaration page, the Object Editor for a module includes a Module page that you can use to add or edit methods and parameters to the module.
Although the Object Editor allows you to use and access all the functions and properties described in this section it is recommended that you create modules, add parameters, add methods, etc. using the Add Module Tool. The sections below can be used to describe the Add Module Tool specifications as well as the Object Editor.
The Add Module Tool also deals with adding, editing and manipulating methods, parameters, and links. See the on-line reference for the Add Module Tool, or see Chapter 7, Building a User Interface in the Getting Started manual for more information on the Add Module Tool.
Adding, modifying and deleting methods in Modules.
To add a method from the Module Editor page:
- Select the type of method that corresponds to the type of application programming interface (API) you are using to integrate code into AVS/Express:
- To use the C++ API, select C++ member function (cxx method). This choice adds a cxxmethod type object to the module. The object takes a string value. If the method function is small, you can type the method code directly into the method value field. AVS/Express interprets any value you give the string as the method code.
- If you do not add a value to the method object, AVS/Express uses the method properties cxx_class, cxx_hdr_files, and cxx_src_files to find and execute the C++ class associated with this method. You can set these properties on the Source Code editor page.
- For more information about adding modules using the C++ API, see The C and C++ APIs: Overview on page 9-4
- For the C API, select C function (omethod). The value of an ommethod object is the name of the C function the method calls when executed. AVS/Express uses the source code management properties set on the Source Code editor page to find and execute the function you name.
- For more information about adding modules using the C API, see the C API Usage Notes on page 9-16.
- For the FORTRAN API, select Fortran subroutine (fmethod). The value of an fmethod object is the name of the Fortran function the method calls when executed. AVS/Express uses the source code management properties set on the Source Code editor page to find and execute the function you name.
- For more information about adding modules using the FORTAN API, see The FORTRAN API: Overview on page 9-73.
- Set the method properties using the editing interface AVS/Express displays for the type of method you selected.
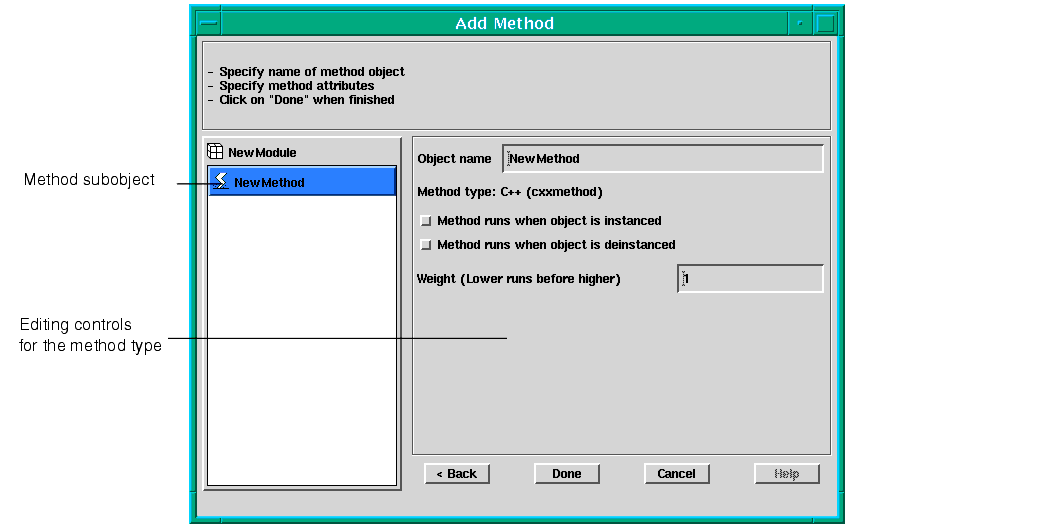
When you select the type of method you want to create and click Add, AVS/Express displays an interface you can use to set the properties for that type of method. For example, this is the dialog box for a cxxmethod object:
Edit the Object name field to rename the method object. The naming conventions are the same as those described in Naming an Object on page 6-8.
In addition, when naming a method you must use a name that does not clash with other components in AVS/Express or other shared libraries. To avoid name conflicts, we recommend the following:
- Use a unique prefix for the name of your methods. Avoid the prefixes used by AVS/Express: OM, UI, FLD, DV, GD, GMOD, AG, PAL, IP, and AC.
- Avoid simple names that might conflict with standard functions, for example, read, write, sort, or select.
There are two buttons that control automatic execution of the method: Method runs when object is instanced and Method runs when object is deinstanced.
Setting the Method runs when object is instanced button specifies that this method is the modules instance method. AVS/Express executes the method's function when the group is instanced.
Setting the Method runs when object is deinstanced button specifies that this method is the modules deinstance method. AVS/Express executes the method's function when the group is deleted.
Setting these buttons is the same as setting the notify_inst and notify_deinst properties on this method in the Properties editor or in V code.
Enter a value in the Weight text field to control the execution priority of the method. Methods with a lower Weight value run before methods with a higher Weight.
By default, all methods have a Weight of one. If two methods with equal weight are invoked simultaneously, for example by a change in a parameter, the order in which they are executed is undetermined. You can ensure that a method is executed first by giving it a weight of 0. You can control the execution order of a set of methods by adjusting their relative Weight values so that the methods you want to execute first have lower weights than the ones you want to execute later.
Setting this field is the same as setting the weight property in the Properties Editor or in V code.
If you select a method type of C function (omethod) or Fortran subroutine (fmethod), the editor panel also includes a text field in which you enter the name of the C function or Fortran subroutine. The name you enter becomes the value of the omethod or fmethod object. It must exactly match the name of the C function or Fortran subroutine you want this method to call.
If you select a method type of C++ member function (cxxmethod) objects, AVS/Express assumes a C++ method name of <module name>::<method name>.
You specify the source file and location of the function or subroutine, and other information about the code that this method depends on, by setting the code management properties.
For more information about the code management properties, see Specifying Code Management Properties on page 6-47.
Adding, modifying, and deleting parameters.
For the base types (boolean, char, byte, double, float, int, short, or string), you can:
- rename the parameter subobject
- export the parameter and its ports to the module interface
- declare the parameter as an array and set its dimensions
- specify a value or connection for the parameter
When you start the Add Parameter dialog, the Object Name text field displays New Parameter as a default name for the module. You can edit the name in this field to rename the object.
The same naming conventions apply to parameters as to modules.
For more information about naming objects, see Naming an Object on page 6-8.
You can control whether the parameter's ports or the parameter itself are displayed in the module interface.
Setting the button Object is an exported parameterexports the parameter to the module's parameter display list. When you open the module in the Network Editor in Display Parameters list mode, only exported parameters are visible. From the editor panel you can only export the parameter to its parent. To export the parameter further levels up the object hierarchy, set the export property using the Property Editor or V code.
Setting the buttons Display input port and Display output port exports the respective port to the module interface. Export the ports that you want to be able to reference graphically in the Network Editor. When you export a port from a subobject, the port becomes visible on the frame of the module window. When you close the module, exported ports appear on the module icon; input ports display at the top of the icon and output ports display at the bottom. When a parameter's port is displayed, you can reference the parameter in the Network Editor by using your mouse to draw a connection line between it and another port in the Network Editor.
You use the Value and Connection fields to set the value of the parameter.
To set the value of the parameter, enter a value for the parameter in the Value field and press Enter to apply it. AVS/Express updates the parameter to display the value in both the Application window and the Network Editor.
To make a connection to another object, enter the name of the object you want to connect to in the Connection field. You do not need to enter the `=>' operator. Press Enter to enable the connection.
For more information about connecting objects by name, see Connecting Objects by Name on page 6-27.
You can use the Add Parameter dialog to define the interaction between the parameter you are adding to the module and the methods in the module.
- Note: In the Add Module Tool you are automatically brought to a screen to select the parameter-method interaction for each parameter you add to the module.
To define the interaction between the parameter and the module's methods:
1. Select the method that you want to interact with this parameter from the Methods list. This is a list of all the methods that you have added to the module.
- Set notify to invoke the selected method whenever the value of this parameter changes.
- Set read to specify that the selected method reads a value from this parameter or write to specify that the selected method writes a value to it.
- You can use the read and write attributes to control execution order when more than one method interacts with the parameter. If a change in the parameter invokes more than one method, methods with the write attribute set on them execute before any methods with the read attribute.
- Set req (require) to specify that this parameter must have a valid value before the selected method executes.
- If you have set req and the parameter does not have a valid value, neither value changed events from a parameter, nor instance and deinstance events cause the method to execute. Setting the req button sets the req attribute on both the parameter and method.
You can repeat these steps to define interactions between this parameter and any other methods in the module.
For more information on these attributes, see Setting Parameter Attributes on page 8-6.
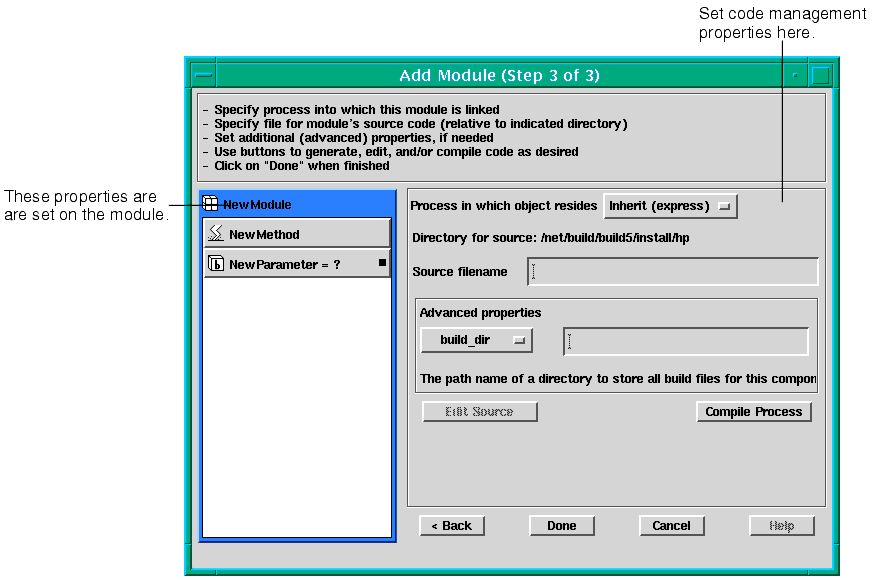
You use this dialog to set the code management properties for a module. These properties supply information about the code that this module depends on. With this information AVS/Express can
- Generate make files
- Move modules from process to process by changing the process property on the module.
For more information on the code management properties, see the Providing Code Management Information on page 8-28.
There are various processes that you can link your module code into. You can choose the following options:
- Inherit - The module inherits the process property of its parent. This is the default. The current value is displayed in parentheses. If the parent process is changed, the process for this module is also changed.
- express - The AVS/Express process.
- user - A smaller user process.
For more information on processes in AVS/Express, see Processes on page 10-4.
Use the Source filename text edit field to enter the name of the source file containing the code for this module, or where you want AVS/Express to create the file. When you choose Edit Source or Compile Process, AVS/Express searches this file to find the code for this module.
For cxxmethod objects, AVS/Express looks for a C++ method named
<module name>::<method name>.For omethods or fmethods, AVS/Express looks for the C function name or Fortran subroutine name you entered when you created the method.
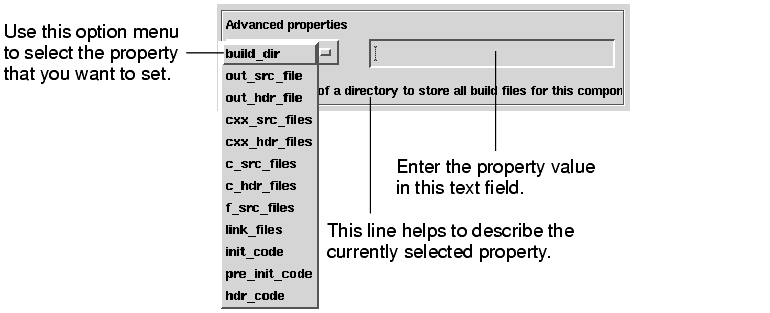
AVS/Express looks for this file in the current build directory. This directory is displayed as the Directory for source just above the Source filename text edit field. By default this is the directory in which you started AVS/Express. You can change the build directory by setting the build_dir property in the Advanced Properties dialog.
The following properties are not required when integrating your module into AVS/Express
The following table summarizes the advanced properties you can set from this dialog.
Table F-1
When you press the Edit Source button, AVS/Express opens an editor and attempts to read the source file you have specified for this module.
If AVS/Express cannot find the source file you specify, it creates the file and generates skeleton source code describing the module you have created. You can then modify the skeleton code to add your own code to it.
Once you have defined the other code management properties, you can press the Compile Process button to recompile the process with the new module. When AVS/Express compiles the process it uses the information you have supplied about source filenames, library dependencies, and process name to construct a makefile and, if possible, execute it.
To create the makefile, AVS/Express searches all the branches of the object hierarchy under Templates looking for objects that are part of the process being compiled.
For more information about compiling processes, see Compiling Processes on page 10-14.
When you select a library you own or in a Workspace and launch the Object Editor, AVS/Express displays the Object Editor window.
The editor pages available for Library objects are:
Each of these is discussed separately below.
The Declaration page for libraries is the same as for other group objects. You can use it to:
- rename the library
- set the library reference mode to By value, By reference, or By pointer.
- make the library an exported parameter
- display input or output ports
- declare the library an array and set its dimensions.
For more information about the setting declaration properties, see Naming an Object on page 6-8.
You can use the Library page to set two special library properties:
- Set the Sort Objects button to have AVS/Express sort objects alphabetically as you add them to the library.
- If Sort Objects is not set (the default), objects you add to the Library are added to the bottom of the Library display of subobjects. If Sort Objects is set, the objects you add are sorted alphabetically when you add them to the library.
- When Sort Objects is on, AVS/Express sorts objects only as you add them to the library based on their current name. If there are objects already in the Library when you set Sort Objects on, they are not sorted or included in the sort of new objects you add. The objects you add are always displayed in the Library above the objects that were in the Library before you set Sort Objects on, and only the objects you add are sorted only amongst themselves.
- If you rename any object in the Library, AVS/Express does not re-sort it based on its new name; it remains in the same place in the library display.
The Source code page for Library objects is the same as that for modules or groups. The source code properties you set on a library will be used for all objects in the library unless you explicitly set the properties for specific objects.
For information about setting the Source Code properties in the AVS/Express editors, see Specifying Code Management Properties on page 6-47.
The AVS/Express field is AVS/Express' uniform data structure used by the Data Visualization modules and viewers. It is a flexible data structure that can be used to represent many different types of data. AVS/Express includes Field Mapper modules that you can use to convert arrays of data into AVS/Express fields
For detailed information about AVS/Express fields, see the AVS/Express Field Format section of the Visualization Techniques manual.
The Object Editor includes the following editor pages that you can use to specify and set properties for the associated type of field component:
- Edit Mesh - available for objects, or for objects containing subobjects, that match the Mesh template, for example, Field, Mesh, Mesh_Unif, and Combine Mesh Data.
- Edit Cell Set - available for objects that match unstructured Mesh or Cell_Set objects.
- Edit Node Data - available for objects that match Node_Data for example, Field and Mesh+Node_Data.
- Edit Cell Data - available for objects that match the Cell Data template.
Each of these editor pages is described in more detail in the following sections.
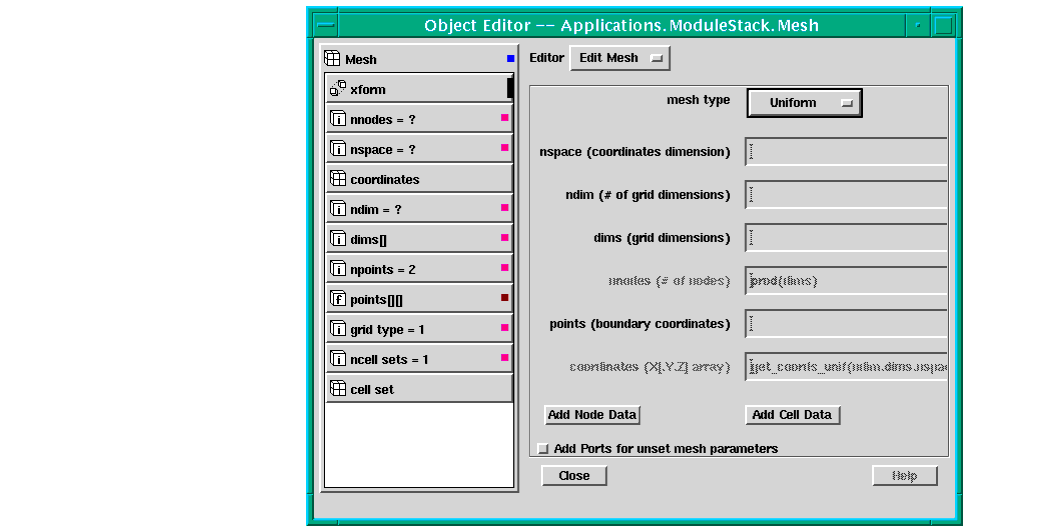
A mesh is the component of an AVS/Express Field that describes where and how the data is located and organized in space. When you call the Object Editor on an object that contains a mesh (e.g. a field or mesh object), the Editor option menu for the object includes the Edit Mesh command. When you select Edit Mesh, the Object Editor displays the following editor page:
You can use the Mesh type option menu to select four different mesh types:
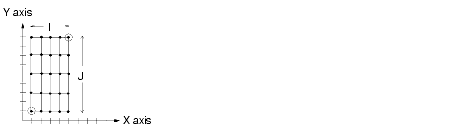
- Only the coordinates of two points, the (0,0) object of the array and the
(i_max, j_max) object of the array, are required to specify the following uniform field.- For uniform meshes you set the nspace, ndim, dims, and points parameters.
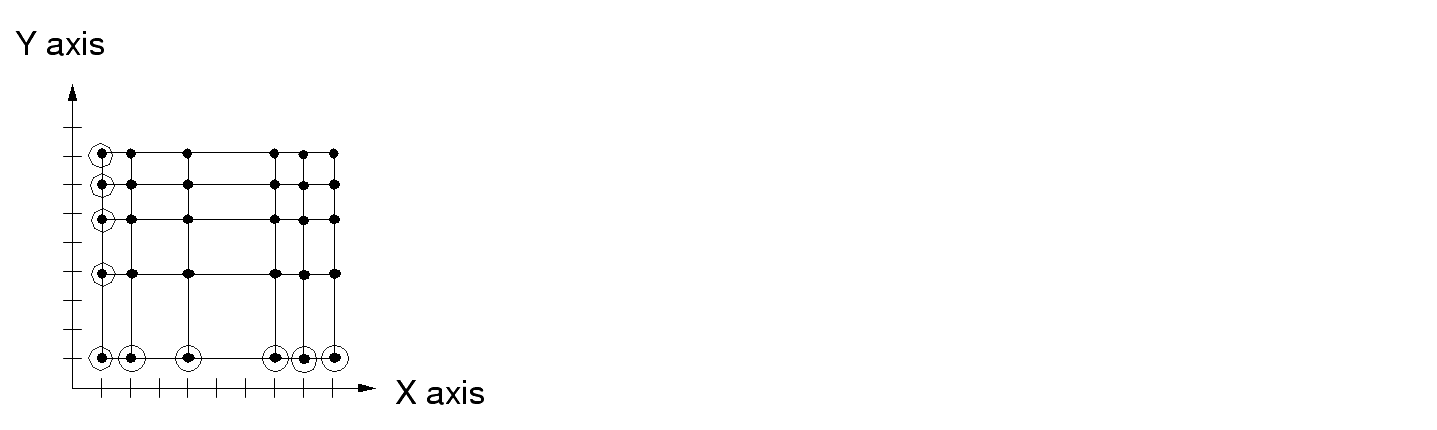
- Rectilinear - Represents data points organized in an array in which the axes are orthogonal but the spacing between data points may be irregular, for example:
- For rectilinear meshes you set the nspace, ndim, dims, and points parameters.
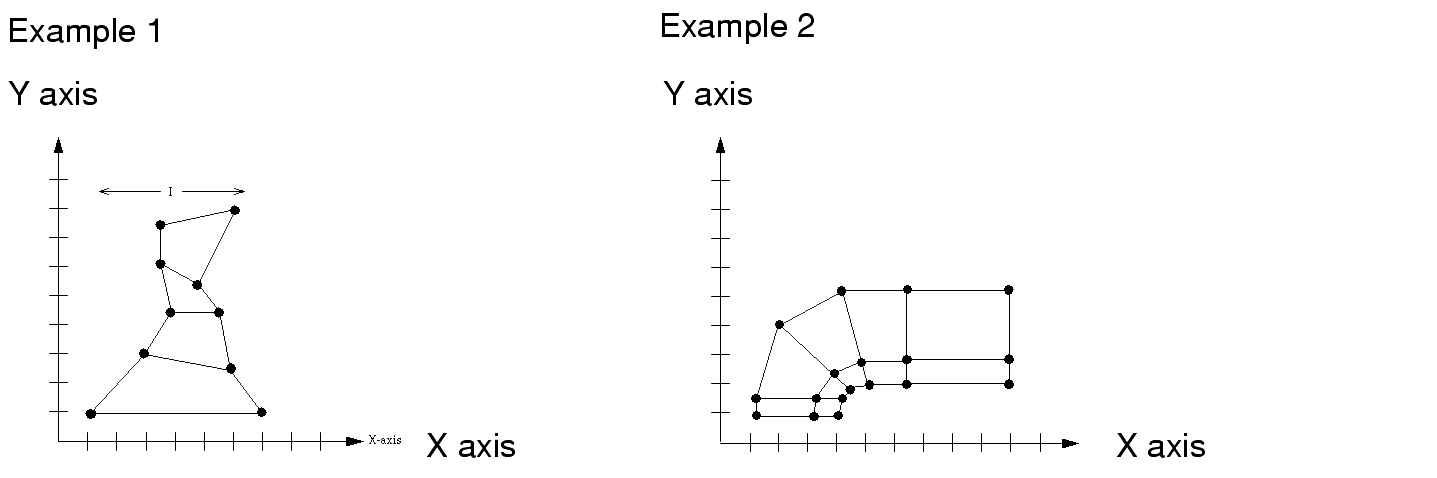
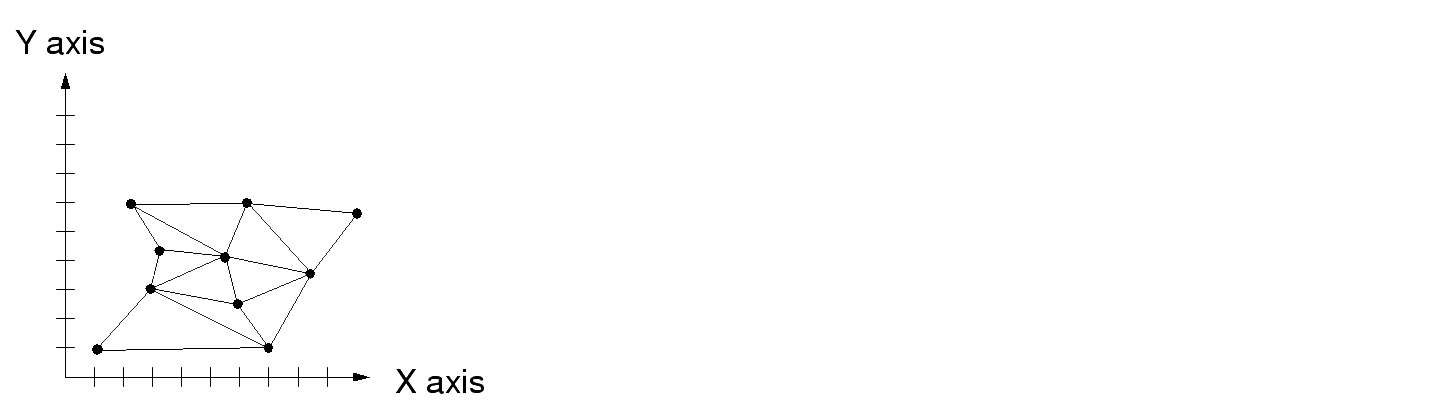
- Structured - Represents data points that are cannot be organized into an array structure; you must supply the coordinates of each point. However, the nodes of the mesh are regular enough that connectivity information can be inferred from the array structure. You do not need to supply cell data. Two examples of structured meshes:
- For structured meshes you set the nspace, ndim, dims, and coordinates parameters.
- For unstructured meshes you set the nnodes, nspace, and coordinates, parameters, and you supply a cell set to provide connectivity information.
When you select a Mesh type, AVS/Express configures the editor panel for the appropriate parameters.
You can use the editor page to set the following parameters:
- nspace: coordinates per node
- ndim: number of grid dimensions
- dims: array of grid dimensions
- nnodes: number of nodes
- points: boundary of coordinates
- coordinates X[,Y,Z] array
Only the parameters that apply to the selected type are active.
For all mesh types, you set nspace to specify the number of coordinates specifying each node. This corresponds to the dimensionality of the physical space in which the data exists.
For uniform, rectilinear, and structured meshes, you set ndim to specify the number of dimensions in the field grid, the computational space. This is also the number of elements in the dims array.
ndim is the dimensions of the array in AVS/Express holding the numeric data.
For an image, ndim = 2. For a volume, ndim = 3.
- Note: In many cases, the values of nspace and ndim are the same - the physical and computational spaces have the same dimensionality. But you might embed a 2D computational field in 3D physical space to define a manifold; or you might embed a 1D computational field in 3D physical space to define an arbitrary set of points (a "scatter").
For uniform, rectilinear, and structured meshes, you set dims to specify an array of computational dimensions. The array contains the dimension size of each axis (the array bound for each dimension of the computational array). The number of dimx entries must match the value of ndim. For instance, if you specify a 3D computational space field (ndim=3), you must specify the length of the X dimension (dim1), the length of the Y dimension (dim2), and the length of the Z dimension (dim3). Note that counting is 1-based, not 0-based. If you have scatter data (ndim=1) in 3D coordinate space (nspace=3), there will be only dim1=value.
For unstructured meshes, you set nnodes to specify the total number of grid locations, or nodes.
For uniform and rectilinear meshes, you set points to specify an array defining the extents of the field in space.
You set coordinates for structured and unstructured meshes to specify an array of points defining the grid.
If your field object does not include node or cell data, you can use the buttons Add node data and Add cell data to add them.
When you press Add node data or Add cell data, AVS/Express adds Edit Node Data and Edit Cell Data to the Editor option menu, and, if necessary, adds the subobjects needed to support node and cell data to the current object. You can choose these Editor options to access the Object Editor page for node and cell data.
For more information about using the node and cell data editor pages, see Using the Node and Cell Data Editors on page 6-65.
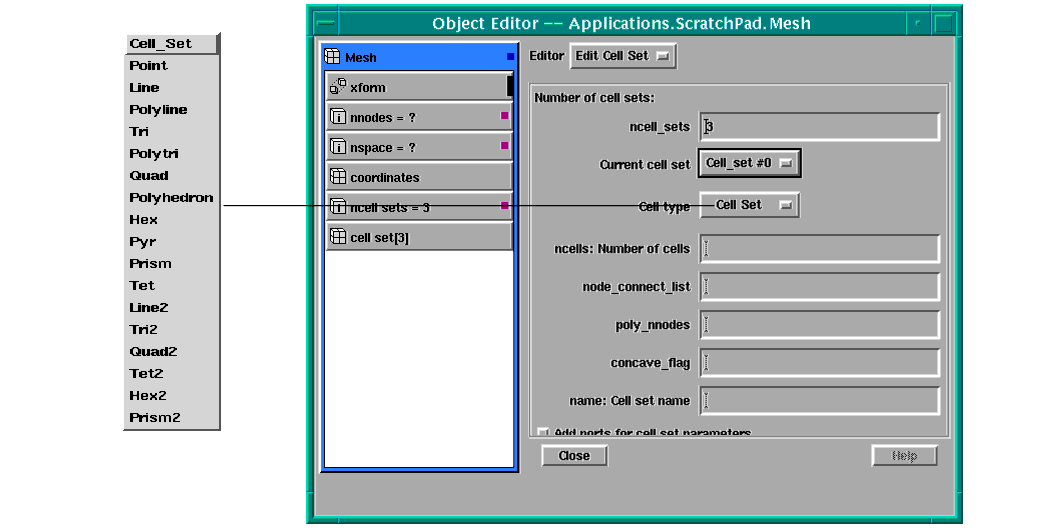
When you call the Object Editor on an object that contains a cell set, the Editor option menu includes the Edit Cell Set. When you choose Edit Cell Set, AVS/Express displays the Cell Set editor page:
- Set the number of cell sets and the current cell set
- Select the cell type
- Set the cell set parameters
- Adding ports for cell set parameters
Unstructured grids only: structured grids implicitly define the connectivity in their structure type.
The grid you define with the Mesh editor specifies the location of the node of your data in space. Cells are data structures corresponding to each node that define the connectivity between each node and the type of interpolation to perform from one to another. You can define different types of connectivity and interpolation for different parts of a grid by defining cell sets. A cell set defines these characteristics for a particular subset of the nodes in the grid.
Cell sets group together cells in the grid with the same properties. If all the cells are of one type, then there is one Cell Set. If there are different types of cells, then there are as many Cell Sets as there are cell types.
To set the number of cell sets, enter the number in the ncell_sets text field and press Return. AVS/Express updates the ncell-sets and cell_sets parameters in the object you are editing.
You set the parameters for each cell set individually. To select the cell set you want to edit, select it from the Current cell set option menu. The edit fields in the lower portion of the Edit Cell Set panel, apply to the currently selected cell set.
You use the Cell type option menu to select the type of set the cell type. The cell type determines the pattern of connections between the nodes. The following summarizes the cell types by dimensionality.
For more details about a cell type, see the Visualization Techniques manual or search for the cell type by name in the online help.
To define non-dimensional cells select Point.
To define the Line and Line2 cell types you set the ncells, n_connect_list, and name parameters.
For one-dimensional cells you can select Line, Line2, or Polyline cell types:
- To define the Line and Line2 cell types you set the ncells, n_connect_list, and name parameters.
- To define the Polyline cell type you set the npolys, poly_connect_list, and name parameters.
For two-dimensional cells you can select Tri, Tri2, Quad, Quad2, or Polytri cell types:
- To define the Tri and Tri2 cell types you set the ncells, n_connect_list, and name parameters.
- To define the Quad and Quad2 cell types you set the ncells, n_connect_list, and name parameters.
- To define the Polyline cell type you set the npolys, poly_connect_list, and name parameters.
- To define the Polyline cell type you set the npolys, poly_connect_list, and name parameters.
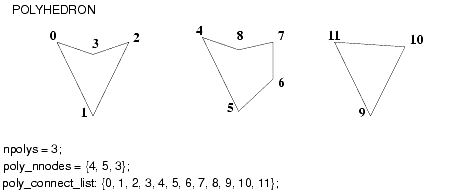
- The Polyhedron cell set type defines the members of this cell set as Polyhedron cells, which actually contain 2D polygons (the cell set is misnamed). Each polygon can have a different number of vertices. The polygons are defined in the order they appear in the poly_nnodes array. The first element of this array, call it n, specifies the number of sides for the first polygon. The first n elements of the poly_connect_list array specify the vertices of that polygon. The next element of poly_nnodes specifies the number of sides for the second polygon, and so on. The total number of polygons is set by npolys.
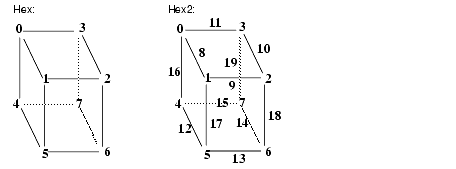
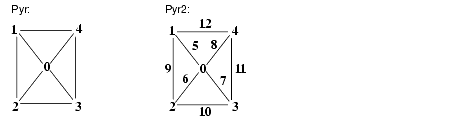
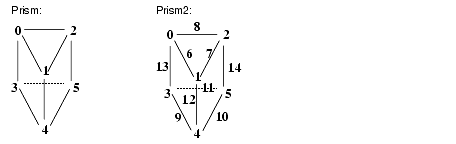
For three-dimensional cells you can select Tet, Tet2, Hex, Hex2, Pyr, Pyr2, Prism, Prism2 cell types:
- To define the Tet and Tet2 cell types you set the ncells, n_connect_list, and name parameters.
- To define the Hex and Hex2 cell types you set the ncells, n_connect_list, and name parameters.
- To define the Pyr and Pyr2 cell types you set the ncells, n_connect_list, and name parameters.
- To define the Prism and Prism2 cell types you set the ncells, n_connect_list, and name parameters.
ncells is an integer that sets the total number of cells in the Cell_Set.
npolys is an integer specifying how many polygons are in the cell set.
The node connect list is an integer array that for each cell (ncells) states which nodes belong to that cell. Cells are not independent entities existing in close formation in space. Rather, each cell is connected to another cell; it shares the nodes on its face with the adjacent cell.
The poly_connect_list is an integer array containing indices into the node coordinate array specifying which nodes are the corners of each polygon. The first poly_nnodes[0] elements of this array specify the vertices of the first polygon; the next poly_nnodes[1] specify the corners of the next polygon, and so on.
An integer array specifying how many vertices (or lines) are in each polygon.
An integer which specifies whether the polygons in the cell set are concave or not.
A string. You can use this field to assign an arbitrary name to the Cell_Set. Note that this is different from the cell_name subobject defined within each cell type to name that cell type (Tri, Quad2, and so on).
You can export the ports for the parameters for the type of cell you have specified, by clicking Add ports for cell set parameters. AVS/Express displays the ports for the parameters at the interface to the object you are editing.
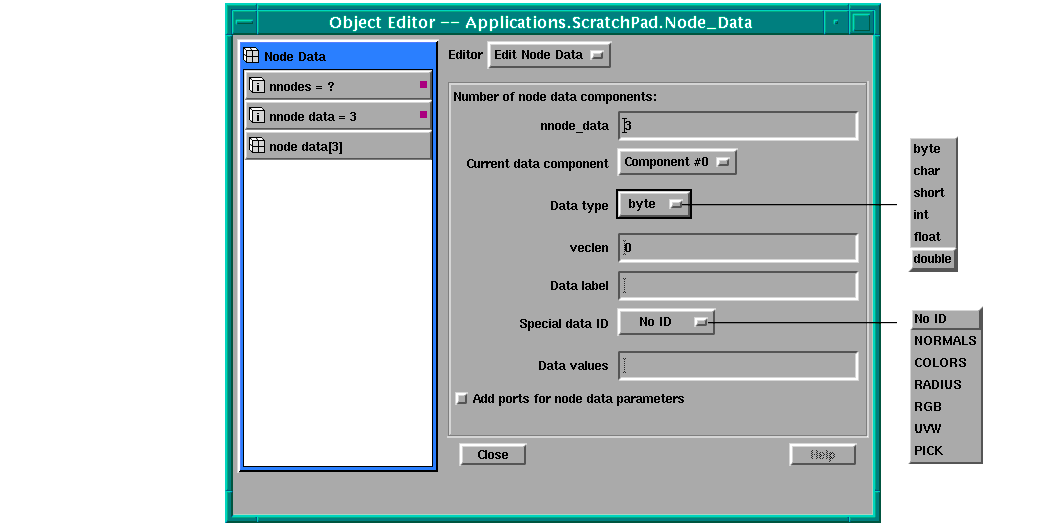
When you call the object editor on an object that contains a node data or cell data subobject, or when you click Add node data or Add cell data on the Edit Mesh editor page, AVS/Express make the Edit Node Data or Edit Cell Data pages available on the Editor option menu. You set the same parameters for both node data and cell data. For example, this is the node data editor page:
Cell_Data holds the cell-based numeric data associated with all Cell_Sets in fields with an unstructured mesh. It does not hold the cell's node data.
Node_Data stores the numeric data located at each node in a field. Its subobjects specify how many components there are in the field (nnode_data) and how many values there are for each component (nnodes). The last subobject, node_data, is an array of Data_Arrays, one for each component, that hold the actual data.
Use the nnode_data or ncell_data to specify the number data components for each node or cell.
nnode_data is an integer that specifies the number of components in the field. Fields often have more than one numeric value at each node. For example, a color image could have red, green, and blue values at each node (nnode_data = 3). Fluid flow data often has nnode_data = 5, with X, Y, and Z velocity vectors, density, and stagnation values at each node.
ncell_data is an integer that sets, for each cell, how many data components it has. The default is 0 (one component).
When you set nnode_data or ncell_data, the Current data component option menu displays a option for each data component you specified. Select the data component you want to define.
The fields in the bottom portion of the panel (Data type, veclen, Data label, Special data ID, and Data values) are set for the currently selected data component.
Note that you set the type of the data (byte, int, float, and so on) for the current data component, not globally for the node data or cell data object. This allows different components to be of different types.
Use the Data type option menu to set the type of the data array subobjects.
Use the veclen field to enter an integer that sets the width (column index) of the values array that actually holds the numeric data.
Node_Data and Cell_Data have some number of components (nnode_data and ncell_data): (a, b, c). There is one Data_Array for each component. However, the components themselves can have subcomponents: (a, [b, c], d). b and c are the subcomponents of the second component. veclen defines the number of subcomponents in this Data_Array component. In the (a, [b, c], d) example, the first and third components' veclen = 1, while the second component's veclen = 2.
In Grids, veclen = nspace, where nspace is the number of coordinates associated with each node. Nodes that occur along a 1D line have one coordinate to specify their location, an X value, and nspace = 1. Nodes that occur in a 2D plane have two coordinates to specify their location, an X and a Y, and nspace = 2. Nodes that occur in 3D space have three coordinates to specify their location, an X, a Y, and a Z, and nspace = 3.
You can use the Data label field to specify a name for this component (e.g, "red," "green," "blue," "pressure," "temperature," "x-velocity," and so on).
Some AVS/Express macros that operate on fields use these strings to construct menus that let the user select, by name, which component of a field the macro should work on.
You can use the Special data ID option menu to assign a data identifier to the data component.
This ID can be used by other routine can discover what type of data it holds and treat it in a special way. In practice, this field is primarily used by the Graphics Display Kit routines to flag a component as GD_NORMAL_DATA_ID, GD_COLOR_DATA_ID, GD_RGB_DATA_ID, GD_RADIUS_DATA_ID, or GD_UV_DATA_ID.
For cell data, you can assign the following identifiers:
For node data, you can assign the following identifiers:
Use the Data Values field to enter or point to the array that contains the actual data.
You can export the ports for the data parameters you have specified by clicking Add ports for cell set parameters. AVS/Express displays the ports for the parameters at the interface to the object you are editing.
You can use the file access objects to import data from a file into AVS/Express in an array format that can be passed to a field mapper. The file access objects include:
- A file object that represents the name of the file you want and includes a pointer to the file in memory and an offset into the file.
- When you instance a file object, you set the name subobject to the pathname of the file containing the data. Once you set the name subobject, the file object's update method assigns values to the fptr, status, and offset subobjects.
- Reader file objects that you can use to import a subset of the data in the file:
- Search file objects that you can use to set the offset into an ASCII text file by searching for an expression or skipping over a specified number of lines or words:
Typically you use a file object to represent each input file you want to access, and then connect reader and search objects to the file object as needed. You can find the file access objects in the Network Editor in Accessories.Utility Modules.File Access.
An easier way to manage these objects is to use the Add File Module tool to create a file module containing them.
For background information on importing data, see the AVS/Express Visualization Techniques manual..
For detailed information about how to use these objects, see the on-line reference pages for each object.
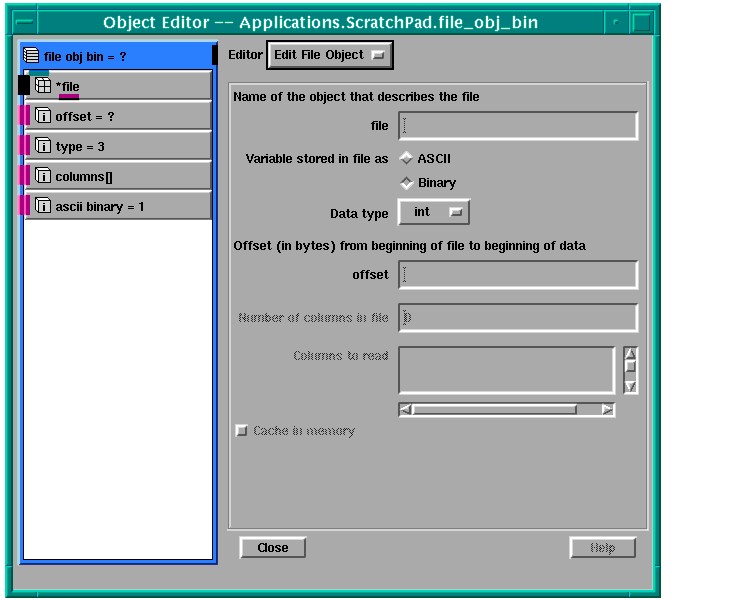
When you open the Object Editor with a file_obj, file_array_asci, file_scalar_ascii, or file_obj_bin object selected, AVS/Express includes the command File Object on the Editor option menu. When you select Edit File Object, AVS/Express displays the following dialog box:
You can use this dialog to specify the following characteristics:
- ASCII or Binary - Use the radio buttions labeled Variable stored in file as to specify whether the data in the file is in ASCII or Binary format.
- Data type - Use the Data type option menu to specify the type of data stored in the file.
- File offset - Use the offset field to enter the number of bytes of data AVS/Express should pass over in the file before beginning to read data. For example, you might want to skip over header information.
- Column specifics - Use the fields Number of columns in file and Columns to read to specify the column structure in the file and the columns you want to access.
- When you enter a number of columns, Columns to read displays a scrolling list of toggles, one for each column. Set the toggle on for each column you want to read.
- Note: The Number of columns in file and Columns to read fields are only active if you have set the ASCII radio button on this panel on and declared the variable as an array in Step 1.
- Cache in memory - Click the toggle Cache in memory if you do not want to create a store for the file data in AVS/Express memory. By default, AVS/Express caches the data.
- Caching the data can improve performance by reducing the number of times the file itself must be accessed. If the data is not cached, each time another object accesses this file variable, AVS/Express re-reads the data from the file.
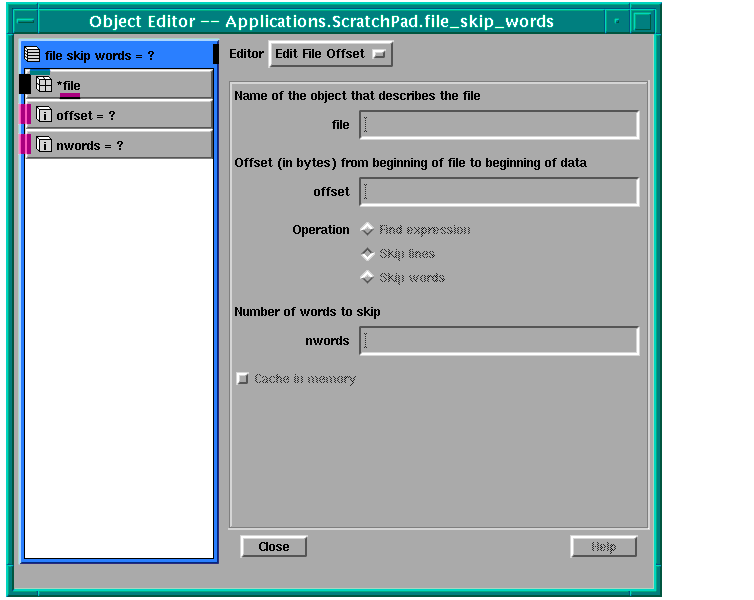
When you open the Object Editor with a file offset parameter (file_find_expr, file_skip_lines, or file_skip_word) object selected, AVS/Express includes the command File Object on the Editor option menu. When you select Edit File Object, AVS/Express displays the following dialog box:
You can use this dialog to set the following offsets:
- Offset in bytes - Use the offset field to enter the number of bytes to pass over in the file before beginning to read data. If you add one of the other operations, Find expression, Skip lines, or Skip words, the operation is applied in the file after this offset.
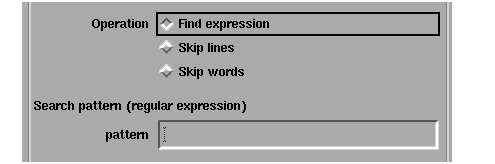
- Offset to an expression - To begin reading the file after a specified expression is found, click the Operation radio button Find expression. The editor panel displays the pattern field:
- Enter the pattern you want AVS/Express to search for in the pattern field. The file module will begin reading data after the first occurence of this pattern in the file.
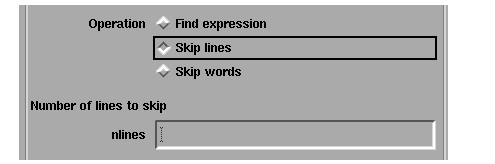
- Offset a number of lines - To begin reading the file after a specified number of lines, click the Operation radio button Skip lines. The editor panel displays the nlines field:
- Enter the number of lines you want AVS/Express to skip in the nlines field. The file module will begin reading data after passing over this number of lines in the file.
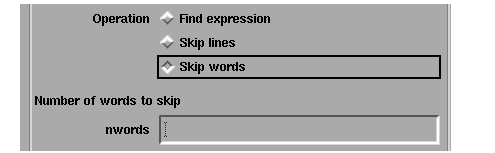
- Offset a number of words- To begin reading the file after a specified number of words, click the Operation radio button Skip words. The editor panel displays the nwords field:
- Enter the number of lines you want AVS/Express to skip in the nlines field. The file module will begin reading data after passing over this number of lines in the file.
- Cache in memory - Click the toggle Cache in memory if you do not want to create a store for the file data in AVS/Express memory. By default, AVS/Express caches the data.
- Caching the data can improve performance by reducing the number of times the file itself must be accessed. If the data is not cached, each time another object accesses this file variable, AVS/Express re-reads the data from the file.