5 Objects in AVS/Express
This chapter brings in more detail on the building block of the visual network: the object. We will start by discussing the types of objects there are, how they are organized, what they are organized in, how they relate to one another, and finally how to perform basic manipulations on them.
The sections of this chapter are:
- Defining Primitive Data Objects
- Defining Groups, Modules, and Macros
- Using the AVS/Express Object Libraries
- Understanding Libraries
- Instancing Template Objects
- Inheritance and the Derivation Hierarchy
- Setting an Object's Display State
- Connecting Objects
- Managing Object Attributes and Properties
- Customizing the Appearance of Network Editor Objects
- Network Editor Properties
Primitive data objects are the simplest base type object and are used to hold the raw system data. They are usually instanced as subobjects of a group or a module but can also be dropped into a macro as an independent piece of data. The following table lists the different types of data that are supported:
Each of the types above can represent either a scalar or a multi-dimensional array. Here are a few examples of different primitive data objects:
The ptr data type is used to store a pointer to a your data structure that may be passed from object to object. AVS/Express treats the entire data structure as a single entity; modules can be notified when the structure changes but cannot determine which pieces of the data have changed. AVS/Express cannot save and restore the value of a ptr object and does not communicate this ptr value between objects in different processes.
The byte, char, short, int, float, and double base types can be constrained by defining min/max/values subobjects for them:
- min - Establishes a minimum scalar integer or real value for the object
- max - Establishes a maximum scalar integer or real value for the object
- values - Defines a list (comma separated, within braces) of valid scalar integer or real values for the object
An attempt to set or get the value to or from an out-of-range value causes an error to be generated. Out of range set operations are not performed. get operations are clamped to the nearest valid value.
Since error checking is performed on set operations, errors on get values will occur when getting a value through a connection or when the min or max value has been changed after the value has been set.
Matching of objects prevent cases where the ranges do not overlap and reject these objects from being connected. Get/set value detection is only performed for scalar operands. Matching is performed for both scalars and arrays.
The boolean primitive base type is implicitly constrained, since the integer value of objects of this type can only be either 1 or 0.
Boolean data objects can connect to other data types that support an integer value, but this value will always be clamped to either 0 or 1 during the set or get operations as they go through the boolean object.
The enum primitive base type allows you to define objects whose value is restricted to one of a list of predefined values. The first index is zero. The list of possible string or integer values (comma-separated, bounded by braces) is specified by defining the choices subobject for the enum object.
You can define a simple enum object, my_enum, in V by typing:
You can set the value of my_enum by assigning either a string or integer value:
Likewise, you can get its value as either an integer or a string:
However, if my_enum's data type is used explicitly in an expression, it will be treated as a string. The following V command:
produces the following output:
The group, module, and macro base types are very similar in how they behave but are used in different situations.
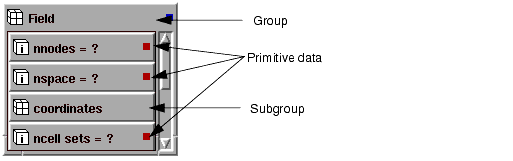
A group is used for an object that is a parameter to a module. It typically has primitive values and other groups as its subobjects. It is displayed in the Network Editor as a list. A typical group is the Field object:
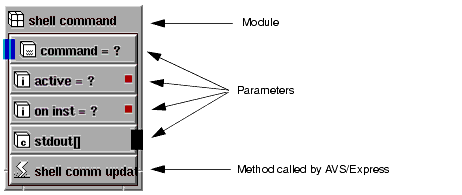
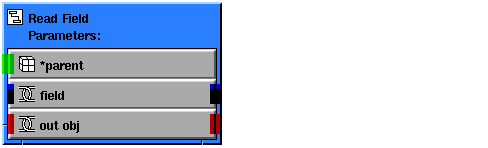
A module is used to define an object that has methods and parameters as its subobjects. It is the object that manages the interface to C and C++ code. A typical module is the shell command module:
Modules and groups are very similar and in some cases their roles overlap. You can have one module be a parameter to another module.
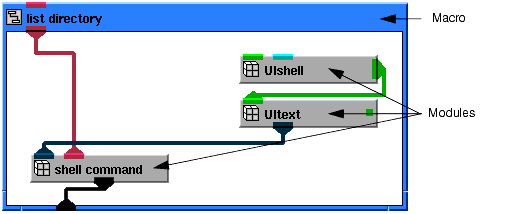
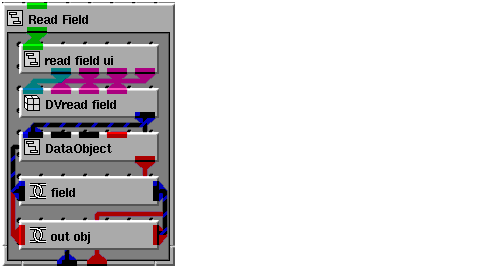
A macro is used to define an object that has modules, other macros, and links as its subobjects. A macro is typically displayed as a graph (or network) of the objects and connections it contains (Network Display Mode):
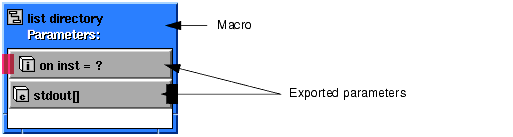
In the Visualization Edition, you may not be able to open some macros, particularly lower-level objects embedded in other macros, in this manner. Where this is the case you will see only a group-like list display of the exported parameters from objects in the macro (Display List mode):
The template objects in AVS/Express are organized into libraries.
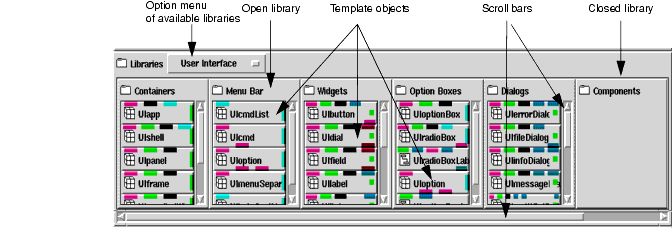
The top part of the Network Editor displays the Libraries object. This consists of a number of pages that represent the different top-level libraries. Only one page is visible at any time. You select a page using the Libraries option menu that contains the names of all available libraries:
Below is the page for the "User Interface" library:
A library page contains a number of libraries, arranged horizontally. If the page contains more libraries than can be displayed in the width of the Network Editor, the page displays a horizontal scroll bar at the bottom. You can use the scroll bar to see libraries that cannot be seen on the page.
A library may be closed, or opened to display its contents. A library contains a collection of template objects and can also contain other libraries (called sublibraries). You may need to use the vertical scroll bar on the right side of the library to see all the objects. You drag template objects from their library and drop them into the Network Editor workspace to build an application.
For more information on instancing objects, see Instancing Template Objects on page 5-25.
If a library is closed, you cannot see its objects. You can open or close a library by double-clicking on the library name; or by using the library pop-up menu. To display the pop-up menu, click the library name to select it and then hold down the right mouse button.
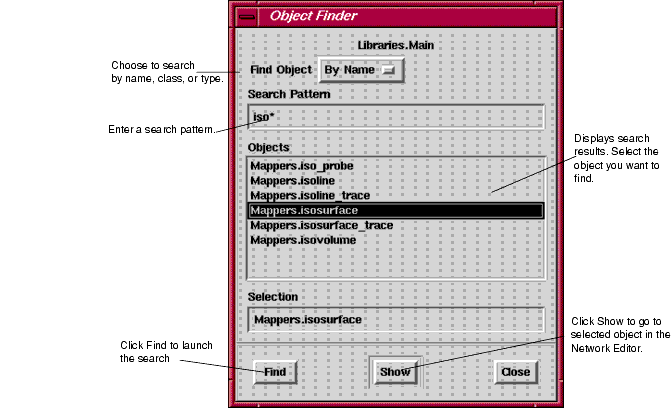
You can use the Object Finder to find an object in the AVS/Express object hierarchy. You can search through all the AVS/Express libraries or limit your search to a selected library or library page:
- To search the entire AVS/Express object hierarchy, choose, Find in All Libraries from the Object menu.
- AVS/Express begins its search at the top of the hierarchy and looks in all libraries in all library pages.
- To limit your search, select the library or library page you want to search, hold down the right mouse button to display the popup menu, and choose Find from the popup menu. Alternatively, you can select the library or library page, and then choose Find in Selected Library from the Object menu
- AVS/Express begins its search at the selected library or library page and looks only in the lower-level libraries contained in the selected library or library page.
In either case, AVS/Express displays the same dialog box:
To complete the dialog, perform the following steps:
- You can search by name, by class, or by type:
- By Name searches for objects whose name matches the search pattern. This is the default.
- By Class searches for objects whose template matches the search pattern.
- By Type searches for objects whose base type matches the search pattern. The base types are library, flibrary, macro, application, module, byte, char, short, int, float, double, string, ptr, prim, group, omethod, cmethod, cxxmethod, link, and mlink.
- The search is case insensitive. (i.e. ARTHUR = Arthur = arthur)
- You can include an asterisk or question mark as wildcard characters:
- An asterisk (*) represents zero or more characters. So Light* matches any name that begins with Light. *Light* matches any name containing Light. L*t matches any name beginning with L and ending with t.
- A question mark (?) represents a single character. So ?ight matches any name that begins with any character followed by ight.
- The Network Editor searches all branches of the object hierarchy under the selected library for matches, then lists the matches in the Objects list box. The first object in the list box appears in reverse video, meaning that it is selected.
4. Optionally, select a different object in the list box. The selected object appears in the Selection text field.
AVS/Express scrolls to the object in the Network Editor and selects it.
AVS/Express searches for files using the XP_VPATH environment variable
It is possible that name conflicts could arise if a V file with the same name lives at both the top-level project directory and the project's v directory.
The default XP_VPATH is set to include the project directory after the v directory for a project. XP_VPATH is specified as:
This allows you to place V files into your build_dir for your modules. This allows the entire source for a particular component to be conveniently placed in one directory.
IMPORTANT: If, when you save a file, you use a file name that is identical to an existing AVS/Express .v file, the new search path will result in AVS/Express using your file will in place of the standard AVS/Express file. This could produce unexpected results. It is strongly recommended that you do not use AVS/Express file names when you name your files.
A library contains a list of AVS/Express templates. Templates are inactive objects that you can copy to create other objects. Libraries can contain macros, modules, parameters and other libraries. Their primary goal is to arrange the collection of available AVS/Express objects into sets that share common behaviors and purposes.
You can add new libraries to existing Network Editor library pages using the Network Editor, simply by dragging a library object (found in the Standard Objects) up into that library. For example, dragging a library object into the Library_Workspaces library produces a new library `column' on that page.
The Templates library contains the actual V-definitions for all object templates. The Libraries hierarchy consists of links referencing objects defined in Templates. When you add your own libraries to AVS/Express, you must consider whether you want them in Templates only or if you also want them displayed on another page in the Network Editor, and if so, which page.
The organization of libraries and modules in AVS/Express is controlled by three V-files:
- templ.v defines all of the objects in Templates. It contains collections of objects organized into libraries.
- lib_xp.v (Developer Edition) or
- lib_vxp.v (Visualization Edition) contains pointers into Templates, but organizes the objects in a more useful way for visual presentation in the Network Editor. Objects in lib_(v)xp.v are of type NElink, which are just references to objects in Templates.
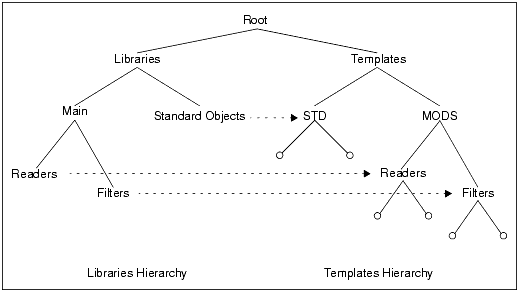
All AVS/Express objects are stored inside the Template object hierarchy. The Templates object itself is a library that contains other libraries. The nature of the Templates hierarchy is not appropriate for direct display in the Network Editor. The names of the libraries in the Templates hierarchy are usually short acronyms since these names are visible in the V language definition of the object. In addition, the libraries in Templates are stored in an order that defines their inter-dependencies and cannot be rearranged to suit a viewing preference.
Instead, the Network Editor displays another object defined as a child of Root called Libraries which contains a set of links into the Templates hierarchy. This structure allows the libraries in Templates to be given more readable names, and for their order to be rearranged. This structure is shown in the following diagram:
The last page in the standard Libraries object is a link to the Templates object itself. Use this page to create any new libraries and to access any libraries that do not have links from the Libraries hierarchy.
The Templates object is defined in the V file templ.v and the Libraries object is defined in the V file lib_xp.v. You can make changes to the Templates hierarchy directly using the Network Editor and save these changes by saving the project, but you must edit the lib_xp.v file manually in order to make changes to the Libraries hierarchy.
There are two methods by which you can make changes to the Libraries hierarchy. The method that you should use depends on whether you wish to inherit from the Libraries hierarchy of an existing project (most useful when you just want to add new libraries) or whether you wish to create a Libraries hierarchy that does not inherit from any other project (useful when you want to create a totally independent library structure).
In either case, the lib_xp.v file should only contain two kinds of AVS/Express objects:
You can use libraries to create new categories of objects that are shown in the Network Editor that are not defined in the Templates hierarchy. The NElink object is used to display a library in the Templates hierarchy at a specific location in the Libraries hierarchy. For example, the first few lines of the standard lib_xp.v file define the appearance of the Main page in the Libraries hierarchy:
library Libraries {
flibrary Main <NEdisplayMode="opened",needs_use_lic="GD DV",
NEhorizontal=1> {
NElink Readers<NEdisplayMode="opened"> = Templates.MODS.Readers;
NElink Filters<NEdisplayMode="opened"> = Templates.MODS.Filters;
NElink Mappers<NEdisplayMode="opened"> = Templates.MODS.Mappers;
NElink Imaging<NEdisplayMode="opened"> = Templates.IP.Macros;
NElink Viewers<NEdisplayMode="opened"> = Templates.VIEW.Viewers;
NElink Writers<NEdisplayMode="opened"> = Templates.MODS.Writers;
NElink Geometries<NEdisplayMode="opened"> = Templates.GEOMS;
NElink Colormaps<NEdisplayMode="opened"> = Templates.DATAS;
NElink Array_Modules<NEdisplayMode="opened"> =Templates.MODS_ARR;
NElink Field_Mappers<NEdisplayMode="opened"> = Templates.FLD_MAP;
};
.....
Before making changes to the lib_xp.v file, it is useful to understand the definition of the Network Editor properties (see Network Editor Properties on page 5-62).
If you want to use a Libraries hierarchy that inherits from that of an existing project, you should create a new project and then create an lib_xv.v file that takes the form shown below in the project's v subdirectory:
"old_proj_dir/v/lib_xp.v" Libraries {
flibrary OURS{
NElink OURS<NEdisplayMode="open"> => Templates.OURS;
};
};
To create a independent Libraries hierarchy that does not inherit (and will not therefore reflect changes made to the library structure of) the AVS/Express install or any other project, you should create a new project and then copy v/lib_xp.v from the install area into the v subdirectory of the new project and make appropriate modifications to that file.
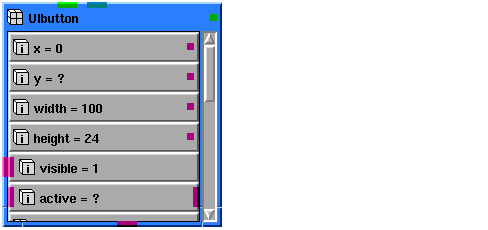
It is important to have a way to uniquely identify every template object in the system. In some cases, it makes sense to simply define global names that are unique in the system. There is only one object in the system, for example, called UIbutton. In the V language, you can create an instance of the template UIbutton with the V statement:
In other cases, it makes sense to use the name of the library so that the name of the object need only be unique for that library. This mechanism partitions the name space into easily managed sets. The clamp object, for example, must be created by specifying the library name MODS along with the object name:
A global library does not require that its name be used to access its subobjects. The UI library is global, the MODS library is not. You can tell which libraries are global by using the $list command on the Templates object. Global libraries are defined either using the base type library or save their type with the string +global.
When you copy a template object to form either another template or an instance, usually the system makes a derived copy of the object. A derived copy retains a handle to the object that it was copied from. When you save the copy, only the changes that were made to the copy that differentiate it from the original object are saved. For example, if we define the following V construct
when saved, the object copied_obj saves itself in the same way you entered it. In this way, if we later make a change to base_obj's b subobject, this change is inherited by copied_obj.
Sometimes, having libraries make derived copies is not desirable. When you define a library of objects, you do not want instances or templates to be derived from that library. You can do this by setting the user_library property to zero on a library. For example, with the above example defined as:
library MYLIB<user_library=0> {
group base_obj {
int a, b;
};
base_obj copied_obj {
a = 3;
int c;
};
};
when we save copied_obj, it is saved as
This property is particularly useful when you are rearranging objects that are already defined in a library without the user_library=0 property. In this way, V files that are saved only reference the original objects, not the rearranged versions.
- Note: Do not set the user_library property to 0 on libraries that define C++ modules (using the cxxmethod). Instances of C++ objects must have a reference back to the template from which they were defined.
There are two base types from which you can build a library in AVS/Express: library and flibrary. The library base type is global by default and used only for simple libraries. The flibrary base type is more general since it can be made global or not, and can optionally store the definition of the objects it contains in a separate V file.
The first major decision that you must make when defining a new library is whether you want to define and maintain your objects using the V language or using the Network Editor. If you are defining modules (i.e., objects that interface to code) and you are defining more than just one or two, it is recommended that you invest the time to learn the V language to specify the precise attributes you want. For more information on using V-code see Chapter 7 of this manual. If you are defining macros, the Network Editor is a better mechanism for visually understanding and editing these objects.
Since the Network Editor saves its objects using fairly readable V, it is not too difficult to switch back and forth between the two ways of editing. If you define objects in V, load these descriptions into the Network Editor and save the resulting description, you will lose your specific formatting and all but specially defined comments.
To define a library that you edit using the Network Editor:
2. If you want your library to be global, select the library object; if you want your library not to be global, select the flibrary object.
5. A new library will be inserted at the end of the Templates library list (scroll all the way over to the right).
6. You can now change the name of this library. Make sure that the name you choose does not conflict with the name of any existing libraries.
To create a library that maintains objects directly using the V language, follow the instructions above except you must select an flibrary object in step 2 (a library object is not valid). Once you have defined a new flibrary object, bring up the Properties editor and set the libfile property to a string that contains the name of a V file. You can specify the libfile property with the absolute pathname of a V file or a relative pathname. If you use a relative pathname, the V file must be located in the path relative to the v subdirectory of your local project directory (or any project directory defined in your XP_PATH).
The objects defined in the specified V file are loaded as subobjects of the flibrary. If you defined a V file as
your library would contain the two objects my_module1 and my_module2.
The V file specified by the libfile property is loaded the first time that the subobjects of this library are accessed. This might be when the Network Editor is first asked to display these objects or when someone loads a V file that references one of your objects. If the library is global, the libfile is loaded right when the process starts.
When you save a project that has flibraries with libfiles, it saves the definition of the flibrary but does not save the definitions of the objects defined in the flibrary. The templ.v file you get when you save a project containing a simple flibrary with a libfile is
You can therefore define a project that has a combination of both libraries defined and edited through the Network Editor and libraries defined using the libfile property in the same project.
If you specify the value of the libfile property without a .v suffix, for example
the system automatically maintains a binary V equivalent of your text V file. This can improve the start-up time of an application significantly if your text V file is large. It also gives you a way to provide a user with the functionality of a particular library of objects without providing them with a readable description of the V code that defines these objects.
The first time a subobject of your library is accessed, AVS/Express looks in the v subdirectory of your XP_PATH for a libfile with a .vo suffix (a binary V file) and a libfile with the .v suffix (the text V file). There are several different cases that are handled:
- If AVS/Express does not find the binary .vo file, it tries to load the .v equivalent and generates a binary V file in the local project's v subdirectory with the .vo suffix.
- If AVS/Express does find a .vo file and there is no .v file with a more recent modification time, it loads the .vo file.
- If AVS/Express does find a .vo file but there is a .v file with a more recent modification time, it loads the .v file and generates a new .vo file in the local project's v subdirectory.
Note that if AVS/Express finds a .vo file and there is no .v file in the path, this is not considered an error. It is assumed that the .vo file is up-to-date.
There are a few caveats to using this functionality:
- If you have nested flibraries with libfiles, you must use binary V libfiles only at the inner level. To disable this feature, ensure that you specify a .v suffix explicitly in the libfile property for your outer flibrary.
- If your V file includes any other files or uses #defines that are defined in a separate V file, the .vo file can be out of date when AVS/Express does not detect this condition. You must either avoid using the binary V libfile mechanism or manually remove the .vo files when the includes or #defines change.
- To prevent AVS/Express from loading any .vo files, you can set the environment variable: OM_NO_BIN_LIBS.
- If AVS/Express encounters errors while reading a .v file, it does not generate the .vo file.
To access some of the more sophisticated features of libraries, you need to be able to merge additional base types into the library specification which you cannot do with the Network Editor. This is easy to do using the VCP. The objects you define can be accessed in the Network Editor and will be saved when you save your project.
In the VCP, traverse to the Templates object and simply enter the following statement to create an flibrary called MYLIB with the libfile property set to my_lib.v:
To define a global flibrary using the VCP, you enter
To define an flibrary whose objects are sorted alphabetically, you can use
For V files that contain large numbers of complex objects that are likely not to be used in any particular session, you can define a library to be buffered. When the system loads a buffered library, it delays the parsing of the V definition of the objects in the library until an attempt is made to copy one of these objects (either for another template or for an instance) or until these objects are selected in the Network Editor. When objects are in a buffered state, they are displayed in the Network Editor with parentheses around the name.
You can define a buffered library using the VCP with
OM(Root) -> Templates {
OM(Root) -> flibrary+buffered MYLIB;You can use the buffered base type with the libfile property.
This section explains how you can customize the Network Editor libraries so that you can add your own library pages or remove or change existing Network Editor libraries.
- Note: This section assumes some familiarity with V-code and libraries. For more information see Chapter 7, V and the V Command Processor and Chapter 15, Application Design Issues
The organization of libraries in AVS/Express is controlled by the V-files templ.v, lib_xp.v (Developer Edition only) and lib_vxp.v (Visualization Edition only). templ.v contains the definition of all template objects. lib_(v)xp.v contains pointers into Templates.
Some of the library objects contained in lib_(v)xp.v refer to actual object definitions in Templates:
Many objects in AVS/Express are stored in multiple places in the library hierarchy for more convenient access. Some libraries consist entirely of objects defined elsewhere in the hierarchy, rather than referring to one library object defined in templ.v.
For these libraries, there is an intermediate layer of objects which does the actual collecting of various modules into visually useful groups. This layer is represented by the Templates.NELIBS object, which is defined in ne_libs.v. For example, look at this definition in lib_xp.v:
In ne_libs.v, the definition for the NE_DATA_IO object just includes instances of other objects defined elsewhere in Templates:
flibrary+buffered NE_DATA_IO<user_library=0> {
...
MODS.Read_Volume Read_Volume;
MODS.Read_Image Read_Image;
MODS.Read_Field Read_Field;
MODS.Read_UCD Read_UCD;
MODS.Plot3d_Multi_Block Plot3d_Multi_Block;
MODS.Read_Column_File Read_Column_File;
...
};
If you want to modify the pages in the Network Editor, (either adding your own libraries or removing or changing existing libraries), you must change the library definitions in lib_(v)xp.v.
You can copy the lib_(v)xp.v file from <express>/v to your project/v directory and edit it. You will likely use this technique so that you can put your libraries in between existing ones, rather than all at the end.
You can create a lib_(v)xp.v file in your project V directory. Access the install version of lib_(v)xp.v from within this file:
"$XP_PATH<0>/v/lib_xp.v" Libraries {
flibrary My_App_Macros {
NElink My_UI_Macros => Templates.App_Lib1.UI_Macs;
};
};
Remember that this copy of lib_(v)xp.v will supersede the version in <express>/v because of XP_PATH. If you use this technique all of your libraries will be added to the end of the current library list.
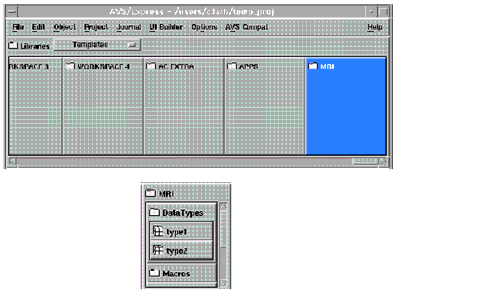
This section describes how you can add a library page named "MRI" to AVS/Express' libraries.
Suppose you have this library of objects in the file mri_lib.v:
flibrary Top {
flibrary DataTypes<NEdisplayMode=îNEopenedî> {
group type1 {
...
};
group type2 {
...
};
};
flibrary Macros<NEdisplayMode=îNEopenedî> {
macro mac1 {
...
};
macro mac2 {
...
};
};
flibrary Modules<NEdisplayMode=îNEopenedî> {
module mod1 {
...
};
module mod2 {
...
};
module mod3 {
...
};
};
flibrary OtherStuff<NEdisplayMode=îNEopenedî> {
flibrary folder {
...
};
group some_obj;
};
flibrary Closed<NEdisplayMode="closedî> {
group new_group {
...
};
...
};
};
Reference the library in templ.v:
This creates a library called "MRI" in Templates. It contains the objects defined in mri_lib.v, that is, the "Top" flibrary:
To get a library for the Top library within the Libraries hierarchy, modify lib_(v)xp.v:
Specifying an object under the Libraries object creates a top level library, that is, the library appears as a page in the Network Editor. In this case the library is named "mri_Page". It doesn't matter that the library is called "Top" in templ.v and the object representing it in Templates is called "MRI".
Notice that in this example the libraries are open in both the Templates area and the Libraries area, since the NEdisplayMode property is specified in the definition of the object. If you wanted the libraries closed in Templates, but open in Libraries, you could write your code this way:
flibrary Top {
flibrary DataTypes {
group type1 {
...
};
...
};
flibrary Macros {
macro mac1 {
...
};
...
};
flibrary Modules {
...
};
};
"/usr/express/v/lib_xp.v" Libraries {
flibrary mri_Page<NEdisplayMode="open"> {
NElink DataTypes<NEdisplayMode="open"> =>
Templates.MRI.DataTypes;
NElink Macros<NEdisplayMode="open"> =>
Templates.MRI.Macros;
NElink Modules<NEdisplayMode="open"> =>
Templates.MRI.Modules;
NElink OtherStuff<NEdisplayMode="open"> =>
Templates.MRI.OtherStuff;
NElink Closed =>
Templates.MRI.Closed;
};
};
Other useful features that allow customization of the Network Editor include:
- The NEnumColors and NEcolor<n> properties to specify the color of an object's port and connection lines.
- NEpixmapMode, NEiconDisplayMode, NEsmallPixmapName or NElargePixmapName to specify icons on your objects.
- NEbackgroundPixmap to specify the background of a macro.
- ne_prefs.v (create a copy of the version in the install directory). You can set the default font used in the NE type-in widgets, and inside the main NE window the highlight color for a selected object, and so on.
- On UNIX systems, you can also set X resources (which will take precedence over a corresponding value set in ne_prefs.v).
This section explores the basics of bringing objects into use and relating them to each other.
Instancing means creating an object that executes its methods. Whenever you create an object that is a child of an object that is itself instanced, the new object is also instanced.
By default, all the children of the Applications object are instanced. The Applications object and its children are displayed in the lower portion of the Network Editor, just below the current library page.
Children of the Applications object can be either closed or maximized. Only one of Application's children can be maximized at a time. This child is referred to as the current application workspace.The most common way to instance an object is to make a copy of a template object by dragging and dropping it into an object in an application workspace.
To instance a template object using drag-and-drop:
- For example, if you want the object to be an immediate subobject of an application, make sure that the application is selected. If you want the object to be an immediate subobject of some other object in the application, make sure that object is open or maximized.
- You may have to open and scroll libraries (and perhaps sublibraries) to make the object visible. Alternatively, you can use the Object Finder.
3. Point to the object, hold down the left mouse button, and drag the object into the parent object.
- As you drag the object, the Network Editor displays a cursor and status bar message indicating the current operation, and it highlights in pink the object into which the instanced object will be placed if you release the mouse button. Also, when the pointer reaches an application workspace, a rubberband outline appears that indicates the location at which the object would be placed.
AVS/Express instances the object and assigns it a name that unique among its siblings. For example, if you instance UIcmd, AVS/Express names the new object UIcmd. If a sibling object called UIcmd already exists, AVS/Express names the new object UIcmd#1.
Using the Object -> Load Objects command it is possible to bring objects defined in .v files into a project or library.
If loaded objects have the same name as existing objects the loaded object is renamed to <object_name>#1. For example, if the current application contains an integer named xavier, and a V file containing a float named xavier is loaded into the current application, then the float xavier is renamed to xavier#1.
The ne_prefs.v subobject allows for replacement of objects, if desired. If the value of NEpreferences.loadedObjectsReplace is set to 1, then loaded objects will replace existing objects with matching names.
Usually, when you create an object as a child of an instanced object, it too becomes instanced. The system only executes methods in instanced objects. The Applications object in the system itself is instanced and therefore objects created in this hierarchy are instanced. There are two cases where this is not true:
- Objects of base type library or flibrary are never instanced (and consequently their children are also not instanced).
- Objects that have the instanced property set to 0 are not instanced.
When you set the instanced property on an object it can change the instanced state on the objects that are children of that object. If you set the state of the instanced property to 0 on an instanced object, all subobjects are de-instanced. This causes the de-instance methods of these objects to be called. If you set the state of the instanced property to 1 on a de-instanced object, it instances all the subobjects causing instance methods to be called.
The ScratchPad object in the File->New Applications menu of the Network Editor has the instanced property set to 0. This means that it, and any objects created in it, are not instanced. The ScratchPad object also has the property NEscratchPad set to 1 which means that objects dragged out of editable libraries are moved rather than copied.
A combination of these two features makes the ScratchPad useful for editing objects that interface to code. AVS/Express does not attempt to run methods that are not fully defined and makes it easier to replace the object into the library when you are finished.
You can merge two group objects into one. A merge operation creates a new object that contains all of the subobjects of the two objects that were merged.
To create an object that is the merger of two group objects:
4. While holding the Ctrl key down, hold down the left mouse button and drag the second object into the first object.
- The Network Editor displays a cursor and status bar message indicating the current operation. When the pointer reaches the first object, the Network Editor highlights the object in yellow.
- The Network Editor merges the second object into the first one. If the second object was instanced, it is deleted.
As already described, objects can contain other objects: modules can contain methods and parameters, macros can contain modules and other macros, and applications can contain all other objects.
An object's parent is the object that immediately contains it. When you instance an object, the object you drop it into becomes it parent.
Reparenting an object means changing its parent object in the object hierarchy.
You can reparent objects by dragging and dropping them with the mouse.
To reparent objects using the mouse:
1. Arrange objects so that the objects you want to reparent are visible and the target object is visible and open.
- As you drag the objects, the Network Editor displays an outline of them and moves that outline. The Network Editor also displays a cursor and status bar message indicating the current operation, and it highlights in pink the window where the objects will be placed if you release the mouse button.
This section described the method and types of inheritance in AVS/Express.
There are two kinds of inheritance. In the first, single inheritance, the object inherits its definition from the template from which it was created. In the second, multiple inheritance, the object inherits its definition from multiple sources.
A group, module, or macro object inherits the definition of the template from which it was created, including subobjects, reference mode, array declaration, value expression, attributes, and properties.
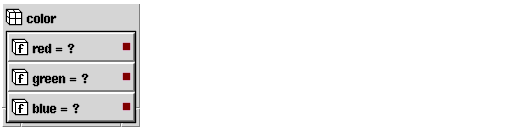
For example, you create a template called color. Remember that to create a template you place the object in a library. Here is color, shown open:
The color object is created directly from the base type group and so it does not have any objects in its derivation hierarchy.
You then create an instance of color, called color1, shown here open and accompanied by its Object Info dialog:
Here's the underlying V code, which you can view in the VCP with the $print command:
color1's type is color, so color1 inherits color's definition: it too is a group and it too has subobjects red, green, and blue.
An object can have multiple types. This is called multiple inheritance or a merging of object templates.
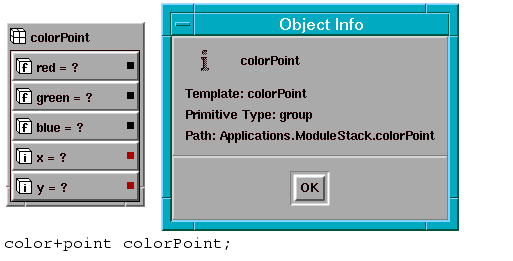
For example, you create another template, called point:
You can create a new template called colorPoint, which inherits the definitions of both color and point, as described below. colorPoint is shown here, open and accompanied by its Object Info dialog:
In the Network Editor, you create an object with multiple inheritance by dragging down an object of the first type, then dragging down the second type with the Ctrl key pressed and dropping it onto the first object.
In V, when you create an object with multiple inheritance, you list all of the types you want to create separated by a "+" symbol:
If the objects being merged have similarly named subobjects, the subobjects themselves are merged. Where one of the subobjects has a characteristic that the other doesn't specify, AVS/Express uses the specified characteristic. Where both specify the same characteristics (for example, both specify an array declaration), AVS/Express resolves the conflict in favor of the type that is merged last (in V, that is the rightmost type in the type list).
Each object has a derivation hierarchy, indicating the object's chain of inheritance. At the top of an object's derivation hierarchy is the base type, such as group or macro.
- Note: The derivation hierarchy is different from the object hierarchy. The derivation hierarchy describes how an object inherits its definition. The object hierarchy describes containment of objects within objects. See AVS/Express Object Hierarchy on page 1-10 for more detail.
For example, you create an instance of ColorPoint:
ColorPoint1's derivation hierarchy looks like this:
You use the following terms for the derivation hierarchy. (The table's examples refer to the previous figure.)
Table E-1
You can modify a template object. These modifications ripple down the derivation hierarchy to derived templates and instances of the template. Changes ripple when the derived template or instance is reloaded into AVS/Express.
You can modify a derived template or instance, for example, by modifying or adding subobjects. The modifications are unaffected by subsequent modifications to the base template.
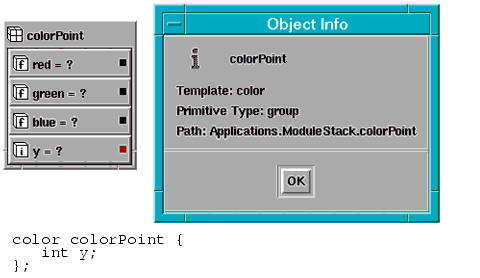
CAUTION: If you delete a subobject that is inherited by a derived template or instance, AVS/Express removes any objects from the derivation hierarchy that defined that subobject. For example:, if you delete the x subobject of the ColorPoint object above, the point template is removed from the derivation hierarchy of ColorPoint. It now looks like:
An object can be in one of three display states:
- Here is a closed object:
- Open - The object is open, allowing you to view it in greater detail or edit it. If the object is a primitive, it includes a typein that displays the object's current value and allows you to enter a new value or reference expression:
- If the object is a group or macro, it displays the object's children. If it is a reference to a group, it displays both the reference value and the children.
- Here is an open group:
- In the Visualization Edition, this is the default mode you will see when you Open most objects. In the Developer Edition you see all objects in network mode, unless you choose to open it using the Display Params popup command.
- Here is the same macro opened in network mode:
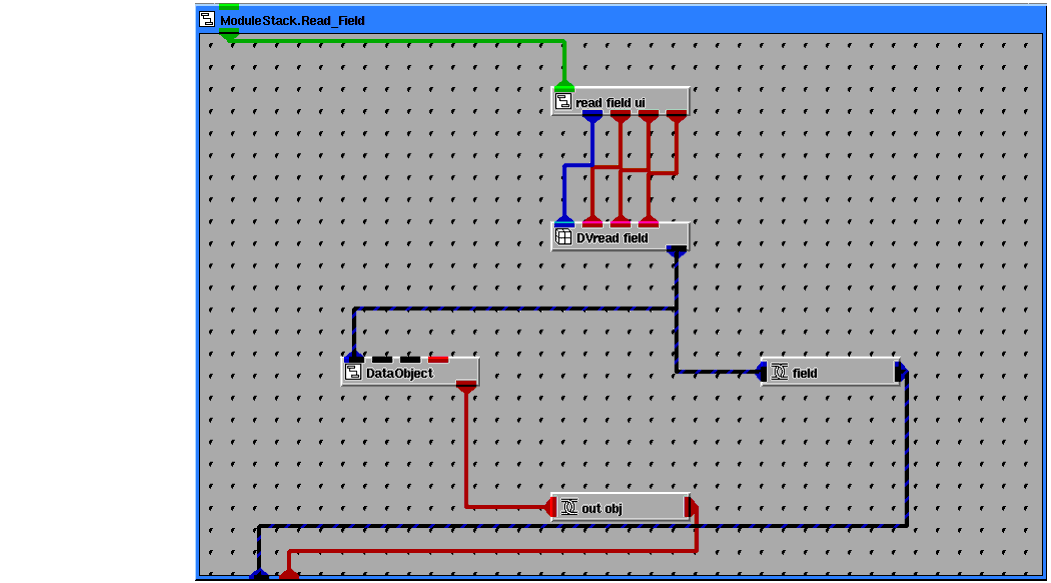
To see the structure of the components that make up a macro more clearly, you can maximize an open macro:
- Maximized - The object is open to the maximum area available, temporarily replacing the current application workspace. Macro objects are the only objects that can be maximized. When an object is maximized, it displays in its title bar the "path" to the object, proceeding down the hierarchy, starting at the Applications object (e.g., DefaultApplication.Read_Field.DataObject).
You can set an object's display state with a popup command or by double-clicking on the object.
To set an object's display state with a popup command:
The commands that are available depend on the edition of AVS/Express you are running, the type of object, and its current state. For example, Maximize is available only for a macro object, and only when the object is not already maximized.
The Reduce command changes the display state of a maximized object to open.
To set an object's display state by double-clicking:
- For a primitive, group, or library object, the display state toggles between open and closed.
- For a macro or application object, the display state toggles between maximized and closed.
Double-clicking is a convenient method for quickly navigating up and down a hierarchy of macros.
To share data between objects in the application workspace, you connect one object to another through ports displayed on the objects' icons.
A port exposes an object, enabling you to graphically (that is, with a connection line) connect the object to another object in the Network Editor.
A connection represents a data reference in the Object Manager. You add ports to objects for which you want references to be manipulated graphically. References involving objects without ports can exist, but they are not displayed in the Network Editor.
A port can appear in any of four locations. Ports on the left and right sides of an object icon expose the object itself. Ports on the top and bottom of the object icon expose subobjects of the object. Ports that are opposite each other refer to the same object.
- Through the object's input port, the object can reference (that is, be connected to) another object's data.
- Through the object's output port, the object makes its data available to some other object.
- Through a subobject input port, a subobject can reference another object's data.
- Through a subobject output port, a subobject makes its data available to some other object.
Ports are color-coded to visually suggest the object's type. This helps you determine which objects are compatible. AVS/Express allows you to connect only compatible objects.
For information on setting port colors, see Customizing Port and Connection Colors on page 5-57.
To view subobject port information for an object:
- The Info dialog box appears. Here is a sample Info dialog box:
The dialog box provides, among other things, a summary of the object's input and output subobject ports.
To quickly view the name of an object associated with a subobject port:
- The object is highlighted in green, and a message of the following form appears in the status bar at the bottom of the Network Editor window:
- Port: object_name...subobject_name (move pointer to connect/disconnect)
You can add an input or output port to an object using the popup menu. For each port that does not exist, the popup menu contains an entry to add it.
You cannot add an input port to a group object unless it is a reference or a pointer.
Exporting a port means exposing it as a subobject port at the level of its parent.
If a port is not already exported, you can export it:
You can export a port on a child of an open or maximized macro object using a connection line. The connection line extends from the port to the frame of the macro window.
To export a port using a connection line:
2. Hold down the left mouse button and drag the mouse pointer toward the top (for an input port) or bottom (for an output port) of the macro window.
- When you press the left mouse button, the Network Editor shows all of the allowable connections and disconnections, including connections to ports on other objects in the macro. As you move the mouse pointer, the Network Editor highlights the connection line that most closely matches the location of the mouse pointer, and it highlights the two objects at each end of the highlighted connection. It also displays a status bar message indicating the current operation.
3. When the Network Editor has highlighted the macro window border in green, release the mouse button.
- A green highlight indicates a connection, while a dark green highlight indicates a disconnection.
- While dragging the mouse pointer, you may decide that you do not want to export the port. To cancel a connection operation in progress, drag the mouse pointer back to the port so that no connections are highlighted, then release the mouse button.
When you point to a port that is not exported, the object popup menu contains an entry that you use for exporting the port.
To export a port using the object popup menu:
You can remove a port from an object, unless the port is exported or a connection to the port exists. You use the object popup menu to remove a port.
To remove a port using the object popup menu:
You can unexport a port by removing it from each ancestor to which it is exported, starting at the outermost level. Alternatively, you can unexport a port from a macro subobject by breaking the connection line from the port to the macro window frame.
To unexport a port by breaking a connection line:
2. Hold down the left mouse button and drag the mouse pointer toward the other end of the connection.
- When you press the left mouse button, the Network Editor shows all of the allowable connections and disconnections, including connections to ports on other objects in the macro. As you move the mouse pointer, the Network Editor highlights the connection line that most closely matches the location of the mouse pointer, and it highlights the two objects at each end of the highlighted connection. It also displays a status bar message indicating the current operation.
3. When the Network Editor has highlighted the macro window border in dark green, release the mouse button.
- A green highlight indicates a connection, while a dark green highlight indicates a disconnection.
- While dragging the mouse pointer, you may decide that you do not want to break the connection. To cancel a disconnection operation in progress, drag the mouse pointer back to the port so that no connections are highlighted, then release the mouse button.
- Note: The Network Editor uses a property called NEportLevels to store port information for an object. All of the port operations described in the previous sections modify the NEportLevels property. You can set port levels for an object by directly changing the NEportLevels property using the Properties Editor.
For more information of the NEportLevels property see Setting Port Levels with the Properties Editor on page 5-55.To connect objects with a connection line:
1. Make sure the object ports you intend to connect are at the same level in the object hierarchy and that both ports are visible.
- When you press the left mouse button, the Network Editor highlights in green the object with the port. It also shows all of the allowable connections and disconnections. As you move the mouse pointer, the Network Editor highlights the connection line that most closely matches the location of the mouse pointer, and it highlights the object at the other end of the connection. It also prints a status bar message indicating the current operation.
- A green highlight indicates a connection, while a dark green highlight indicates a disconnection.
- While dragging the mouse pointer, you may decide that you do not want to make a connection. To cancel a connection operation in progress, drag the mouse pointer back to the port so that no connections are highlighted, then release the mouse button.
Primitive data objects can always serve either as the initiator or destination of a connection. When you are making simple connections between primitive data objects, although these connections respond symmetrically to read and write operations, there are two significant differences between connecting object a to b and connecting b to a:
- In the NE an object that has a connection cannot be connected to another object without breaking that connection. If you intend to create a chain of three connected objects, you will only be able to extend this chain using the value of the first object in the connection.
- The object that is receiving data from the other object loses its value when the connection is made. If the initial value of one object is important, make that object the one connecting through its output port. Any information the object receives from its input port will wipe out the data value currently in it.
For example, there are two unconnected objects, a and b:
Since object a has a default value, if it is the destination of the connection (i.e. "b"s output port [the right side port] is connected to "a"'s input port [the left side port]) it loses its value and inherits the value of b (which in the case is not set):
If a new object c is introduced, it can only be connected to a in this case since b is already connected to a.
A connection between two objects is stored in the object that is on the input side of the connection. You can see and set the connection in the object's value box.
To connect objects through a value box:
n In the value box for the object that is on the input side of the connection, enter the name of the other object.
- You precede the object reference with the connection operator (=>).
Many objects are set so that enumerated values can be used when setting subobjects. In most cases, this will not cause any issues. However, if your application makes use of some of the AVS/Express examples, you might run into problems.
If your application makes use of AVS/Express examples and you experience problems, you should verify string/enum connection statements. For example, if your application has enum=>string you should change it to string=>enum
If your application "assigns" the string rather than connects it, you shouldn't experience any problems.
If you are trying to connect objects and the Network Editor will not let you, consider the following possible reasons:
- The ports are not at the same level in the object hierarchy.
- The objects you want to connect have incompatible data types.
- The input object is a scalar and is already connected to another object. The input port of an object can be connected to several objects only if it is an array. If an object has no visible connection, you can determine if it is connected to another object by opening it and looking at its value box. If the value is of the form "=> object_name", the object is already connected.
- When connecting groups, the input object's reference mode is not by-reference or by-pointer.
To disconnect objects by breaking the connection line:
3. Once the Network Editor has highlighted the connection you want to remove, release the mouse button.
The objects to be disconnected are highlighted in dark green, rather than light green.
To disconnect objects with a popup command:
To disconnect objects through a value box:
n In the value box for the object that is on the input side of the connection, remove the object reference.
- Enter the connection operator (=>) followed by nothing.
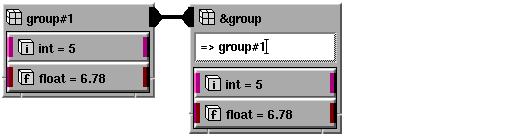
You can view and set values for the subobjects of a group through a reference to the group.
When a group reference is open, it includes a typein value box that indicates the name of the referenced group. The referenced group's subobjects are displayed. If the reference is currently unassigned, the subobjects displayed are those of the reference template.
For example, if you have a group with an int subobject, and the group's reference mode is & (by-reference), the group appears as follows when it is opened in the Network Editor:
If this object is then connected to another group with an int and float subobject, the reference object will display the subobjects of the group that it references:
You cannot perform port operations on the subobjects of an open connected group reference, since those subobjects are actually located elsewhere in the object hierarchy.
For more details on connections between various objects, see Setting the Reference Mode of a Group, Module, or Macro on page 6-10 and the rest of Chapter 7.
All objects have a set of defined characteristics called their properties and attributes. These properties and attributes control the appearance and behavior of the objects.
This section uses the property editor to introduce the system of attributes and properties that control the appearance and behavior of objects. All these can be manipulated through the properties editor or in V code.
For a summary of all the properties and attributes you can change using the Properties Editor, see Network Editor Properties on page 5-62.
- Note: In addition to the Properties Editor, AVS/Express provides several tools which provide an easy interface to the properties you most often need to set when adding a module, editing an existing object, or managing the specialized field and file objects. These are discussed in Chapter 6 and Chapter 9.
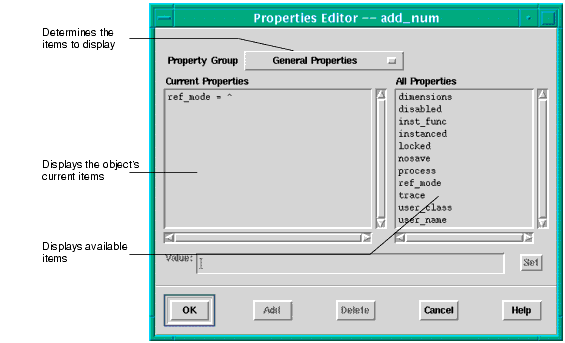
The Properties Editor is a dialog box that lets you view and edit the assignable characteristics (properties and attributes) of an object. Note that properties and attributes, which are treated differently in V, are viewed together in the Properties Editor.
Here is a sample Properties Editor:
To display the Properties Editor for an object:
n Select the Properties popup command for the object. Or select the object, then select the Object->Properties pulldown command.
The Properties Editor divides properties and attributes into functionally related property groups. The Property Group popup determines the type of items listed in the All Properties and Current Properties list boxes. By default, Property Group is set to General Properties, so these are the group of properties and attributes that you will first see.
The following property groups are available:
The property editor does not display properties that are not applicable to the current object. For example, code management properties do not apply to primitive objects, so that property group does not appear in the option menu.
When you select a category on the Properties Group option menu, all properties in that group that apply to the object are placed in the All Properties list box, and all properties in that group that are currently defined for the object are placed into the Current Properties list box.
You can display the online documentation for an item in Current Properties or All Properties. Do the following:
- AVS/Express displays the reference documentation for the selected property.
You assign an item to an object by adding it to the Current Properties list box. Do the following:
- Array declaration is listed as dimensions. Reference mode is listed as ref_mode.
- Adding an item to Current Properties does not change the object's definition until you select the OK button.
Once an item is in Current Properties, you can set its value. Do the following:
- The Network Editor displays the item's current value in the Value field. If the item is an attribute, it is just a boolean flag, and it has no value. In this case, the Value field is grayed and contains no text.
- The value you enter in the Value field for a property must be a constant. The type of constant depends on the property. It can be:
- The Network Editor updates the item in the Current Properties list box.
- The object's definition changes only when you select OK. OK changes the object and removes the Properties Editor. You can make any number of changes before selecting OK.
To remove an item from Current Properties:
- The object's definition changes only when you select OK. OK changes the object and removes the Properties Editor. You can make any number of changes before selecting OK.
Since AVS/Express applies changes only when you press OK, you can cancel the changes any time before then. Do the following:
To view an object's reference mode look at the object's icon or display the Properties Editor for the object.
In the object's icon, if the reference mode is by-reference (&) or by-pointer (*), the symbol & or * precedes the object's name. If the reference mode is by-value (^), nothing precedes the name.
In the Properties Editor, the reference mode appears in Current Properties under ref_mode.
To set an object's reference mode:
- If the object has an array declaration, the dimensions property will be set and therefore visible (with the declared value) in the Current Properties list box.
c. If the object does not yet have an array declaration, add the dimensions item from the All Properties list box to the Current Properties list box.
d. Modify the dimensions property by selecting it from the Current Properties list box and editing its associated value.
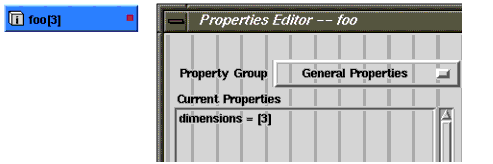
A C-style array declaration specifying the dimensions of a primitive data object, group, or macro can be made by setting the dimensions property for that object. By default (that is, without an array declaration), a primitive object has a single value. When the dimensions property is set, an object represents an array of primitive objects.
The dimensions property can be set to:
- A scalar value (for example, [1], [2], or [3][4]).
- A variable or object (for example, [dims], where dims is another int object).
- No value, leaving the array unbounded ( [] ).
The simplest array dimension declaration is a simple scalar value. For example:
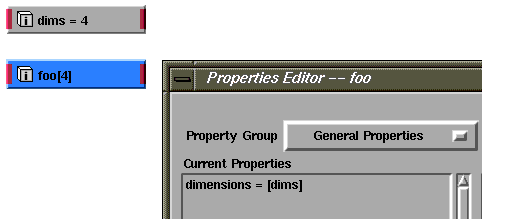
If dimensions is set to reference another object (rather than being set to a constant value), the value of that object dynamically determines the dimensions of the array. For example:
In either case, whenever the value of dims is set, the foo array is dynamically redimensioned to reflect the value of foo. Note that caution should be used when using dynamic redimensioning, since the values in your array can be lost if they are incompatible with the new dimensions.
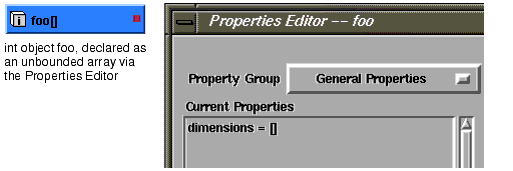
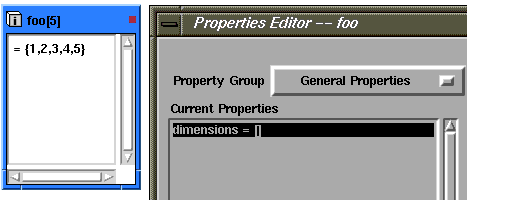
Objects can be declared as unbounded arrays by adding the dimensions property and including no value between the square braces (so the dimensions property has value "[]"). For example:
Such an object will automatically take on the dimensions of any array of values placed in foo. For example, if foo is set to equal {1,2,3,4,5}, the dimensions of foo will dynamically be set to [5], although the dimensions property is still seen to be unbounded when viewed in the Properties Editor.
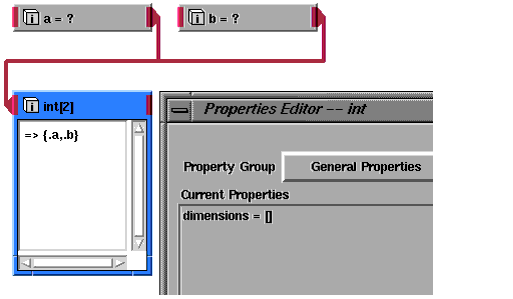
Alternately, unbounded array objects may contain references to other objects and their dimensionality therefore set to be a function of other object's values. For example:
Attached to int primitives a and b, int becomes a two dimensional array that contains references to a and b. Looking at the dimensions property of int in the Properties Editor, you can see its dimensions remain physically unbounded. Its dimensions are the dynamic function of the attached objects.
Note that strings, groups, modules, and macros can only be stored in a one-dimensional array.
For more information about arrrays, see Defining Primitive Data Objects on page 5-2, and Defining Arrays Of Groups, Modules, And Macros on page 6-36.
The Network Editor uses a property called NEportLevels to store port information for an object. All of the port operations described in the previous sections modify the NEportLevels property. This property is an array of two integers. The first of these indicates the object's input port level, and the second indicates the object's output port level.
A port's level determines how many levels the object is exposed in the object hierarchy. For example:
- 0 means that the port is not exposed.
- 1 means that the object is exposed to the level of the object's siblings.
- 2 means that the object is exposed to the level of both the object's siblings and the siblings of the object's parent.
- Higher levels expose the object further.
The NEportLevels property stores the port levels for an object. You can set it directly. Do the following:
- Here are some examples:
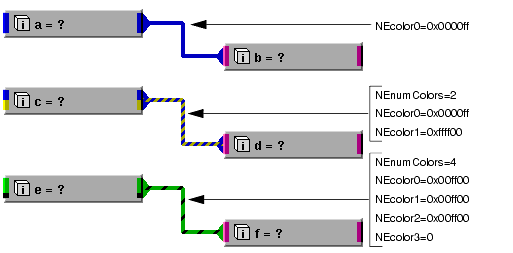
An object can have up to six colors in its port. You specify the number of colors using the NEnumColors property. The NEcolor0 property indicates the first color, the NEcolor1 property indicates the second color, etc.
You use hexadecimal numbers of the form 0xrrggbb to indicate the values for the NEcolorn properties. For example, 0xffff00 indicates the color yellow.
Connections between multicolored ports are represented using striped lines.
The following examples show various port/connection styles:
Network Editor objects can include developer-specified pixmaps. There are a number of Network Editor properties that control the display of an object's pixmap:
The following two icons illustrate the difference between small and large pixmap mode:
You can now use the Microsoft Windows BMP file format for an object's icons pixmap in the Network Editor.
IMPORTANT: If the objects NEpixmapMode property is set to "large", set the NElargePixmapName and NElargePixmapType properties instead.
The background of a macro can display a pixmap that is specified in AVS image format. To specify the background pixmap for a macro, set the NEbackgroundPixmap property to the name of the AVS image file to be displayed.
You can customize some characteristics of the Network Editor using a V file containing user preferences. On UNIX systems, you can also use X resources to specify these preferences.
The user preferences for the Network Editor are stored in a V file called ne_prefs.v. This file is read once during initialization of the Network Editor. You can edit a copy of ne_prefs.v and place it in the v subdirectory of your local project directory in order to override the one that is in the AVS/Express installation directory's v subdirectory. The ne_prefs.v file contains a single object, called NEpreferences. This object contains subobjects that define individual preferences. For example, the bevelThickness subobject is an integer that defines the thickness of the bevels around the edges of all Network Editor objects.
On UNIX systems, each subobject of NEpreferences corresponds to an X resource. If you specify an equivalent X resource in your ~/.Xdefaults file, it is used instead of the NEpreferences subobject. For example, if your ~/.Xdefaults file contains the line:
the value of the Network Editor bevel thickness will be 3, regardless of the value of the bevelThickness subobject of NEpreferences.
Some colors are specified in ne_prefs.v. Others are determined by X resources (on UNIX systems) or current desktop colors (on Windows systems). Colors specified in ne_prefs.v must be in the form "#rrggbb", where rr, gg, and bb are the RGB components of the color, expressed in hexadecimal notation. For example, yellow is expressed as "#ffff00".
On UNIX systems, the colors used for unsettled objects are determined by the background, foreground, topShadowColor, and bottomShadowColor X resources.
On both UNIX and Windows systems, the bevel and text colors for highlighted objects depend on the actual highlight background colors.
On Windows, the correspondence between desktop colors and Network Editor colors is as follows:
The following is a list of all subobjects of the NEpreferences object:
The following table describes all Object Manager properties that are associated with the Network Editor.
For information on editing properties, see Using the Properties Editor on page 5-47.
Table E-1