7 Creating a New Component
In this chapter, you create an AVS/Express component from the ground up using standard objects like module and float.
- Start AVS/Express
- Instance and Name the Component's Objects
- Connect Depth to an Expression
- Use the Object Editor to Turn Time and Depth into Arrays
- Save Echo as a Template
- Create a New Project
- Use Echo in a Simple Application
- Restart AVS/Express with the New Project
In the first two chapters, you created and modified an application using existing AVS/Express components.
Starting in this chapter, and proceeding through the rest of the manual, you build a set of new components from the ground up to create a fully functional application called Echo Sounding. The application will include a user interface, as well as components to read a data file and process the data. In the last chapter of this manual, you will assemble and deliver a completed application.
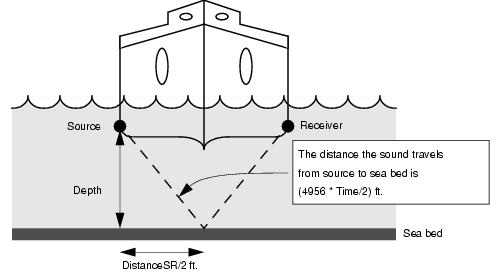
The Echo Sounding application calculates the depth of a sea bed based on an echo sounding performed aboard a ship. As depicted in the figure below, a source on one side of the ship transmits a sound. The sound travels along the path indicated by the dashed line-from source to sea bed to receiver:
Time is the duration of the trip, from source to receiver. DistanceSR is the distance between the source and receiver. The velocity of sound through water is 4956 ft./s.

The depth of the sea bed is determined as follows:In this chapter, you create a component called Echo that calculates Depth based on Time and DistanceSR. You build Echo out of AVS/Express' standard objects like float (defines a floating-point number) and module (encapsulates data parameters and execution methods).
This chapter introduces several new ideas:
- modules
- the Add Module tool
- connections to expressions
- arrays
- using the V Command Processor to inspect objects
- exporting ports
- the bidirectional nature of a connection
- Visualization Edition users type:
- Developer Edition users type:
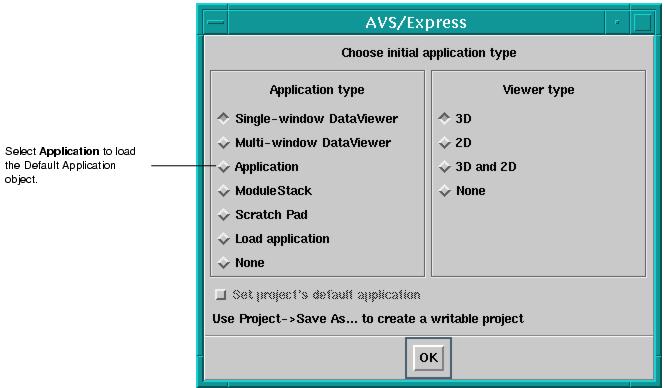
Application loads the Default Application, an application framework that does not include the DataViewer window and does not instance Uviewer or any other objects. You can use it as a base application to begin building your own applications.
You define Echo as a module. A module is an object that encapsulates data parameters and the execution methods that act on the parameters. Echo has two input data parameters (DistanceSR and Time) and one output data parameter (Depth). All three parameters are float objects.
Echo does not require a method. Instead, you connect Depth to a C-style expression that performs the necessary work. (In a later chapter, you will write a C method when you create a component to read sample echo-sounding data from a file.)
In this section, you instance and name the objects that make up Echo.
- AVS/Express displays a new application dialog very similar to the start-up application dialog.
- AVS/Express loads the ScratchPad into the Network Editor's applications workspace.
- The ScratchPad application provides a special application interface that you can use to build and edit objects. Unlike the other application workspace, AVS/Express does not execute objects instanced into the ScratchPad. This lets you work with an object without AVS/Express attempting to execute a partially constructed component.
- ScratchPad signals this difference by loading an application workspace with a white background. It does not display the pegboard background used by the other applications.
3. From the Libraries option menu in the Network Editor, select Standard Objects to go to the Standard Objects library page.
- This library contains base objects that you can use to construct your own components.
The Add Module tool is a sequence of dialogs that guide you through the process of creating a module. The dialogs follow a series of steps that you would normally follow to create a module and at each step the dialogs prompt you for information about the module you want to create.
- ScratchPad is highlighted in blue.
- AVS/Express displays the first step of the Add Module dialog:
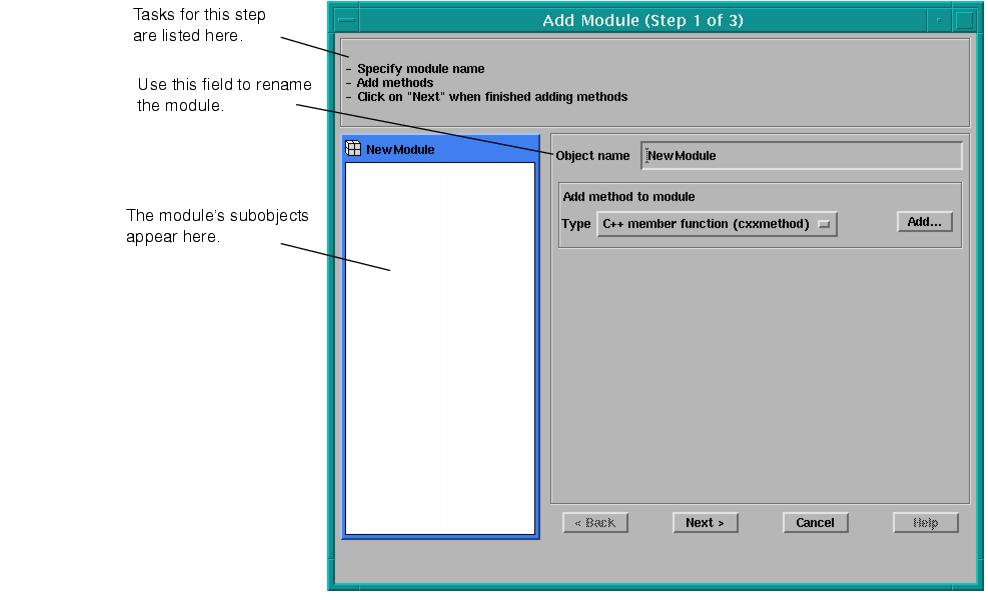
- In the Object name field, select NewModule and then type Echo.
- The new name is assigned to the module when you hit Enter on your keyboard or leave the Object Name field.
- You can also use this dialog to add Methods to the module, but this module does not use methods so we will skip this portion.
- You use the next dialog to add parameters to the module:
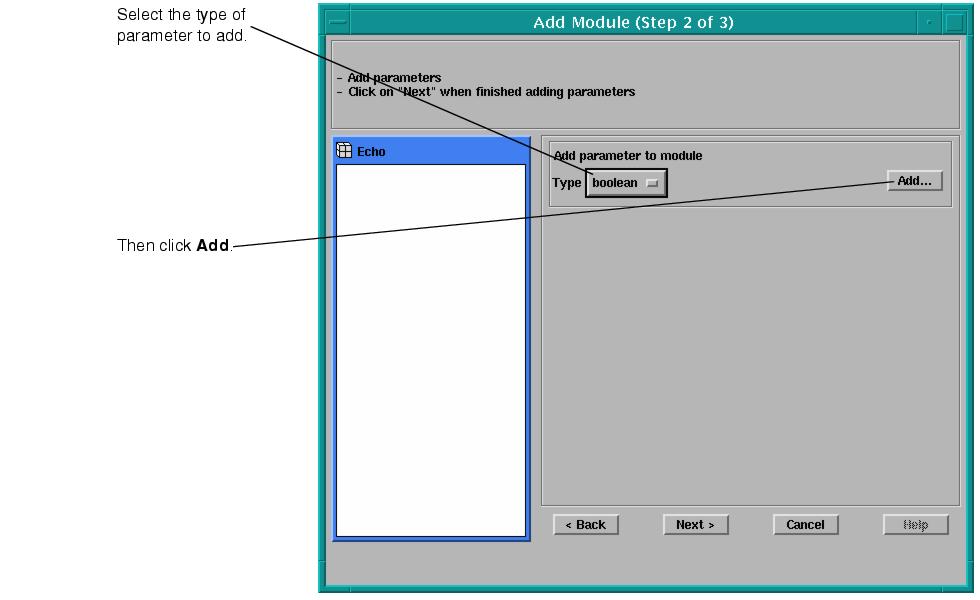
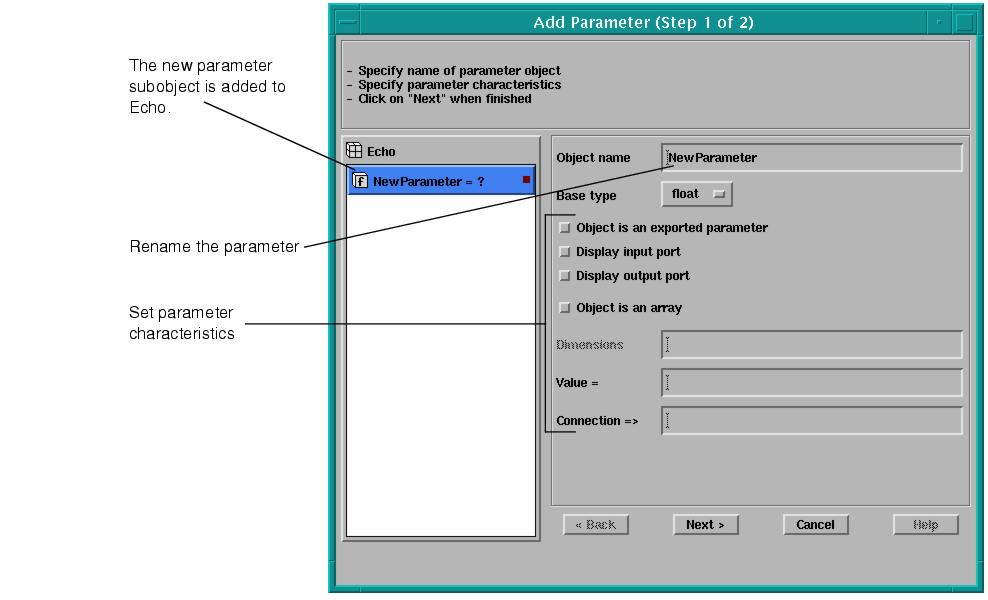
- A parameter subobject appears in the Echo module and the Add Module tool displays the first of two Add Parameter steps:
- Use the Object name field to rename the parameter DistanceSR.
- Set the parameter characteristics by pressing the toggles for Object is an exported parameter and Display Input port
- Setting Object is an exported parameter causes the parameter to be visible when the module is displayed in Display Params mode.
- Setting Display Input port exports the port to the module interface. A port connected to this parameter will appear at the top of the module.
- The Add Module tool displays the dialog for the next step. In this step you define the relationship between the parameter you have just added and the module's methods. Since you are not using any methods in this module, you are done with this parameter.
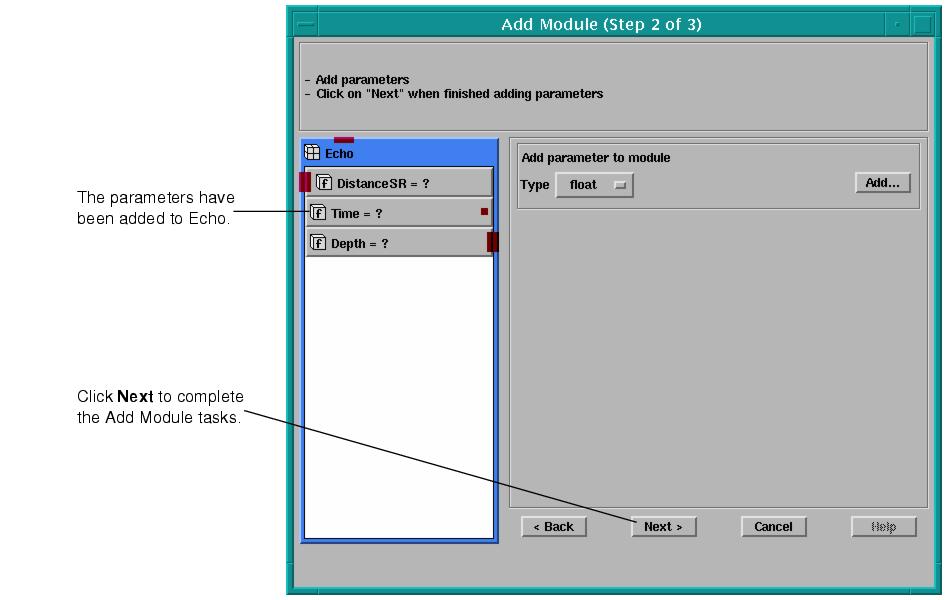
- The Add Module tool returns to allow you to add more parameters.
- The Add Module tool displays the last dialog in the Add Module sequence.
- You use the last dialog to manage code management properties for the module. Since you have not used any external code, you do not need to add anything in this dialog.
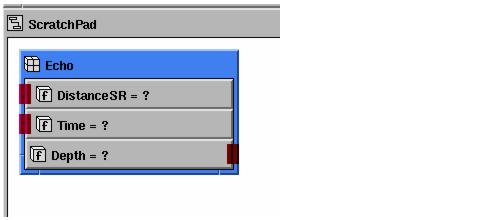
Turning back to the ScratchPad workspace in the Network Editor, you can see that the parameters have been added to the Echo object:
- Note: You may have to close and re-open the module to see all the parameters and their ports.
A module typically performs its processing by calling a method, which can be a C or C++ routine. But in this case, you can implement Echo's processing simply by connecting Depth to a C-style expression.
The expression references the input parameters DistanceSR and Time. As you will see when you test Echo, the expression is dynamic; whenever the input parameters change, AVS/Express recalculates the expression and updates Depth's value accordingly.
- Note: You could use the same technique described below to connect Depth to an expression by typing the expression in the Value field of the Add Parameter dialog described in Step 6 of the previous section.
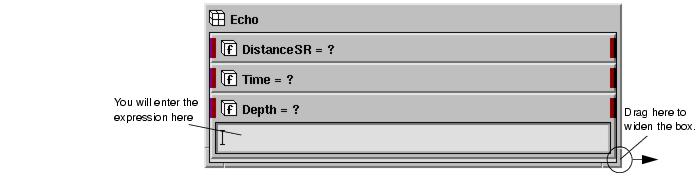
- You open Depth by double-clicking on it or by selecting the Open popup command.
- You will be entering a long expression, so you first widen Echo's window.
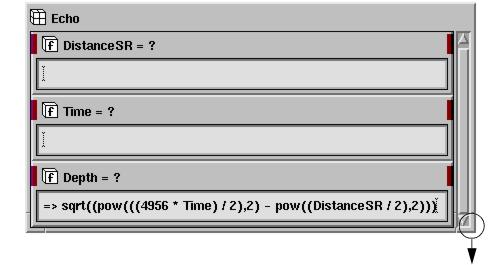
- Here is the expression you want to represent:

3. In Depth's entry field, type the connection operator (=>) followed by the expression, as shown below.
- The connection operator is an equal sign followed immediately by a greater-than sign. Type the expression carefully. Do not leave out parentheses or commas.
- When you apply the expression, AVS/Express adds additional parentheses. These have no effect on the expression.
- Note: Another way to apply the expression is to close the object.
- Notice that the title bars for DistanceSR, Time, and Depth contain question marks. The Network Editor tries to display each object's value in the title bar. But DistanceSR and Time have no values yet. Depth has no value either, as it is connected to an expression that currently cannot be resolved because it references objects that do not yet have values.
- All this will change when you assign values to DistanceSR and Time.
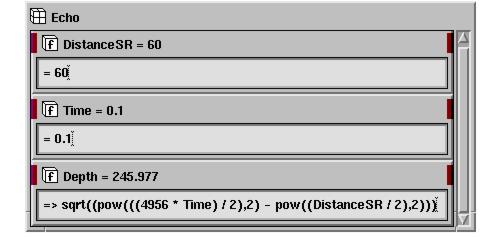
- To assign a value, type the value in the entry field for the object, then press Enter (or Ctrl+Enter). In the diagram below, an equal sign precedes the values in the entry fields. You do not have to enter these. AVS/Express inserts them when you press Enter.
- Once you have assigned values to both input parameters, AVS/Express is able to evaluate Depth's expression. The result appears in Depth's title bar.
- To assign another value, overwrite the current value, then press Enter. Each time you change the value of an input parameter, AVS/Express reevaluates the expression.
A typical echo sounding produces many samples. Your Echo component should be able to input an array of Time values and produce an array of corresponding Depth values.
In this section, you use the Object Editor to turn Time and Depth into arrays. You then test the result.
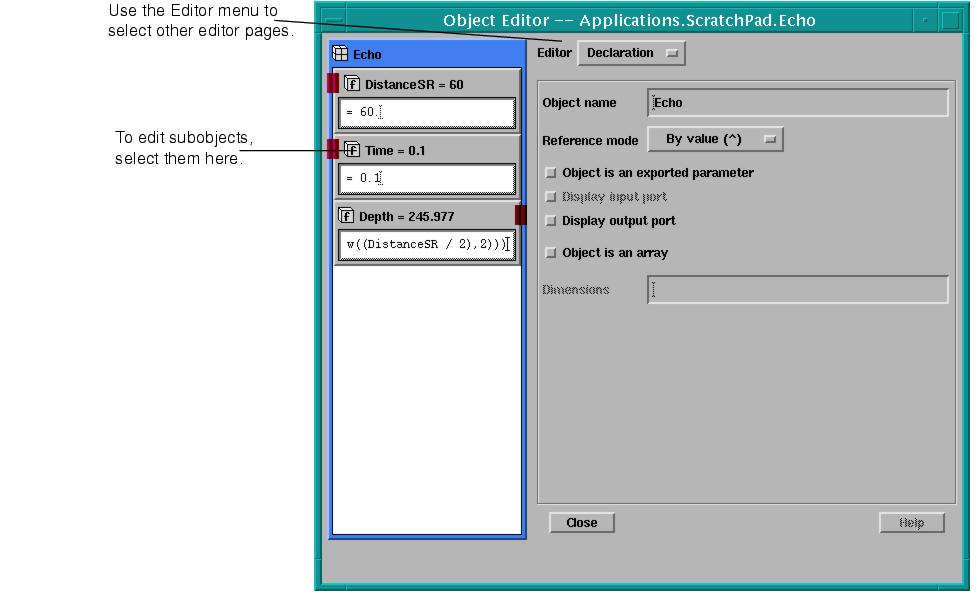
You can use the Object Editor to edit the properties of existing objects. The editor presents a series of dialogs, similar to those in the Add Module tool, that you can use to specify various characteristics of the object.
- AVS/Express opens the Object Editor containing the Echo module:
The page displays the Declaration page for the Echo module. You can use the Editor option menu to display other pages that are specific to modules: Module, to add additional methods or parameters, and Source Code to set source code management properties.
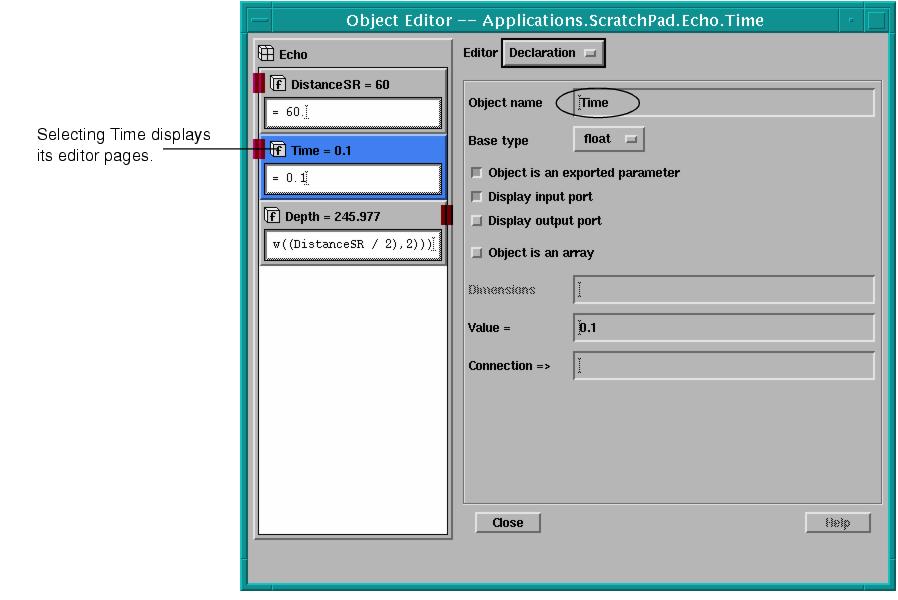
You can edit subobjects of the module by selecting them in the Echo module.
- The Object Editor opens the Declaration page for a parameter:
- Erase the current contents of the Value field, then press Enter. You will be turning Time into an array with an unspecified size. This works more cleanly if Time does not currently have a value.
4. Change Time to an array by setting the toggle Object is an Array. In this case, the dimension is a pair of open and close brackets without a value.
- Notice that Time's title bar in both the Object Editor and the Network Editor displays the object's dimension. You may need to close then reopen Time to refresh the title bar. To close an open object, either double-click on its title bar or select the Close popup command for the object. To reopen the object, either double-click on it or select the Open popup command. When you reopen Time, it displays a multi-line entry field.
- Select Depth in the Echo module to change the focus of the editor page.
- Click the toggle Object is an array to turn Depth into an array.
- Do not remove the expression in Depth's Connection field.
- Notice that the array brackets appear on Depth's title bar as well.
- Notice that the Network Editor now displays Time's entry field as a multi-line field, enabling you to enter a multi-line array literal.
- Remember to use curly brackets- "{}"- around the expression and use commas-","- to seperate the values.
- For a multi-line entry field, you cannot press Enter to apply the value. Enter simply repositions the insertion beam to the start of the next line in the entry field.
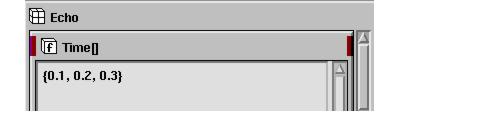
- Notice that Time's title bar now indicates that Time is a three-element array. Depth, too, is a three-element array, as you can verify by scrolling Echo until you get to Depth.
- Remember to press Ctrl+Enter. Time and Depth are now four-element arrays.
An object's value field can specify either a connection operator (=>) or an assignment operator (=).
- For Depth, you used the connection operator (=>). A connection creates a dynamic data relationship, either to another object or to an expression. Whenever the object or expression changes, AVS/Express updates the value of the connecting object.
- For Time and DistanceSR, you used the assignment operator (=). (You used it implicitly. AVS/Express inserted the assignment operator when you applied the assignment.) The assignment operator creates a one-time-only assignment of some value. You can assign a constant value, as you did with Time and DistanceSR, or you can assign the value of an object or expression. After the assignment, the object has the new value, but keeps no record of how it got its value (through a constant, object, or expression).
You are almost ready to save Echo as a template object in a library. In preparation, you set default values for the input parameters. In this case, you set the input parameters to null.
- To set the value to null, erase the current contents of the entry field, then press Enter.
- To set the value to null, erase the current contents of the entry field, then press Ctrl+Enter.
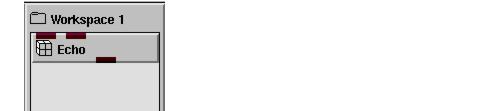
- You will use Workspace 1 to hold all of the components you create for the Echo Sounding application.
- You can release the mouse button when Workspace 1 turns pink.
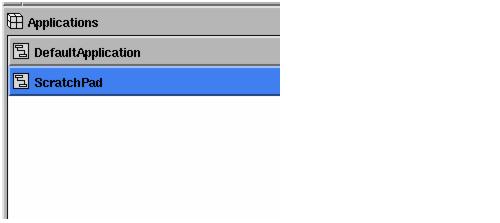
Echo disappears from ScratchPad and appears instead in Workspace 1.
- The Network Editor workspace shows the Applications object with its subobjects: DefaultApplication and ScratchPad:
3. Instance Echo by dragging the Echo template from the Workspace1 library into the DefaultApplication workspace.
- Notice that in this case, AVS/Express makes a copy of the template of Echo as it would any of the existing AVS/Express objects.
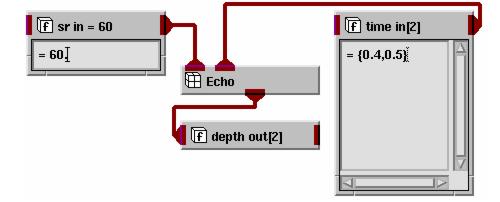
4. Verify that Echo is a working module by entering a literal into DistanceSR (for example, 60.0), and an array literal into Time, for example, {0.1,0.2,0.3,0.4}.
AVS/Express offers a text-based alternative to the Network Editor, called V. You will not be using it much in this manual. But through V, you can define objects, connect objects, assign values to objects, and submit special commands to the Object Manager to debug and inspect your application.
The V Command Processor (VCP) lets you enter V statements and commands interactively. On UNIX systems, the VCP appears in the window where you started AVS/Express. In Windows, it appears in a separate command shell. In this section, you use the VCP to print Depth's current values.
- It should look something like this:
- OM indicates that you are interacting with the Object Manager. (Root) indicates that you are currently working with the Root, or top-most, object in the object hierarchy. You enter V code to the right of the -> prompt.
- You want to print the value for Depth, so you first navigate to its container object, Echo.
- Type the command, including the open brace, then press Enter.
OM(Root) -> DefaultApplication {
OM warning: jumping from: Root to Root.Applications.DefaultApplication
OM(DefaultApplication) ->
- The Object Manager prints a message informing you that you have jumped two levels in the object hierarchy, from Root to Applications, and from Applications to DefaultApplication.
- Notice that the prompt now displays (DefaultApplication), meaning that you are in the DefaultApplication object.
- The first line (Time = ...) must be terminated by a semicolon.
- Notice in the Network Editor that Time's value field now displays the new array literal. Actions you take in the VCP are reflected in the Network Editor. The Network Editor and the VCP are simply two ways of communicating with AVS/Express' Object Manager.
An AVS/Express project defines your development and execution environment. Each time you work with AVS/Express, you are working on a project.
A project has three major parts:
- Libraries - the libraries of template objects
- User code - the C and C++ routines associated with those objects
- Processes - the express executable, as well as any external processes and an internal bootstrap process called base
AVS/Express provides an initial project, located in the install directory. This is the project you work on when you first start using AVS/Express.
You can create your own project. The project defines itself as being like the install project, but with certain additions and modifications. You must create a new project to hold your new application component. AVS/Express does not let you modify the install project.
- A file-selection dialog appears.
AVS/Express creates a project directory called myproj, where it stores the new project.
Late, when you want to work on more complex projects remember to use Project ->Save As as one of the first steps in creating a new project. It creates a project directory and generates a skeleton project containing initial version of essential files such as avsenv and v/templ.v.
In this section, you construct a simple test application using Echo. As part of the test, you experiment with the bidirectional nature of connections.
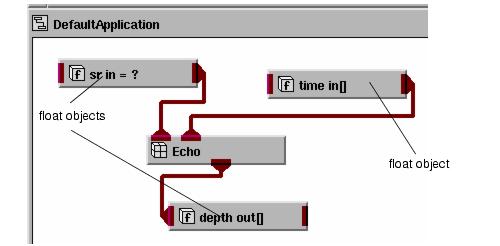
- To create sr_in, time_in, and depth_out, instance three float objects from the Parameters library on the Standard Objects library page. Then use the Object Editor to rename them as shown, and turn time_in and depth_out into arrays of unspecified size. Connect the objects as shown.
- Press Enter to apply the assignment.
- Press Ctrl+Enter to apply the assignment.
- Notice that depth_out is changed to a two-element array.
OM(Root) -> DefaultApplication {
OM warning: jumping from: Root to Root.Applications.DefaultApplication
OM(DefaultApplication) -> $get_array depth_out
{990.746,1238.64}
When an object is connected to a single other object, the connection is bidirectional. That is, if you assign a value to the object on the output side of the connection, the object on the input side changes, and vice versa. This is a valuable feature in many applications.
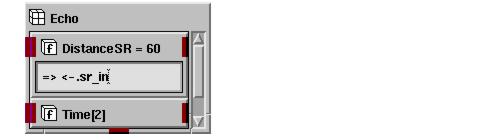
- You can see that DistanceSR's current value is 60.
- Notice also that DistanceSR's value field shows the connection to sr_in. (The pathname prefix <- tells AVS/Express that the connected object, sr_in, is located one level up in the object hierarchy, that is, at the same level as Echo.) You could have entered this syntax directly to connect DistanceSR to sr_in without using a graphical connection.
- DistanceSR changes accordingly.
- Overwrite the current contents of DistanceSR (=> <-.sr_in) with the value 50, then press Enter.
- sr_in changes. Notice that the connection reappears in DistanceSR's value field.
At start-up, AVS/Express begins by determining the project to use and loading it. By default, AVS/Express loads the install project. You can change this behavior in several ways. One way is to specify the -project command-line option.
- Visualization Edition users type:
- Developer Edition users type:
Depending on where you saved myproj, you may have to specify a pathname. In Windows, you must specify the -vcp option for the V Command Processor (VCP) to appear.
In the initial application dialog box, choose Application.
- Note: If you want AVS/Express to load DefaultApplication at start-up without displaying the initial application dialog, set the toggle Set Project's Default Application.The next time you load this project, AVS/Express will use DefaultApplication as the default without querying you for an initial application.
AVS/Express loads your project. You can verify this in three ways: a start-up message appears indicating the project's pathname; the Network Editor's title bar displays the project's pathname; and the Library Workspace page contains Echo.