A - B - C - D - E - F - G - H - I - L - M - N - O - P - R - S - T - U - V - W
11 Creating and Compiling an Application
In this chapter, you assemble a finished application and compile it.
In this final chapter, you create a finished Echo Sounding application and package the application into a special kind of object called an application. Once the application is packaged, you can then save the application object as a compiled, stand-alone project that can be delivered to a customer and executed.
Depending on where you saved myproj, you may need to specify a pathname.
AVS/Express begins and loads your project.
- To delete the current application workspace, select File->Delete Application.
- To load the new application workspace, select File->New Application and select Single-Window DataViewer from the New Application dialog.
You use the DataViewer application in order to take advantage of the viewer and the visualization editors built-in to this application.
In this section, you assemble the finished Echo Sounding application. The application:
- includes a user interface for selecting a data file
- reads the data file and produces depth and location data
- maps the data to an AVS/Express field
- manipulates and renders the data
You are now ready to assemble the Echo Sounding application.
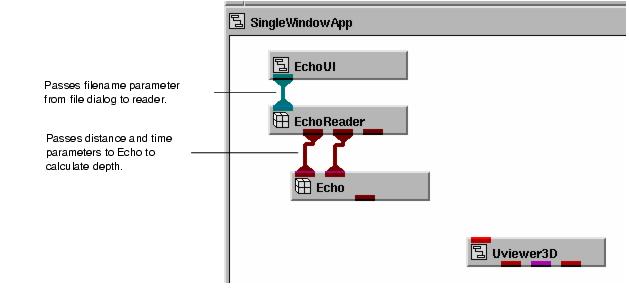
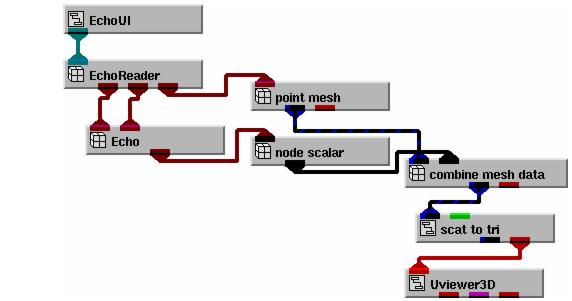
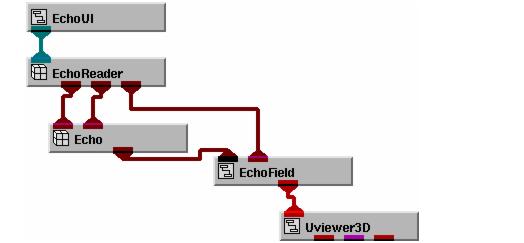
1. Assemble the Echo Sounding objects in the SingleWindowApp workspace, as shown in the diagram below.
- Instance EchoUI, EchoReader, Echo. Position the objects as shown so connection lines will be clear. When you instance EchoUI, the application's user interface appears.
- Connect the objects as shown. When you connect EchoUI to EchoReader, the reader executes and an error message appears because you have not yet selected a data file. You can dismiss the error message. To get information about an object's ports, select the Info popup command for the object.
As currently assembled, your application allows a user to read in a file of data and calculates a depth value for each pair of time and distance parameters.
To render the data you need to map the location data, output from EchoReader, and the depth data, output from Echo, to an AVS/Express field data format that can be passed to the viewer.
To map this data to a field, you connect AVS/Express objects that
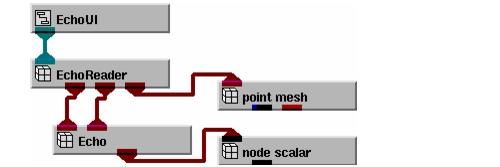
1. Map the data to field components. To do that instance the node_scalar and point_mesh objects into the application workspace and connect them to EchoReader and Echo as shown below.
- Both are on the Main library page in the Field Mappers library. node_scalar is in the Data Mappers sublibrary, and point_mesh is in the Field Mappers sublibrary. Remember you can use the Object Finder to go directly to an object.
- point_mesh references the location data from Echo_Reader and outputs the data in a coordinate mesh.
- node_scalar references the depth data calculated by Echo and outputs data a node data.
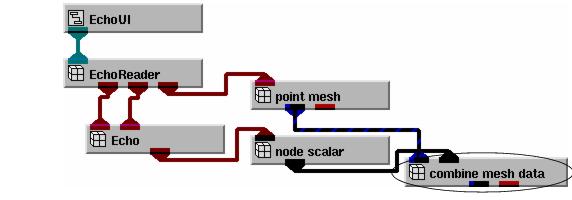
- Next you will combine the field components into a single field.
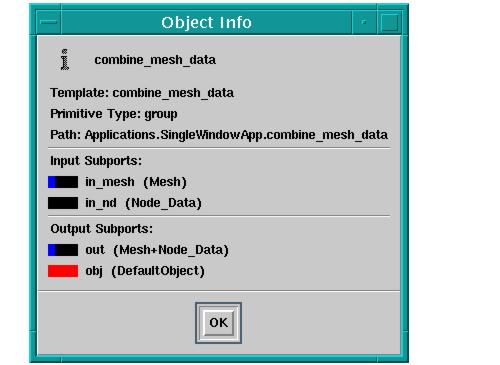
- The combine_mesh_data object is also in the Field Mappers library, but in the Combiners sublibrary.
- The Info dialog displays the following information:
- Notice that the module takes a mesh and node data as inputs and outputs a Mesh+Node_Data field. You connect the point_mesh output to the in_mesh port and the node_scalar output to the in_nd port.
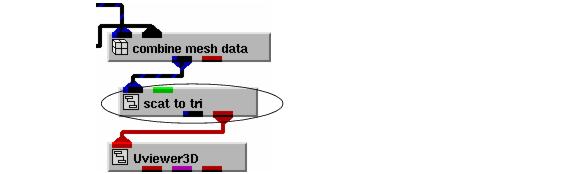
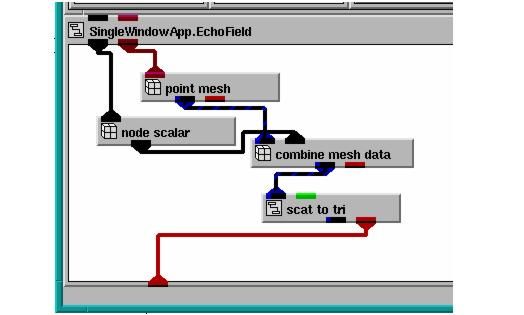
- As a last step you add and connect an object that converts the scattered grid represented by this field into a triangular mesh that can be rendered by the viewer.
4. Instance the scat_to_tri object and connect it as shown below. scat_to_tri is on the Main library page in the Mappers library.
- AVS/Express generates some error messages when you connect these objects because you have not yet selected a data file.
Your finished application should look like this.
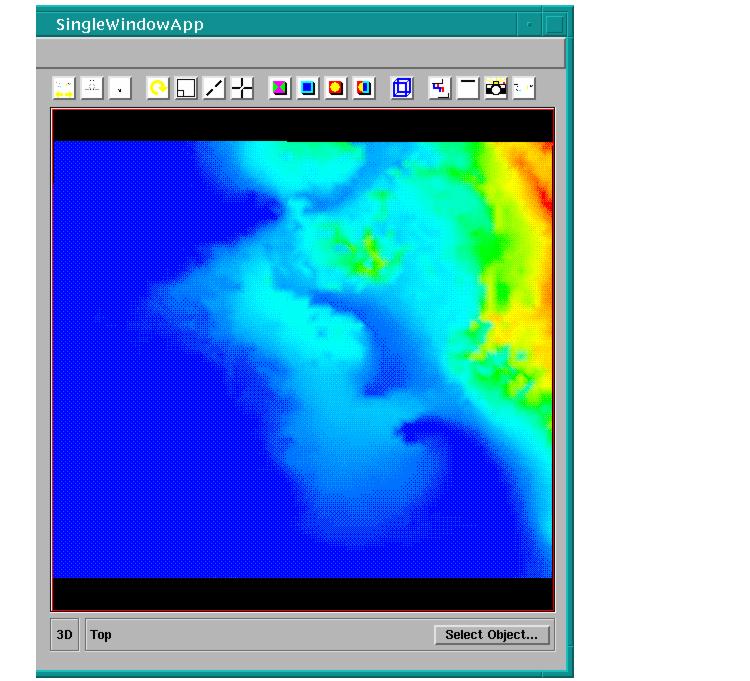
- A file-selection dialog appears.
- The data appears in the viewer window.
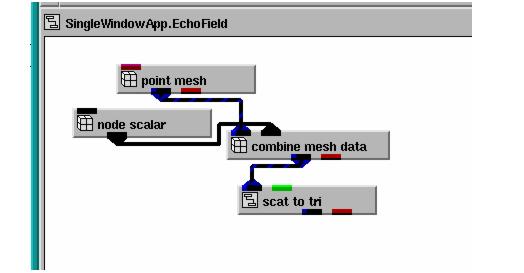
In order to reduce the complexity of the objects that appear to the user, you modularize the mapper objects by encapsulating them in a macro object.
3. Remove the connections to the input ports on point_mesh and node_scalar, and to the output port of scat_to_tri.
4. Reparent the mapper objects into the macro by selecting point_mesh, node_scalar, combine_mesh_data, and scat_to_tri and dragging them into the macro.
5. Maximize the macro and position the objects so you can see all of them. Remember you can move all the objects at once by holding down the Shift key while using the middle mouse button.
6. Export the ports that were connected in the application: the input ports on point_mesh and node_scalar, and the right output port on scat_to_tri.
- As before, for the purposes of this illustration we have reduced the height of the application workspace. You do not need to change the size of your Network Editor window.
- Select Project->Save.
- Notice that the application works as before.
An application object represents a completed application. In this section, you create an application object and save the object in a library.
The SingleWindowApp workspace is itself an application object. Since your network is already in an application object, you can simply rename SingleWindowApp and save it in a library. This is what you will do in this section.
SingleWindowApp is special in that it contains some hidden objects that define the DataViewer window. When you use SingleWindowApp as your application object, your application automatically includes the DataViewer editors and viewer. If you did not want the DataViewer as part of your application, you could have built the application in a different workspace, such as DefaultApplication. Or you could instance an empty application object from the Standard Objects library page, then move your application into that object.
For your application, you use the SingleWindowApp workspace.
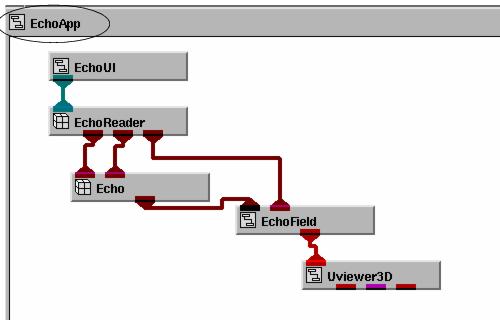
- To rename the application, move the mouse pointer to the SingleWindowApp title bar and use the Rename popup command.
- To close the object, either double-click on its title bar or select the Close pop-up command.
- EchoApp now appears closed within a container object called Applications.
- Notice that the application is no longer in the Applications container object, so AVS/Express no longer executes it. The user interface window, View window, and Module Stack window all disappear.
- Select Project->Save.
You can save an application object to a V file. This enables you to execute it at AVS/Express start-up.
- Move the mouse pointer to EchoApp's title bar, then either double-click on the object or select the Maximize popup command.
- AVS/Express saves the application as a V file.
11. Restart AVS/Express, specifying the name of the project and the name of the application's V file.
- Note: AVS/Express searches for the application v file that you specify in the current directory and then in the 'v' subdirectory of your project directory. If you have saved the application to another location, you must specify the path to the application file, for example:
- AVS/Express loads your project, then executes the objects in the specified V file. The application appears on your screen, including the user interface for selecting a file, the Module Stack window, and the View window. The Network Editor does not appear.
- Open the data file through the user interface. To exit the application, select the File`Exit pulldown command from the Echo window.
One way to save an application is as a compiled project. AVS/Express creates a standalone project directory, including a standalone version of the express executable. The project contains only those objects used by your application. This makes the project smaller and more efficient. In a real-world application, this is what you would deliver to your customer.
In this section, you save EchoApp as a compiled project.
Note: To compile EchoApp as a stand-alone application, you must have a C++ compiler because you will be rebuilding the express executable. Also, the Visualization Edition of AVS/Express does not allow you to save applications as compiled projects.
You want all of the application's modules to run in the express executable. But for EchoReader, you specified that its process was "user". So you must change EchoReader's process property from "user" to "express".
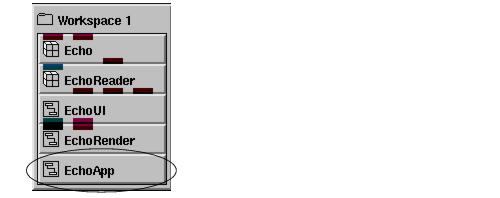
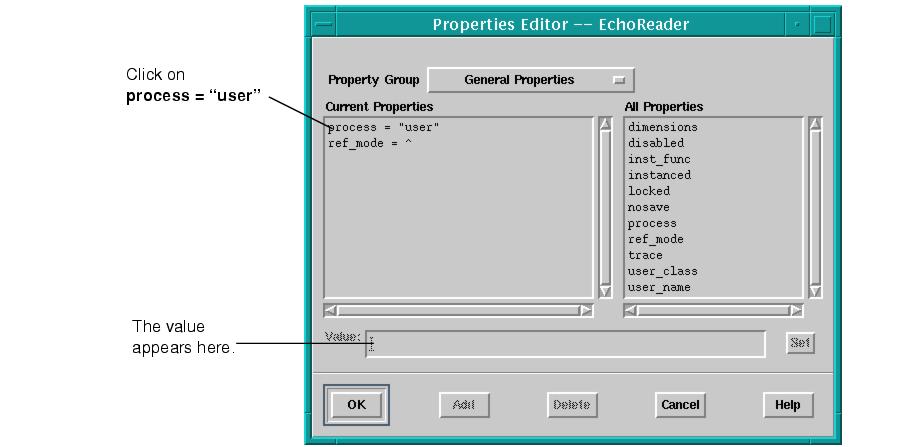
- Move the mouse pointer to EchoReader in the Workspace 1 library and select the Properties popup command. The Properties Editor appears:
- In Current Properties, select the process property so its current value appears in the Value field:
- Change "user" to "express". Remember to include quotes. Press Enter or the Set button to assign the new value. Current Properties should now look like this:
- Select the OK button to apply the new setting.
- You are now ready to save a compiled project.
- Note: If you now attempt to instance EchoReader in your current project, you will get an error message. AVS/Express will look for EchoReader's update function in the express executable, because that is now where the process property says it is located. But it is really in the user process.
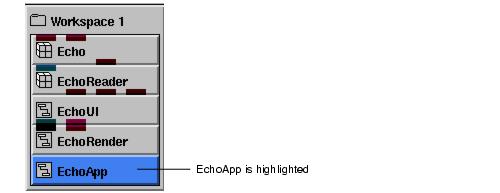
- You may have to scroll down to find EchoApp.
- Highlighting an application object tells AVS/Express which one you want to save.
- The Save Compiled Project dialog appears. You can accept all of the default settings. You only need to supply the name of the project directory AVS/Express should build.
6. In the Directory Name field, enter the full pathname where you want to store the project directory.
- You can use the Browse button to navigate. The Directory Name field must not specify a relative pathname.
- The sample below indicates that you want to create a compiled project directory called EchoProj in /home/joe/. (On UNIX systems, you need to press Enter after entering the directory name.)
- AVS/Express creates a standalone project directory containing a new express executable. The executable contains only the objects required for the Echo Sounding application.
- AVS/Express displays a window containing informational messages. At the end of a successful compile, you see the following message:
- You can close the window.
- You can now execute the application.
- When you are finished, select File->Exit to exit.