


|
|
Modifying a camera for annotation (AnnoCamera)
Many times you might like to add non-transformable annotation or simple graphics to a view. This example illustrates one way to do this by having a non-pickable 2D camera in the view and placing the annotation or simple graphics in that camera.
Instance into the SingleWindowApp workspace the object Uviewer.
![]()
Create an object and generate field data
We need to create a Graphics Display Kit object.
Instance Read Geom and connect it to Uviewer's left input port.
We're now ready to specify a data file. Select Editors->Modules to display the Read Geom user interface. Select the Browse button. A dialog box appears. Select teapot.geo, then select the OK button.
The application renders the teapot in the view's window.
We need to modify the 2D camera so annotation and simple graphics will be non-transformable.
Select Editors->Camera to display the camera editor's user interface.
Select in the view's background until the 2D camera is selected.
Toggle the Pickable control in the camera editor's user interface so that it is set off.
This makes the camera as well as all the objects in the camera unpickable. You will be unable to directly manipulate the objects, making them effectively "non-transformable". Note however, that if the transform subobject of the object changes in some other manner, the object will still be transformed.
We can now add some text and graphics that we want to be non-transformable to the view.
Instance TextString and connect it to the view as shown in the diagram below.
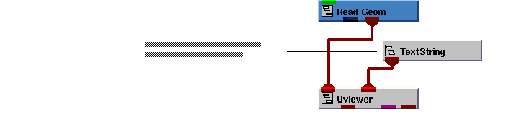
The text string "Hello World" will be rendered in the middle of the view. We need to move it to the top of the view, render a different string and make the font larger.
Scroll down to find the position subobject and open it. This position represent the XY coordinates where the string will be rendered.
Replace the current values with -4.0 for X and 3.5 for Y. With the current string and font size, "Hello World" is rendered towards the upper left.
Change the text string and the font size.
Replace "Hello World" with "Non-Transformable Annotation".
Find the value 20 in the font specification and replace it with 30.
We now have a title at the top of the view that is non-transformable.
We can now add a legend to the view that will also be non-transformable.
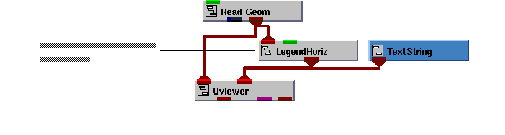
Instance LegendHoriz and connect it to the view as shown in the diagram below.
Try transforming the objects in the view.
Notice that the only objects that you can pick are Top3D and teapot. Since the text string and legend are in a camera that is not pickable, they cannot be selected.
This completes the tutorial. The completed tutorial is available in Libraries.Examples.Graphics_Display.AnnoCamera.
|
|