


|
|
Adding to a view's pull-down menus (CreateViewCmds)
In this tutorial, we will add entries to the pull-down menu on the view's window.
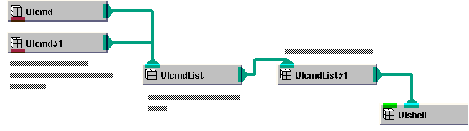
Here is the basic structure of a command list. In the diagram, the command list is connected to UIshell, which defines the application's window:
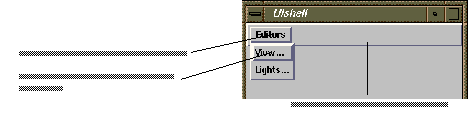
Here is an illustration of what the resulting menu bar might look like:
This is just one of many possible configurations. For example, you can connect multiple UIcmdList objects to the UIcmdList that creates the menu bar. This gives you a menu bar with multiple items on it. You can use other UI objects in addition to UIcmd. For example, another UIcmdList object creates a cascading pull-down menu. A UIoption object creates a pull-down command that works like an option box.
We create the application's window and view with the application component Uscene3D.
Instance into the SingleWindowApp workspace the object Uscene3D. Uscene3D can be found in Libraries.Accessories.Graphics.Modules.
When we instance Uscene3D, a black window appears inside the SingleWindowApp. This is where the data is rendered.
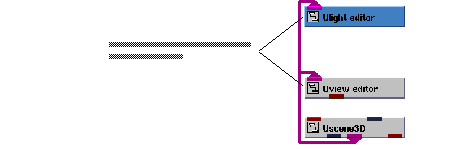
We want our application to have view and light editors that pop up when the user selects the appropriate pull-down command. For this tutorial, we create the editors using the application components Uview_editor and Ulight_editor. Each defines an edit object and a complete user interface (panel, sliders, buttons, etc.) for the editor. We will look at editors more closely in a later tutorial.
Instance Uview_editor and Ulight_editor, then connect them to the other objects, as shown in the diagram below. When the editors are instanced, the UIcmd contained in the editors is automatically installed on the Editors pull-down menu.
Select the Editors->View and Editors->Light pull-down commands.
Notice that selecting a command displays its associated editor.
Create an object and generate field data
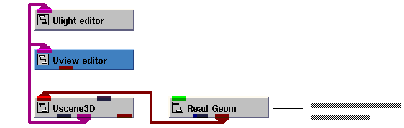
Finally, we need a Graphics Display Kit object with field data. We can create both with Read Geom, using the second output port.
Instance Read Geom and connect it to Uscene3D, as shown in the diagram below.
We are now ready to specify a data file. In the SingleWindowApp window, select the Editors->Modules pull-down command. The user interface for Read_Geom will appear. Select thr browse button. A dialog box appears. Select teapot.geo, then select the OK button.
The application renders the teapot in the view's window.
Select Editors->Light and try the light editor.
The light editor is connected to the view, so, for example, when we turn the ambient light off, the view is updated accordingly.
This completes the tutorial. The completed tutorial is available in Libraries.Examples.Graphics_Display.CreateViewCmds.
|
|