10 Building a User Interface
In this chapter, you build a user interface with the User Interface Kit.
- Start AVS/Express
- Create a Window
- Add a Menu Bar
- Add a File-Selection Dialog
- Add an Exit Confirmation Dialog
- Encapsulate the User Interface in a Macro
The User Interface Kit enables you to build sophisticated user interfaces for your applications. A user interface can include windows, dialogs, menu bars, widgets (fields, list boxes, etc.), labels, and common dialogs (file selection dialogs, message dialogs, etc.). Interfaces you build work on both UNIX and Windows systems.
In this chapter, you build a user interface for the Echo Sounding application. The interface enables the user to select a data file and exit the application.
- how to build components from base objects provided by a kit. The techniques you use in this chapter-learning essential information about the kit's objects, instancing and connecting the objects, and setting object parameters-apply equally to other AVS/Express kits. For example, with the Graphics Display Kit, you can assemble base objects to create a custom data viewer.
- how to encapsulate a network of objects into a macro
Depending on where you saved myproj, you may need to specify a pathname.
AVS/Express begins and loads your project.
n If you are still in AVS/Express from the last chapter, delete the current application workspace and load a new one.
In this section, you create the user interface's window.
- UIapp is located in the Containers library.
- AVS/Express executes the object. An empty window appears on the screen. Here is a portion of it:
- That way, neither window obscures the other.
- Remember to enclose the literal in quotes and to press Enter to apply the change.
- After you press Enter, AVS/Express may insert a connection operator (=>) before the literal. You can ignore it.
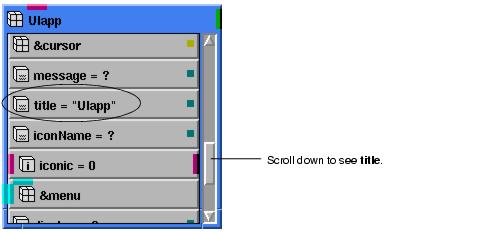
- Notice that the window has the title you specified:
- (Note that when you instanced UIapp, the title parameter was connected to the expression name_of(<-). This set the window's title to the name of title's parent object, UIapp. That is why when you instanced UIapp, the window's title was also UIapp.)
- For example, parameters x, y, width, and height let you specify the window's position and size. The visible parameter determines whether the window appears; it is currently set to 1, meaning that the window is visible.
- The documentation for a kit includes a detailed description of each object in the kit. You can also get online help for an object.
- When you press Enter to apply the change, the Echo window disappears.
- The window reappears.
In this section, you add a menu bar to the Echo window. The menu bar includes a File menu with pulldown commands.
1. Reposition UIapp in the DefaultApplication workspace, such that vertically it is in the center of the workspace and horizontally is somewhat to the right of center.
- You will be instancing and connecting several user-interface objects. Positioning UIapp as described will allow all of the objects to fit easily in the workspace.
- Later, if you run out of room, you can easily reposition the objects in the workspace. For example, you can lasso and drag the object. Alternatively, you can move the mouse pointer to an unoccupied area of the workspace, then drag the mouse pointer while holding down the Shift key and middle mouse button (on UNIX systems) or right mouse button (in Windows).
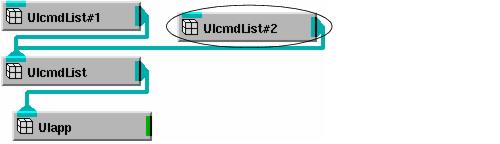
- UIcmdList is located in the Menu Bar library.
- The window now has an empty menu bar. (In Windows, a menu bar does not appear until the menu has a menu item.)
Consider the connection between UIapp and UIcmdList. The purpose of the connection is not to reference UIcmdList's data; UIapp does not need it. But UIapp's update method does need a pointer to the window's menu bar, if any, so it can display the correct one. The connection provides that pointer.
- The window's menu bar now has a menu item, which is currently set to UIcmdList#1.
2. Open UIcmdList#1 and set the label parameter to the literal "File". Be sure to include quotation marks around the name.
- When you press Enter, the window menu's name changes to File.
- A menu bar typically contains several menu items, like File, Edit, and Help. Accordingly, you can connect several UIcmdList objects to the menu bar's UIcmdList object.
- The window's menu bar now has a second menu item.
- To delete the object, select the Delete popup command for it.
The File menu requires Open and Exit commands. You create these, along with a separator that will appear between them.
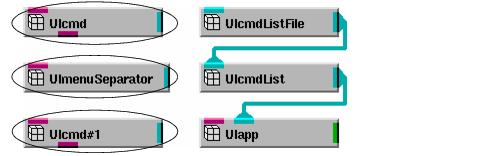
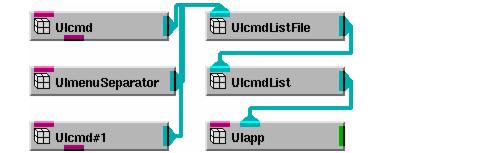
7. Instance a UIcmd object, a UImenuSeparator object, and another UIcmd object, and arrange them as shown below.
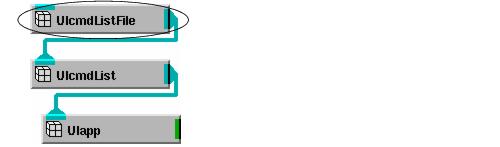
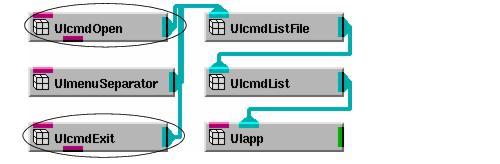
8. In the order described here, connect UIcmd to UIcmdListFile, then UImenuSeparator to UIcmdListFile, and finally UIcmd#1 to UIcmdListFile.
- The order you connect objects to UIcmdListFile determines the order they appear in the menu.
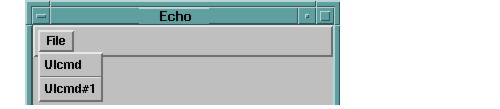
- The commands are currently named UIcmd and UIcmd#1.
- Press Enter to apply the change, then close UIcmd.
- Press Enter to apply the change, then close UIcmd#1.
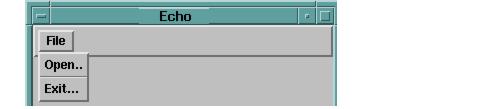
- The menu now displays the names you assigned.
The User Interface Kit includes a wide assortment of common dialogs, such as a dialog for selecting a file or for displaying an error message. To use a common dialog, you simply instance it, set appropriate parameters, and connect it into your application.
In this section, you add a file-selection dialog to your user interface. You then explore how the user interface works.

- You connect these objects so that the Open pulldown command in the Echo window brings up a file dialog.
- If you previously tried selecting the Echo window's File`Open pulldown command, the file-selection dialog will now appear. Select the Cancel button to remove it.
- You can now test the dialog.
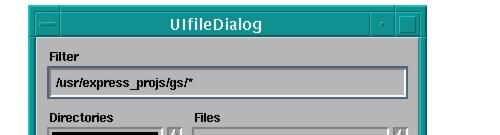
- A file selection dialog appears. Here is the top portion of it:
- Notice that the dialog's name is UIfileDialog. You want to set it to something more meaningful.
- To see the entire literal at once as you enter it, you need to widen UIfileDialog. Drag the lower right-hand corner of UIfileDialog's window to the right.
- Remember to enclose the literal in quotes and press Enter to apply the change. You can now see the results.
- The file-selection dialog appears, with its new title. Select the Cancel button.
In this section, you open UIfileDialog and UIcmdOpen to see how they work.
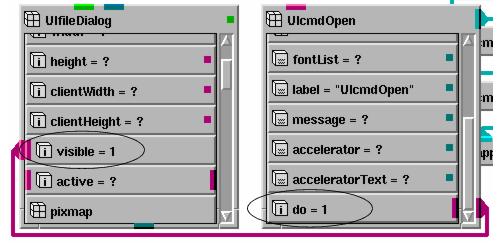
- Notice that UIfileDialog.visible is connected to UIcmdOpen.do.
- Here is how they work:
- When you select File->Open in the Echo window, UIcmdOpen's update method executes and sets UIcmdOpen.do to 1. UIfileDialog.visible is connected to the do parameter, so it, too, gets set to 1. This causes UIfileDialog's update method to execute, and it displays the file-selection dialog. (In Windows, if UIcmdOpen.do is already 1 when you select File->Open, AVS/Express increments it to 2, but everything else works the same way.)
- When you select the Cancel button in the file-selection dialog, UIfileDialog's update method executes. The update method then removes the window and sets UIfileDialog.visible back to 0. Because of the connection, UIcmdOpen.do is also set back to 0. (If you select the OK button, the update method also inserts the filename you selected into UIfileDialog's filename parameter.)
3. Select the File->Open pulldown command from the Echo window, then select the Cancel button in the file-selection dialog.
- Observe what happens to UIcmdOpen.do and UIfileDialog.visible.
When a user of your application selects the Exit command, the application should exit, but should first display a confirmation dialog. In this section, you add an exit confirmation dialog to your application's user interface.
1. Instance UImessageDialog and connect it to UICmdExit, thus exporting the input port for the visible parameter. (Use the same procedure as you did for UIfileDialog in steps two and three in the last section, Add the Dialog )
- UImessageDialog is located in the Dialogs library.
- The parameter currently has no value.
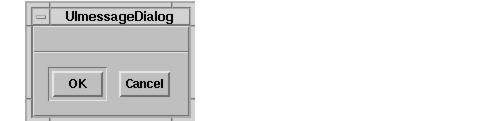
- A message dialog appears.
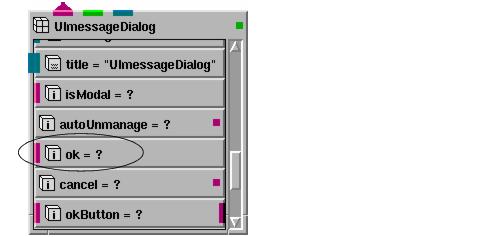
- Notice that the dialog currently does not have a meaningful title and has no descriptive message. You will add these soon. First, observe what happens when you select the OK button.
- The dialog is removed and the ok parameter gets set to 1.
- In the next chapter, you will connect the output of ok to a module that exits AVS/Express. In preparation, you will now export a port for ok.
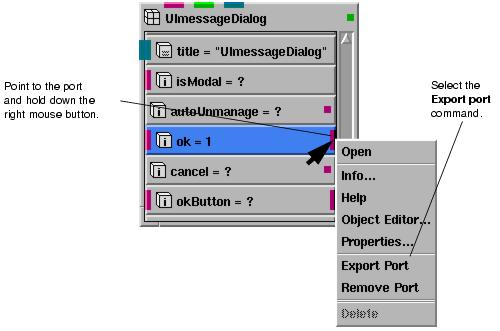
- To add an output port, select the ok parameter and the select the Add Output Port popup command.
- A port is added to the right side of the parameter:

- To export the port, move the mouse pointer directly over the output port, then select the Export Port pop-up command as shown below.
- The port now extends to the outside of the module.
- Next, add a meaningful title and message.
- Remember to enclose the literal in quotes and press Enter.
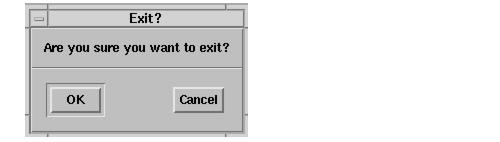
8. In UImessageDialog, scroll to the message parameter and change its value to the literal "Are you sure you want to exit?".
- You have to widen UImessageDialog to see the whole literal as you are typing it.
- You can now see the results.
- The message window reflects your changes to the title and message parameters.
- Notice that UImessageDialog now displays the output port for the ok parameter.
- Remember you can always determine which parameter is accessible through a port by selecting the Info popup command for an object.
AVS/Express supplies a set of general-purpose modules for doing handy things like creating execution loops and timers. One of the general-purpose modules is called exit_process. As its name suggests, exit_process exits the express process. You want to connect this object to your application, but you want to make sure it does not inadvertently execute.
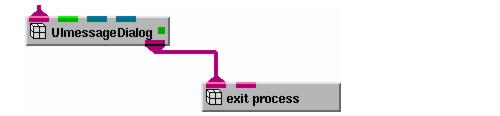
In the previous section, if you had tried the Echo window's File`Exit command and had selected the OK button in the message box, UImessageDialog's ok parameter would have been set to 1. If you then connected exit_process to EchoUI, exit_process would execute immediately, causing AVS/Express to exit.
In this section, you add exit_process to your application. But first you make sure it is safe to do so.
- This will result in cleaner connection lines.
- You open a group object by double-clicking on it or by selecting the Open popup command.
- The value appears next to the parameter's name. A null value appears as a question mark.
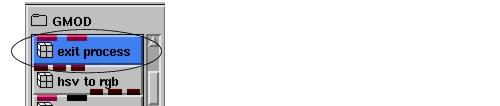
- You are now ready to add exit_process. It is located in the GMOD library on the Templates library page. But what if you did not know where it was located? The instructions below show you how to find the object using the Object Finder.
- The Object Finder appears. Here is the top portion of it:
- The object's name is exit_process (you can type a space instead of the underscore). Do not use quotes.
- AVS/Express searches for all occurrences of the specified object. It finds one, which it displays in the Objects list box. For Developer Users, the listing tells you that exit_process is located on the Templates library page, in the GMOD library.
- AVS/Express displays and open the appropriate library page and library, and highlights exit_process.
Continue on to the next section to save this user interface in a macro. But first, notice the technique you have used to construct a user interface:
- You instance objects from the User Interface library, where each object defines a particular piece of the user interface.
- You connect the objects in a standard way to build the functionality you want.
- You set object parameters to tailor the objects to your needs.
This is the same technique you use for other groups of objects in other libraries.
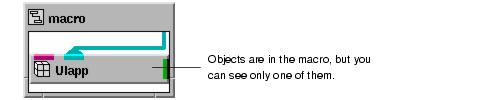
A macro is one of AVS/Express' standard objects. You use a macro to encapsulate a network of connected objects.
In this section, you encapsulate the user interface you just built into a macro.
- macro is located in the Macros library.
- Notice that macro is in the open state, enabling you to move objects into it.
- One way to select multiple objects is to select one, then Shift-select the others (that is, hold down the Shift key while selecting the other objects).
- Another way is to use a lasso. Move the mouse pointer to just above UIfileDialog. Then drag the mouse pointer down and to the right to create a rectangular region called a lasso. The lasso should fully or partially surround all of the objects you intend to select. Then release the mouse button.
- The Network Editor highlights the selected objects in blue. All of the objects in the workspace, except for macro, should be highlighted in blue.
- To drag the objects, move the mouse pointer to one of the selected objects, then drag the pointer into the macro. When the macro turns pink, you can release the mouse pointer.
- Moving objects from one container object (in this case, DefaultApplication) to another is called reparenting. The objects now have a new parent object, the macro.
- You will soon maximize the macro to view and reposition its subobjects. First, though, you rename the macro.
- To maximize the object, move the mouse pointer to EchoUI's title bar and select the Maximize popup command.
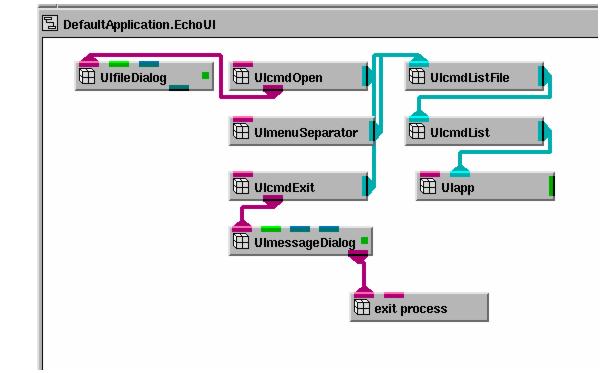
- EchoUI now occupies the entire workspace. The title bar reads DefaultApplication.EchoUI, indicating that you are viewing the EchoUI object, located in DefaultApplication.
- Many of the objects are probably not visible in the workspace.
- To move all of EchoUI's objects, including objects you cannot currently see, position the mouse pointer in an unoccupied area inside EchoUI. Then drag the mouse pointer while holding down the shift key and middle mouse button (on UNIX systems) or right mouse button (in Windows)
- You should now be able to see all of EchoUI's objects.
You can export ports out of a macro, in much the same way as you can for a module or group object. Exporting an object's ports allows you to connect the object to other objects in your application, which you will do in the next chapter.
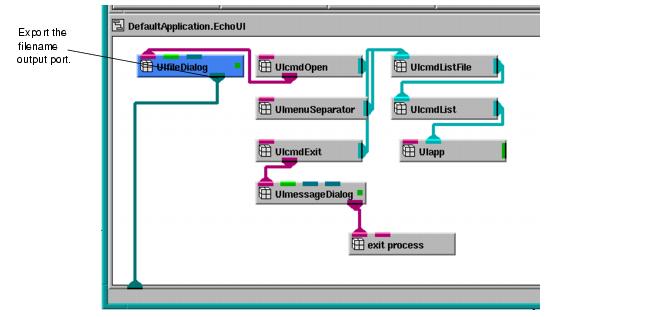
8. Export UIfileDialog's output port and to the outside of the EchoUI macro. This makes the filename parameter, a string containing the filename selected in the file dialog, accessible to other object outside the macro.
- You can export the port in either of two ways:
- Move the mouse pointer to the port, then select the Export Port popup command.
- Draw a connection line from the port to the top or bottom of the macro. For an input port, you draw the connection line to the top of the macro. For an output port, you draw the connection line to the bottom.
- The diagram below shows the result. (Note that the height of the AVS/Express window has been reduced in order that the screen shot you see takes up less space. You do not have to reduce the height of your AVS/Express window.)
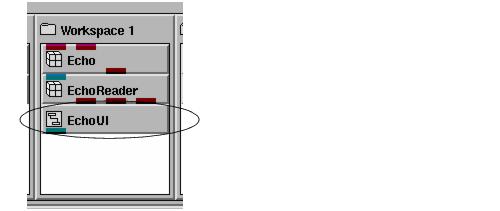
- Move the mouse pointer to EchoUI's title bar, then either double-click or select the Close popup command.
- Select Project->Save.