


|
|
In this tutorial, we create a view from the ground up.
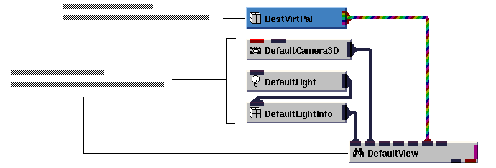
Here is what a view definition looks like, at the base-type level, along with the Graphics Display Kit objects and window that connect into the view:

The view we'll build consists of DefaultView (the view's "root" object), DefaultCamera3D, DefaultLightOn, DefaultLightInfo, and BestVirtPal. These define, respectively, root information for the view, a camera, a light, basic lighting information (such as ambient lighting), and a virtual palette. Notice how a view can have its own virtual palette; multiple views can also share virtual palettes.
Instance into the DefaultApplication workspace the following objects: DefaultCamera3D, DefaultLightOn, DefaultLightInfo, DefaultView, and BestVirtPal. Then connect them as shown in the diagram below.
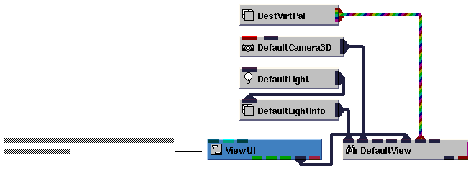
A Graphics Display Kit application requires a window in which to render the view. We create a window using the application component ViewUI. ViewUI defines a window, complete with a window panel and a UIrenderView panel in which the view appears.
Instance ViewUI, then connect it to DefaultView, as shown in the diagram below.
Note that ViewUI can also be found in Full_Library.Components in the Graphics_Display collection. The easiest way to find an object in Full_Library is with the Find pop-up command.
When we instance ViewUI, an empty window appears. When we connect ViewUI to DefaultView, a black window appears inside the window. This is where the data is rendered.
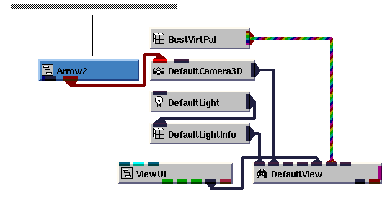
Finally, we need to supply the Graphics Display Kit with an object to render. We can do this with Arrow2. It makes the data available both as a field (first output port) and as a Graphics Display Kit object (second output port), ready for rendering. We use the second output port.
Instance Arrow2 and connect it to DefaultCamera3D, as shown in the diagram below.
The application renders an arrow in the view's window.
Notice that a Graphics Display Kit object connects to a camera (either DefaultCamera3D or DefaultCamera2D), which in turn connects to a view. You can connect several objects to a camera, and you can connect several 2D and 3D cameras to a view.
This completes the tutorial. The completed tutorial is available in Libraries.Examples.Graphics_Display.CreateView.
|
|