


|
|
Creating an object hierarchy (ObjHierarchy)
A Graphics Display Kit object can have zero or more child objects. You can connect multiple objects into a camera. These capabilities enable us to create elaborate object hierarchies. In this tutorial, we create a multi-level object hierarchy.
Instance into the SingleWindowApp workspace the Uviewer3D object.
![]()
Instance several objects, then connect them, as shown in the diagram below. After we have put the pieces together, we analyze what we have done.
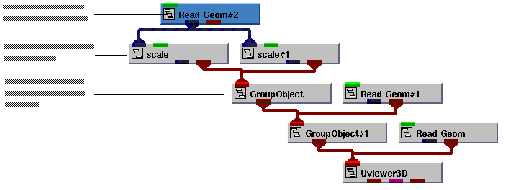
The application creates the data object hierarchy shown below. Uviewer3D and the two instances of GroupObject create top-level objects that do not themselves have data:
Uviewer3D
GroupObject
GroupObject#1
scale (data from Diamond3D)
scale#1 (data from Diamond3D)
Read Geom #1
Read Geom
Display the modules window by selecting Editors->Modules. Select the first Read Geom from the option menu and press the Browse butto. A dialog box appears. Select dodec.geo, then select the OK button. Repeat the procedure for the other Read Geom entry in the option menu, but select a different file.
The application renders four objects:
1. the object created by Read Geom
2. the object created by Read Geom#1
3. the object created by scale
4. the object created by scale#1.Notice that scale and scale#1 both use the data provided by Diamond3D.
Use Uviewer3D's capabilities to manipulate the objects. For example, using the object selector (Select Object...), select an object in the hierarchy. (Remember to select the Apply button when you select an object.) Point to an open area in the view and perform a translate operation. Different objects move, depending on which object in the hierarchy is selected.
This completes the tutorial. The completed tutorial is available in Libraries.Examples.Graphics_Display.ObjHierarchy.
|
|