This is an archival copy of the Visualization Group's web page 1998 to 2017. For current information, please vist our group's new web page.
Table of Contents
- Current Status
- What is Vizserver, and when might you want to use it?
- Obtaining Vizserver clients.
- Configuring and Using a Unix/Linux client.
- Configuring and Using a Win32 client.
- Additional Reading
Current Status
11 March 2004
As of the time of this writing, we are preparing to work with a small group of users to evaluate the efficacy of the Vizserver software for use in a remote visualization setting. Right now, the Vizserver server on escher is active, but is accessibly only to a small group of authorized users. If you have an interest in participating in an evaluation, please contact us by sending email to vis at nersc dot gov.
What is Vizserver, and when might you want to use it?
In a nutshell, Vizserver is a pair of software components from SGI that are used to allow you to run fully hardware-accelerated graphics applications on a remote machine and have images delivered to your desktop. One of the components, the server, is installed on escher.nersc.gov, while the other, the client, is something you must install on your workstation. After some initialization, during which time you will authenticate through the client to the server, you can run nearly any graphics or visualization application on the remote SGI host (escher.nersc.gov), and have the resulting imagery delivered to your desktop. For more information, see the bibliography in the Additional Reading section below.
On the surface, this approach might seem no better than using the $DISPLAY environment variable to route X to your remote workstation. There are a number of reasons why the Vizserver approach is better:
- X doesn't support hardware accelerated 3D graphics.
- The X protocol is horribly inefficient. In contrast, Vizserver uses a much more streamlined (custom) protocol to move events and payload image data.
- Vizserver lets multiple users interact simultaneously with a single application running on the graphics server.
Obtaining Vizserver Clients
There are two sources from which you can obtain Vizserver clients at this time. Clients are available for Linux, Win32 and Solaris platforms.
11 March 2004 Note: our evaluation at the present time uses a beta version of Vizserver - the clients posted at the SGI website are the most recent production release, and will not be compatible with the version of vizserver installed on escher. For now, you'll need to download the correct version of the client from escher.nersc.gov
- From the SGI website at http://www.sgi.com/products/evaluation/index.html#gl_viz. From that URL, you can download (for free) the Vizserver client for your workstation.
- From the /usr/local/vizserver directory on escher.nersc.gov.
Configuring and Using a Unix/Linux Client
After you install the client on your workstation, you will begin a session as follows:
- Build an SSH tunnel to be used for authenticating to the server. This
is a one-line operation; enter the following from the command line:
	yourmachine %  ssh -L 7051:escher.nersc.gov:7051 -N escher.nersc.gov
	[you will then be prompted for your password or passphrase]
After you successfully authenticate, you can place that process into the background if you want, and continue the remaining steps from the same xterm. Or, you can leave it in the foreground and perform the rest of the steps from a different xterm. - Set an environment variable needed by the client:
yourmachine % setenv VSX_SESSION_HOST escher.nersc.gov
- Launch the client:
yourmachine % vizserver -h localhost
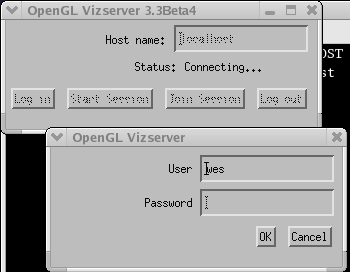
- Authenticate to the server.
Upon success, you will be presented with a login window (below). Enter
your user name and password into the appropriate typeins, and press "Ok".
Note that your authentication credentials are sent through an encrypted
link - the ssh tunnel you created earlier.
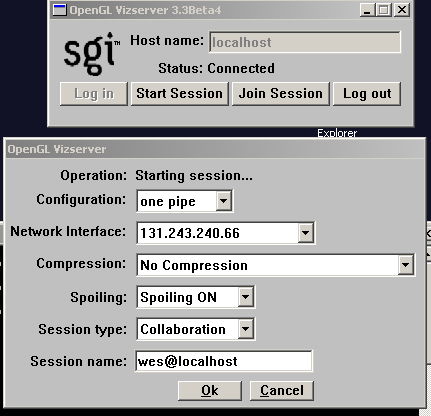
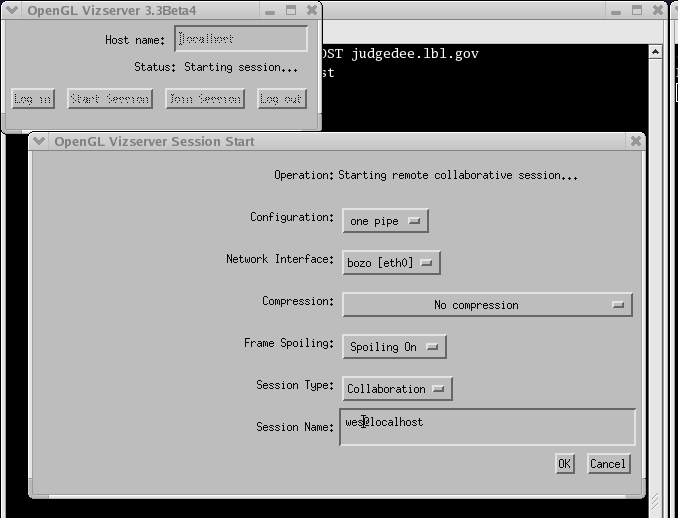
- Start a session. After you successfully authenticate, you will be presented
with a new menu that allows you to specify parameters for a new vizserver
session. Refer to Vizserver documentation for more information
about the effect of parameter values on the session.

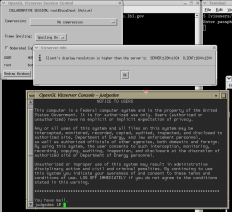
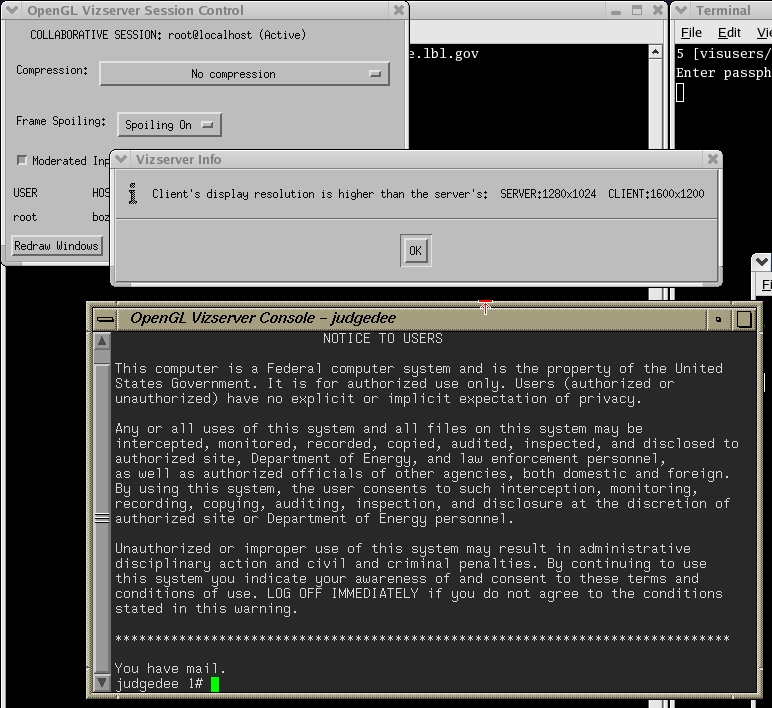
- Launch your visualization application from the command line in the
new OpenGL Vizserver Console window. After you launch the session,
(and assuming there are no errors) Vizserver will create an "OpenGL
Vizserver Console" window that presents you with a command-line prompt
on the server machine. Sometimes, it takes ten or fifteen seconds for
the Vizserver Console window to appear on your machine.
All you need to do at this point is just launch
the visualization application from the command line. There is no need
to set the $DISPLAY environment variable.
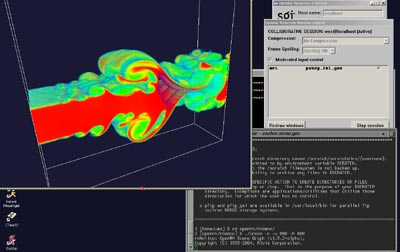
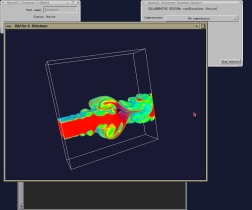
- Interact with your application. Once the application starts, you will
have the ability to interact with it as if you were sitting at the
graphics console. All X buttons, menus and so forth behave more or less
as they would if you were sitting directly at the console. One difference
to be aware of is that Vizserver will render and show a depiction of your
pointer in addition to the one drawn by your local window system. In the
image below, the Vizserver pointer is shown in red, while the one drawn
by the native window system is in black.

Configuring and Using a Win32 Client
After you install the client on your workstation, you will begin a session as follows:
- Build an SSH tunnel to be used for authenticating to the server.
In our testing, we made use of F-Secure's SSH Client for Win32, version
5.2-33. With this particular client, there are a couple of options for
building an SSH tunnel. The first method is the most direct, and uses
command-line arguments similar to the Unix version above. This technique
should work with most any ssh client for Windows.
   c:\Program Files\F-Secure\Ssh\> ssh2.exe -L 7051:escher.nersc.gov:7051  escher.nersc.gov
	[you will then be prompted for your password or passphrase]
The other approach for F-Secure's client is to use the GUI and manually assign port forwarding so that 7051 on localhost is forwarded to 7051 on the remote host. Don't build a reverse tunnel for port 7051 - only a one-way, to-the-server tunnel is needed. - Set an environment variable needed by the client:
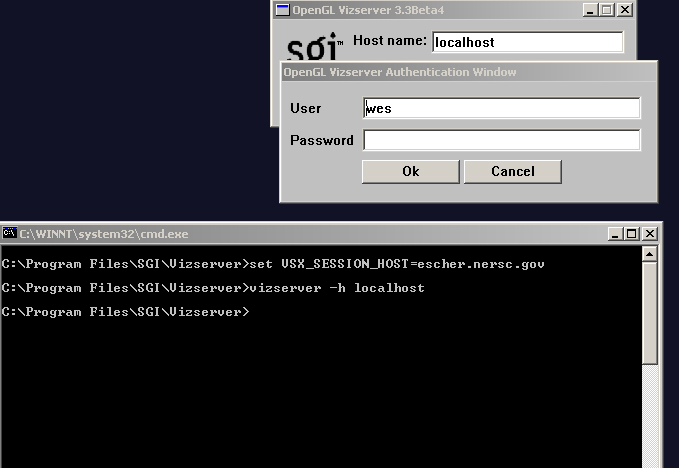
c:\Program Files\SGI\Vizserver> set VSX_SESSION_HOST=escher.nersc.gov
- Launch the client:
c:\Program Files\SGI\Vizserver> vizserver -h localhost
- Authenticate to the server.
Upon success, you will be presented with a login window (below). Enter
your user name and password into the appropriate typeins, and press "Ok".
Note that your authentication credentials are sent through an encrypted
link - the ssh tunnel you created earlier.
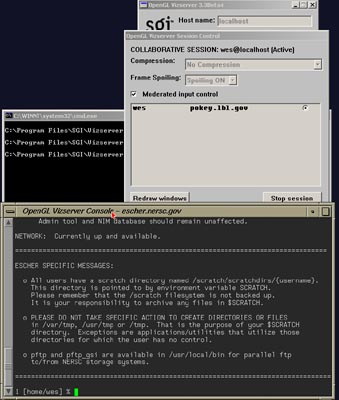
- Start a session. After you successfully authenticate, you will be presented
with a new menu that allows you to specify parameters for a new vizserver
session. Refer to Vizserver documentation for more information
about the effect of parameter values on the session.

- Launch your visualization application from the command line in the
new OpenGL Vizserver Console window. After you launch the session,
(and assuming there are no errors) Vizserver will create an "OpenGL
Vizserver Console" window that presents you with a command-line prompt
on the server machine. Sometimes, it takes ten or fifteen seconds for
the Vizserver Console window to appear on your machine.
All you need to do at this point is just launch
the visualization application from the command line. There is no need
to set the $DISPLAY environment variable.
- Interact with your application. Once the application starts, you will
have the ability to interact with it as if you were sitting at the
graphics console. All buttons, menus and so forth behave more or less
as they would if you were sitting directly at the console. One difference
to be aware of is that Vizserver will render and show a depiction of your
pointer in addition to the one drawn by your local window system. In the
image below, the Vizserver pointer is shown in red, while the one drawn
by the native window system is in black.