Graphics Display Kit |
This chapter describes the Graphics Display Kit's facilities that allow the user to interactively draw and edit 2D objects in a view.
The Graphics Display Kit has a flexible pipeline for constructing and editing 2D objects. This process can be broken down into the following stages:
This chapter provides conceptual material describing this process and a series of examples to illustrate the process.
The first step in the interactive 2D drawing pipeline is the construction of the drawing in screen space coordinates.
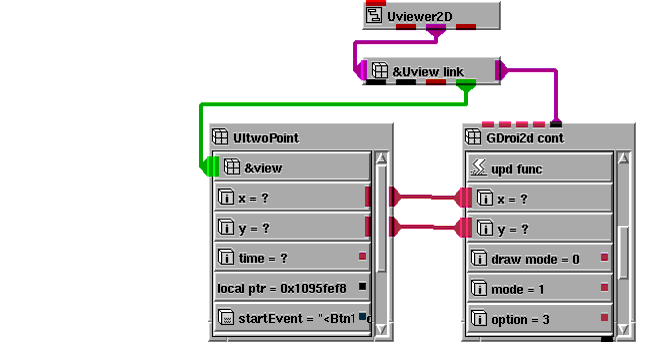
Two modules are provided for construction: GDroi2d_cont and GDroi2d_click. The two modules produce the same end result (that is, a screen space drawing) but use a different method of construction. The major inputs to these modules are a view and screen space XY coordinates. The module obtains an input view by connecting downstream of one of the viewers provided in the Graphics Display Kit. This is done so the modules can draw on top of the existing contents of the view without having to rerender all the objects currently in the view if possible.
Part of the Graphics Display Kit API provides routines that do drawing directly in screen space coordinates. This part of the API is a thin layer built directly on top of the windowing system, so modules built with it are portable between X Windows and Win32. The screen space XY coordinates are typically obtained by connecting to a UI interactor. The UI interactor effectively puts you inside the window system event loop. It also provides you with the ability to easily change the gesture that causes the XY positions to be generated since that specification is part of the UI interactor.
|
The GDroi2d_cont module generates the drawing with a continuous stream of screen space XY positions typically fed to the module from a UItwoPoint interactor. With this method of interaction, you can generate a drawing with one smooth, continuous motion of the input device. The disadvantage of this method is that it does not allow you a chance to edit the drawing during the construction process. The following V code describes the GDroi2d_cont module.
The GDroi2d_click module generates a drawing with screen space XY positions provided one at a time typically from a UIonePoint interactor. With this method of construction, you have the opportunity to more accurately place each point in the drawing and to erase points as needed during the construction process. The add, erase, and close elements are also typically connected to UIonePoint interactors. Included below is the V description of the GDroi2d_click module.
The output of these modules is a buffer of screen space coordinates - GDroi2d_buffer. It is important to note that the points in the drawing that are generated are kept in the module's internal buffer until you commit to the drawing. This keeps any modules connected to the construction module from running until that time. This provides a tight loop during construction composed of the UIinteractor that is generating the XY screen space coordinates and one of the Graphics Display Kit's construction modules.
There are a number of additional parameters to the modules that control their operation. The value of option determines what type of primitive is built. Supported types of primitives are points, lines, boxes, polylines and polygons. The value of mode determines if the new primitive is appended to the internal buffer or if it replaces whatever primitive(s) might be in the internal buffer. The values of the red, green, and blue parameters are used as the color to draw the primitives during construction. This is termed the "build" color. The value of immed determines if the internal buffer is written to the output buffer when the primitive is completed or if the write to the output buffer happens when the value of done changes. When a change of unset is detected, both the internal local buffer and the output buffer are cleared.
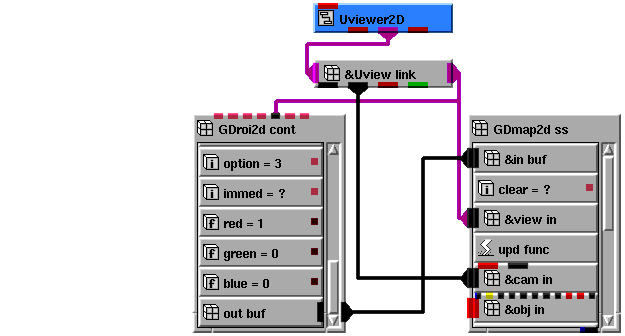
The second step of the interactive 2D drawing pipeline is the mapping of the screen space coordinates into world space.
The GDmap2d_ss module performs the mapping from screen space to world space. This module accepts a GDroi2d_buffer as input. As described previously, this buffer contains the screen points that represent the drawing that you have generated and committed to. The other required inputs for the module are a view and a camera. The view and camera are needed to be able to determine the mapping from screen space to world space. An object is an optional input to the module. When the module executes, if an object does not exist, the screen points are mapped into the coordinate system of the camera. If the object does exist, the points are mapped into the same coordinate system as the object.
|
Included below is the V description of the GDmap2d_ss module.
The output of the GDmap2d_ss module is an AVS/Express field (that is, Mesh) that contains the drawing. This field can now be input to a GDobject that in turn can be input to a viewer to be rendered as part of the normal rendering pipeline.
Once the drawing is converted into an AVS/Express field, it can be picked with the normal picking process, zoomed and panned, have its attributes changed and so on. It should be noted that all the attributes (for example, line width and line style) at this point are on a per field basis. This means that if a field has multiple primitives, the attributes cannot be changed individually.
There are a number of additional parameters to the module that control its operation. The value of mode determines if the output mesh is either replaced or appended to. The value of color determines if the red, green, and blue values are written to the output mesh as cell colors. This color is termed the "map" color. A name, if provided, is written as the cell set name in the output mesh. This name can be used by other modules as a filter. Two of the existing AVS/Express modules that can use this name are select cells and vector2raster.
There is a tremendous amount of flexibility due to the number of combinations that are available.A good example of how the field is used by modules that take it as input is in the construction of region of interests (ROIs) in a medical imaging application. The user can have a name attached to each ROI or set of ROIs. This is possible to do by using the proper combinations of modes. The various combinations and their effect on the output mesh are outlined below.
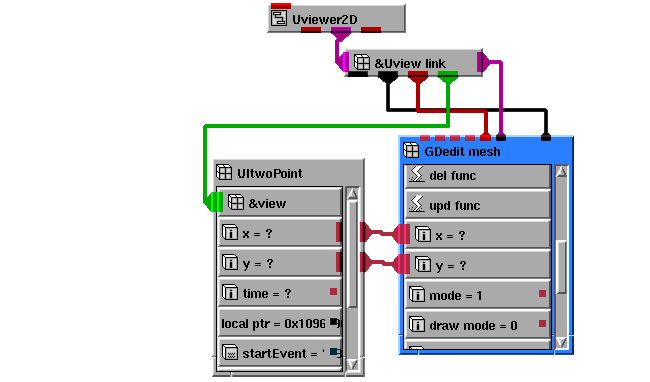
The third step of the interactive 2D drawing pipeline is the highlighting and editing of the world space coordinates. This is a two stage process. First, you must select the object to edit using the normal pick process. When the selection occurs, all or part of the object is highlighted. Then, you can move the highlighted section of the object around. The edit is committed to the AVS/Express field under your control. Much like the construction process, the edit takes place locally. This allows the drawing in response to the edits to be done directly in screen space coordinates. The changes are then mapped back into world space coordinates when you commit to the edit.
The GDedit_mesh module performs the editing. This module accepts as input an object to edit. Typically, this module connects to the picked object output port from one of the standard viewers in the Graphics Display Kit. In this way, when an object is picked, the edit mesh module runs and gets an opportunity to highlight the item that was picked. The field that is attached to the object is what is edited. The other inputs to the module are screen space XY coordinates that are used to move the selected object. These values are normally attached to a UItwoPoint interactor. The other required inputs to the module are a view and camera. As in the mapping stage, these are used by the module to map screen space coordinates into world space.
|
Included below is the V description of the GDedit_mesh module.
The output of this module is changes to the mesh that are attached to the picked object.
There are a number of additional parameters to the module that control its operation. The value of mode determines if a point, primitive, or cell is highlighted and then edited. The value of immed determines if the field is updated immediately when the user interface gesture is completed or if an explicit confirmation is required. A change to the done value provides the explicit confirmation. A change to the remove value causes the currently highlighted point, primitive, or cell to be removed from the output field. The red, green, and blue values are the colors used to perform the highlight.
The final step in the ROI pipeline, after construction, mapping, and editing is the conversion of the vector information into raster information for use by subsequent image processing routines.
The GDvector2raster module performs this conversion. The input to this module is an AVS/Express field, typically output from either the GDmap2d_ss or GDedit_mesh modules. The output of the module is a byte image that contains either the value 0 or 255 at each point in the image. A value of 255 indicates to the image processing routine that the pixel is to be processed.
The inside element controls if the image generated is either inside or outside the vector ROIs provided. A value of 0 means generate the image outside the ROIs provided, a value of 1 means generate the image inside the ROIs provided.
A name element is provided to allow the input vector ROIs to be filtered based on a name. If the name is the empty string, all ROIs are processed. If a name is provided, only those ROIs that have a name that matches are processed.
The V code for the GDvector2raster module is as follows:
There are several higher-level macros that bundle sets of modules and user interfaces that aid in the process of drawing ROIs. They are as follows:
The remainder of this chapter contains examples of the use of the Graphics Display Kit's a flexible pipeline for constructing and editing 2D objects. These show you how to:
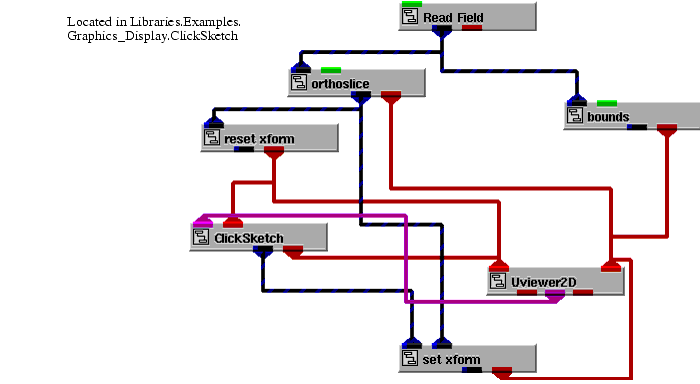
The following example illustrates how to use the ClickSketch module to draw on top of a slice from a volume. The drawing that is produced from the ClickSketch module is subsequently displayed in both a 2D and 3D view.
|
This example is found in Libraries.Examples.Graphics_Display. Upon being instanced, the example renders a slice from hydrogen in both viewer's windows. In the 2D view, the slice, rendered as a image, appears normalized in the view. In the 3D view, the slice, rendered as a mesh, appears normalized in the view.
We are now ready to construct a drawing in the 2D view.
By default, the ClickSketch module is set up to draw a polyline. Other primitives that are available are point, line, box, and polygon.
The mouse operations that control the drawing in the ClickSketch module are:
This example has the ClickSketch module configured so that upon completion of a primitive it is immediately converted into an AVS/Express field. When this happens, the color of the primitives you have drawn on the slice changes from the build color to either the map color, if the Use Map Color toggle is set, or the primary color as specified by the Graphics Display Kit object's properties.
This example touches on only a small portion of the functionality in the ClickSketch module. For more information on the construction and mapping phases of the Graphics Display Kit's interactive 2D drawing capabilities, see
Once the drawing is converted into an AVS/Express field, you can also view it in the 3D view.
The following example illustrates how to use the EditMesh module to edit a drawing that has been built using the ClickSketch module on top of a slice from a volume.
|
This example is found in Libraries.Examples.Graphics_Display. Upon being instanced, the example renders a slice from hydrogen.fld in the viewer's window.
We are now ready to construct a drawing in the view.
By default, the ClickSketch module is set up to draw a polyline. Other primitives that are available are point, line, box, and polygon.
The mouse operations that control the drawing in the ClickSketch module are:
This example has the ClickSketch module configured so that upon completion of a primitive it is immediately converted into an AVS/Express field. When this happens, the color of the primitives you have drawn on the slice changes from the build color to either the map color, if the Use Map Color toggle is set, or the primary color as specified by the Graphics Display Kit object's properties.
This touches on only a small portion of the capabilities in the ClickSketch module. For more information on the construction and mapping phases of the Graphics Display Kit's interactive 2D drawing capability, see
We are now ready to edit the drawing in the view.
By default, the EditMesh is set up to edit a primitive. Points or cells can also be edited.
The mouse operations that control editing in the EditMesh module are:
When the select operation takes place, the point, primitive or cell selected is drawn in the highlight color. The highlight of the point is done with a small rectangle.
When the move primitive operation is in progress, the current position of the updated primitive is echoed in the highlight color. By default, the EditMesh module is configured so when the move primitive operation is completed, the field is updated. This causes the drawing to be rerendered to reflect its new contents.
Points, primitives, and cells may also deleted by clicking on the Delete button after a select operation is done.
For more information on the edit phase of the Graphics Display Kit's interactive 2D drawing capability, see
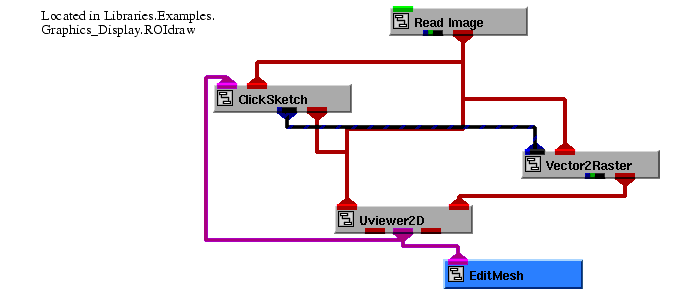
The following example illustrates how to use ClickSketch in a network to draw an ROI on top of an image. The vector ROI that is produced from the ClickSketch module can subsequently be edited with the EditMesh module. The vector ROI is also converted to a raster mask by the Vector2Raster module and then displayed in another view. Typically, this mask would be an input to various image processing routines.
|
This example is found in Libraries.Examples.Graphics_Display. Upon instancing, the example renders an image of the mandrill in one of the viewer's window. The other view has nothing rendered in it initially.
We are now ready to construct a drawing in the view.
By default, the ClickSketch module is set up to draw a polygon. Other primitives that are available are point, line, box, and polygon. In this example, we must use either the box or the polygon primitive since we are drawing a region and it must be closed for proper operation.
The mouse operations that control the drawing in the ClickSketch module are:
Since you have chosen the polygon primitive, each add point operation adds another point to the polygon. The polygon is terminated and automatically closed with the close operation.
This example has the ClickSketch module configured so that upon completion of a polygon it is immediately converted into an AVS/Express field. When this happens, the color of the primitives you have drawn on the slice changes from the build color to either the map color, if the Use Map Color toggle is set, or the primary color as specified by the Graphics Display Kit object's properties.
This touches on only a small portion of the capabilities in the ClickSketch module. For more information on the construction and mapping phases of the Graphics Display Kit's interactive 2D drawing capability, see
We can now see the raster mask that has been created from the polygon(s) that have been output from the ClickSketch module in the second view. This mask has been rendered as an image that has two different values, 0 meaning outside and 255 meaning inside. A value of 0 is rendered as blue and a value of 255 is rendered as red.
By default, Inside was set. This caused the Vector2Raster module to set any pixels inside the polygons to 255 and any values outside the polygons to 0. By toggling Inside, the Vector2Raster module now sets any pixels inside the polygons to 0 and any pixels outside the polygons to 255.
The field that represents this image can be used as input to many of the image processing routines to control which pixels in the image are actually processed.
For more information on the vector-to-raster phase of the Graphics Display Kit's interactive 2D drawing capability, see
We are now ready to edit the drawing in the view and observe the effect that the edit has on the raster mask.
By default, the EditMesh is set up to edit a primitive. Points or cells can also be edited.
The mouse operations that control editing in the EditMesh module are:
When the select operation takes place, the point, primitive or cell selected is drawn in the highlight color. The highlight of the point is done with a small rectangle.
When the move primitive operation is in progress, the current position of the updated primitive is echoed in the highlight color. By default, the EditMesh module is configured so when the move primitive operation is completed, the field is updated. This causes the drawing to be rerendered to reflect its new contents.
Points, primitives, and cells may also deleted by clicking on the Delete button after a select operation is done.
Notice that any edit that is performed is immediately reflected in the appearance of the raster mask in the other view.
For more information on the edit phase of the Graphics Display Kit's interactive 2D drawing capability, see
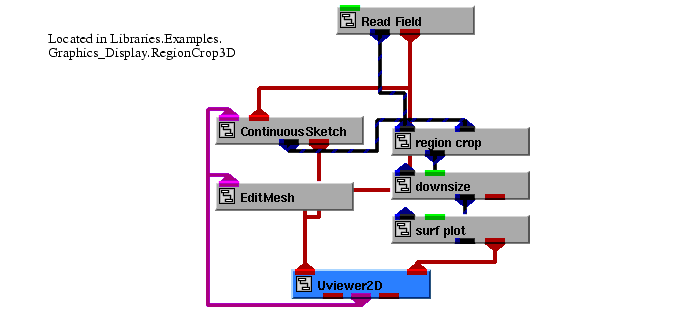
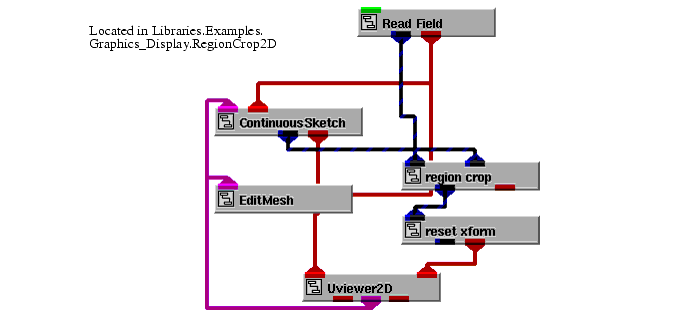
Another example that involves some of the interactive 2D drawing modules is to select a region within an image in a 2D view using the ContinuousSketch module. The selected region is then displayed as a surface in a 3D view.
|
This example is found in Libraries.Examples.Graphics_Display. The example renders the image of Mount St. Helens in the 2D viewer's window. The image appears normalized in the view. The 3D view has nothing rendered in it initially.
We are now ready to select a region in the image to be displayed as a surface in the 3D view.
The mouse operations that control the drawing in the ContinuousSketch module are:
In this example, the ContinuousSketch module is set up to draw a box in XOR mode. Once the operation is complete (that is, the right mouse button is released), the box is converted into a field since the Immediate toggle is set.
The extents of this field are used as input parameters by the region crop module to select the region to display in the 3D view. Note that region crop is a macro that was built for this example. The V code for it can be found in v/gd_examp/GDinter5.v.
This touches on only a small portion of the capabilities in the ContinuousSketch module. For more information on the construction and mapping phases of the Graphics Display Kit's interactive 2D drawing capability, see
Once a region is selected in the image, you can also view it as a surface in the 3D view.
A completely new region can be selected by repeating the same process that was used to generate the initial region.
Alternatively, we can edit the region in the 2D view and observe the effect that it has on the surface in the 3D view.
In this example, the EditMesh is set up to edit a cell.
The mouse operations that control editing in the EditMesh module are:
When the select operation takes place, the region is drawn in the highlight color.
When the move primitive operation is in progress, the current position of the updated region is echoed in the highlight color. By default, the EditMesh module is configured so when the move primitive operation is completed, the field is updated. This causes a new region to be cropped from the image and rendered in the 3D view as a surface.
For more information on the edit phase of the Graphics Display Kit's interactive 2D drawing capability, see
Another useful example is when one view displays a filtered down version of a large image and the second view displays a section of the image at full resolution. This uses the ContinuousSketch to select a region within an image.
|
This example is found in Libraries.Examples.Graphics_Display. Upon being instanced, the example renders an image of Mount St. Helens in the 2D viewer's window. The second 2D view has nothing rendered in it initially.
We are now ready to select a region in the image to be displayed in the second 2D view.
The mouse operations that control the drawing in the ContinuousSketch module are:
In this example, the ContinuousSketch module is set up to draw a box in XOR mode. Once the operation is complete (that is, the right mouse button is released), the box is converted into a field since the Immediate toggle is set.
The extents of this field are used as input parameters by the region crop module to select the region to display in the second 2D view. Note that region crop is a macro that was built for this example. The V code for it can be found in v/gd_examp/GDinter6.v.
This touches on only a small portion of the capabilities in the ContinuousSketch module. For more information on the construction and mapping phases of the Graphics Display Kit's interactive 2D drawing capability, see
Once a region is selected in the image, you can also view it in the second 2D view.
You can select a completely new region by repeating the same process that was used to generate the initial region.
Alternatively, we can edit the region in the initial 2D view and observe the effect that it has in the second 2D view.
In this example, the EditMesh is set up to edit a cell.
The mouse operations that control editing in the EditMesh module are:
When the select operation takes place, the region is drawn in the highlight color.
When the move primitive operation is in progress, the current position of the updated region is echoed in the highlight color. By default, the EditMesh module is configured so when the move primitive operation is completed, the field is updated. This causes a new region to be cropped from the image and rendered in the second 2D view.
For more information on the edit phase of the Graphics Display Kit's interactive 2D drawing capability, see
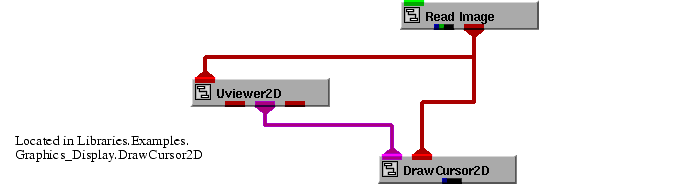
The following example illustrates how to use the DrawCursor2D module to probe a location in a 2D view. DrawCursor2D is a general module that, given a screen space XY coordinate, translates that position into the coordinate system of any Graphics Display Kit object. A cursor is displayed at the current screen space XY position.
|
This example is found in Libraries.Examples.Graphics_Display. The example renders the image avs.x in the viewer's window.
We are now ready to probe positions in the image.
The mouse operations that control the drawing of the cursor are:
The DrawCursor2D module displays the XY position it is probing in its user interface. By default, the module updates the XY position every time it gets a new screen space input.
This causes the XY position to be updated only when the right mouse button has been released (that is, at the end of the gesture).
The avs.x image has dimensions of 628 by 184. Notice that when the cursor is inside the extents of the image, the values displayed in the DrawCursor2D user interface for X are in the range 0 to 627 and for Y in the range of 0 to 183.
Notice that the values displayed in the DrawCursor2D user interface now range from -5 in the lower left to 5 in the upper right. This is the default coordinate system of the camera. When there is no object as input to DrawCursor2D, the screen space positions are translated into the camera's coordinate system.
This causes a cross of the specified size and thickness to be displayed when probing instead of a full-screen cross hair cursor.
The DrawCursor2D module can be used to probe locations in a 2D view. DrawCursor2D is a general module that, given a screen space XY coordinate, translates that position into the coordinate system of any Graphics Display Kit object.
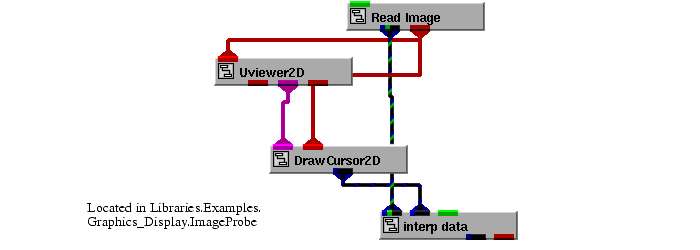
The following example shows how to extend the DrawCursor2D module to also return the value of the image at the XY position.
|
This example is found in Libraries.Examples.Graphics_Display. The example renders the image mandrill.x in the viewer's window.
We are now ready to probe values in the image.
This causes the XY position to be updated only when the right mouse button has been released (that is, at the end of the gesture).
The mouse operations that control the drawing of the cursor are:
The mandrill.x image has dimensions of 500 by 480. Note that when the cursor is inside the extents of the image, the values displayed in the DrawCursor2D user interface for X are in the range 0 to 499 and for Y in the range of 0 to 479.
The entries in the array are in order alpha, red, green, and blue. The range for the values is 0 to 255. Notice that if you probe the mandrill's nose which is a shade of red that the red value is dominate. Note that if you probe the mandrill's cheeks which are a shade of blue that the blue value is dominate.
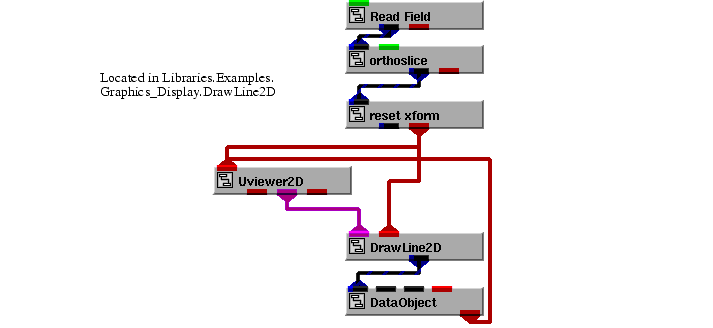
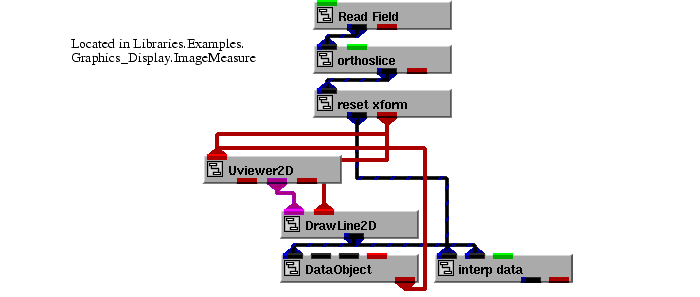
The following example illustrates how to use the DrawLine2D module to probe the locations on a line in a 2D view. DrawLine2D is a general module that, given a screen space line represented by two endpoints, translates those endpoints into the coordinate system of any Graphics Display Kit object.
|
This example is found in Libraries.Examples.Graphics_Display. Upon being instanced, the example renders a slice from hydrogen.fld in the viewer's window.
We are now ready to probe positions in the view.
The mouse operations that control the line drawing are:
The DrawLine2D module draws a line from the start position to the end position. As long as the right button is held down the a line is drawn from the start position to the current end position. When the right button is released, the line is converted into a field.
The start and end points of the line are then displayed in the user interface for the DrawLine2D module. By default, the module updates the XY position immediately when the right button is released.
This causes the XY position to be updated only when the Measure button is clicked.
The slice of hydrogen has dimensions of 64 by 64. Notice that when the line is inside the extents of the slice, the values displayed in the DrawLine2D user interface for X and Y are in the range 0 to 64.
When you click the Measure button, notice that the line is drawn in the lower left, and the values displayed in the DrawLine2D user interface now range from -5 in the lower left to 5 in the upper right. This is the default coordinate system of the camera. Because you are no longer passing the object from reset_xform as input to DrawLine2D, the screen space positions are translated into the Uviewer camera's coordinate system.
One use of the DrawLine2D module is for probing and measuring images. The output of the DrawLine2D module, two XY positions, can be used in a number of different ways:
|
This example is found in Libraries.Examples.Graphics_Display. Upon being instanced, the example renders a slice from wind.fld in the viewer's window.
We are now ready to probe values in the slice.
The mouse operations that control the line drawing are:
The DrawLine2D module draws a line from the start position to the end position As long as the right button is held down the a line is drawn from the start position to the current end position. When the right button is released, the line is converted into a field.
The start and end points of the line are then displayed in the user interface for the DrawLine2D module. By default, the module updates the XY position immediately when the right button is released.
The slice of wind.fld has dimensions of 25 by 32. Notice that when the line is inside the extents of the slice, the values displayed in the DrawLine2D user interface for X and Y are in that range.
The entries in the array are in order the scalar value at the start point and the scalar value at the end point. In this case, the scalars are of type float.
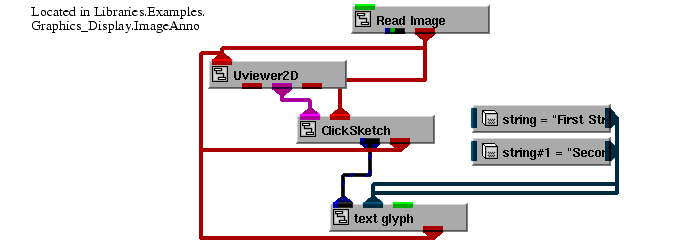
The drawing modules can be used to place annotation interactively. This example uses the ClickSketch and text_glyph modules to do this. A text string is rendered at each coordinate in the field created by the drawing module.
|
This example is found in Libraries.Examples.Graphics_Display. Upon being instanced, the he example renders the image avs.x in the viewer's window.
We are now ready to annotate the image.
In this example, the ClickSketch module is set up to draw a polyline. Other primitives that are available are point, line, box, and polygon.
The mouse operations that control the drawing in the ClickSketch module are:
Since you have chosen the polyline primitive, each add point operation adds another point to the polyline. The polyline is terminated and automatically closed with the close operation.
Since the immediate toggle is set in this example, the ClickSketch module converts the polyline to a field as soon as the close region operation is performed.
This touches on only a small portion of the capabilities in the ClickSketch module. For more information on the construction and mapping phases of the Graphics Display Kit's interactive 2D drawing capability, see
As soon as a field is created by the ClickSketch module, text strings appear at each point in the field. The text_glyph module does this by taking a field and an array of strings as input.
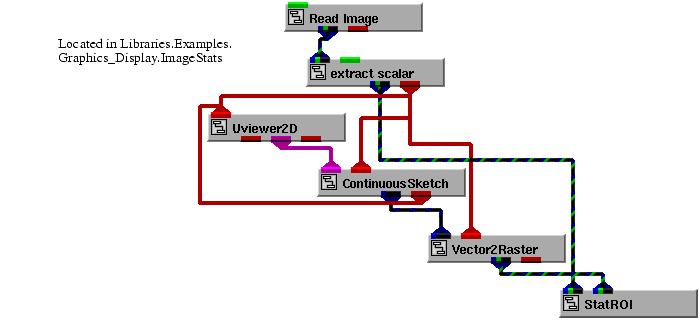
Another example that involves some of the interactive 2D drawing modules is to select a region within an image in a 2D view using the ContinuousSketch module and calculate some simple statistics on the values within that region.
This example is found in Libraries.Examples.Graphics_Display. The example renders the image avs.x into the viewer's window.
We are now ready to select a region in the image to calculate statistics.
The mouse operations that control the drawing in the ContinuousSketch module are:
In this example, the ContinuousSketch module is set up to draw a polygon in COPY mode. Once the operation is complete (that is, the right mouse button is released), the polygon is converted into a field since the Immediate toggle is set.
The polygon converted into a raster mask by the Vector2Raster module. The raster mask is then used by the StatROI macro to calculate some statistics on the pixel values inside the polygon. Note that StatROI is a macro that was built for this example. The V code for it can be found in v/gd_examp/GDinter11.v.
This touches on only a small portion of the capabilities in the ContinuousSketch module. For more information on the construction and mapping phases of the Graphics Display Kit's interactive 2D drawing capability, see
Once a region is selected in the image, you can also view the statistics on the values in that region.