


|
|
Using accelerate mode in a view (AccelMapSymbol, AccelGraph/AccelGraphSlice, Accel3Dprobe, Accel2DGlyph)
Rendering performance can be an issue when working with complex data sets, particularly when you need to move another smaller graphical object over or through such a data set (for example, when probing a large geometry).
In such cases you may want to take advantage of accelerate mode rendering in which objects in a view are marked as either dynamic or static and then handled differently by the renderer(s):
• Small objects that will need to be moved should be marked as dynamic.
• Large data sets should marked as static (the default). Image and z-buffer information for static object is stored by the renderer(s).
When dynamic objects are subsequently moved, only they require rerendering -- into the buffers that already contain the rendered static objects. Note that if static objects are moved, they must obviously be also rerendered thus negating the performance advantages of accelerate mode.
Note: The performance of accelerate mode in renderers is highly dependent on the technique that the graphics library/hardware vendor uses for grabbing frame and Z buffers, and does not therefore always provide a significant performance advantage. For example, accelerate mode is not noticably faster on a PC than normal rendering (and in fact is slower on some machines).
In the following tutorial, you will move a simple 2D arrow glyph (the dynamic object) over a large 3D geometry (the static object) with accelerate mode active and inactive to compare performance in both states.
Note: In this example, because the only dynamic object is 2D, only the image buffer need be rerendered into the buffer containing the static object -- the Z-buffer need not be saved.
In order to perform the manipulation of the graphic objects required to complete this tutorial, you will need to use some of the basic mouse operations that control editing in the Uviewer scene window:
|
|
|
|
Press Control left button while the mouse is over an object in the view. | |
|
Hold down the Control key and drag the object while holding the middle mouse button. | |
Instance the example network, Accel2DGlyph
The Accel2DGlyph macro contains a complete example network complete with large and small data sets and a viewer already set up for accelerate mode.
Instance into the empty NE workspace the object Accel2DGlyph from the Graphics Display Examples library.
![]()
After the example has loaded, view the example network.
Investigate the controls that affect accelerate mode
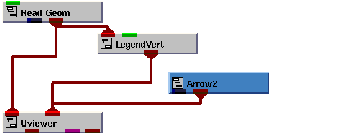
The DataViewer instanced as part of the Accel2DGlyph network contains a 3D map of the Caribbean ( $XP_ROOT/data/geoms/carib.geo , read in via the Read_Field module), and an instance of a simple 2D arrow (Templates.GEOMS.Arrow2). (There is also a legend for the map, but this is can be ignored for the purposes of this tutorial.)
Accelerate mode is controlled at the low level by the accel parameter of the DefaultView object (see ). However, the Single Window Dataviewer used in this tutorial provides much easier access to this parameter via the Accelerate toggle button in the View Editor that forms part of it's user interface.
To look at the Accelerate control, open the View Editor by selecting Editors->View from the Dataviewer menubar and then selecting Options from the View popup at the top of the Module Panel. You will see that the Accelerate toggle button is set on, and that accelerate mode is therefore active. Later on we'll turn accelerate mode off and see the impact that this has on rendering performance.
The nature (dynamic or static) of an object in a view is controlled at the low level by the type parameter set on objects (see ). However, the Viewer used in this tutorial provides much easier access to this parameter via the Dynamic toggle button in the Object Editor that forms part of it's user interface. To see the setting of Dynamic control for the Arrow2 and carib objects:
Select the Arrow2 object by placing the cursor over it and control-left-clicking (when selected, "Arrow2" will replace "Top3D" on the message line below the view). You will see that the Dynamic toggle button is set on, marking the arrow as a dynamic object for accelerate mode rendering.
Select the carib object by placing the cursor over it and control-left-clicking (when selected, "carib" will replace "Arrow2" on the message line below the view). You will see that the Dynamic toggle button is set off, marking the carib as a static object for accelerate mode rendering.
Reselect the Arrow2 object by placing the cursor over it and control-left-clicking.
Translate Arrow2D over carib by moving the mouse while holding the Control key and the middle mouse button. Note the speed at which the arrow is rerendered with accelerate mode on.
To compare rendering performance with accelerate mode off, unset the Accelerate toggle on the View Editor and then repeat step 7. You should notice a significant decrease in performance.
You can obtain a more quantitative measure of the difference performance with the Timer facility (also set via a toggle button in the Options page on the View Editor), which reports rendering performance in Frames Per Second (FPS) in the VCP window, set on:
"Throw" the arrow object with accelerate mode on (by dragging the mouse with the middle button held down and realeasing the button while the mouse is still in motion). To stop rotation, left-click in the view, at which time the rendering speed will be written to the VCP.
Repeat the operation outlined in step b. above with accelerate mode off. The rendering speed reported by the timer should be significantly lower.
Delete the example application workspace.
For more examples of the use of accelerate mode, see related examples available in the Examples.Graphics_Display library. For brief descriptions of these examples, see: